|
|
Post by bradshaw on Oct 31, 2015 8:15:41 GMT -5
A challenge of stone work is to understand angle, inclines, curves built into respective parts, and to adhere----not deviate----from properly designed relationships. Other than removing metal where necessary to reduce excess, or remove a radius or angle where a sharp corner is proper, the job is to smooth LET OFF. Clearly, engagement surfaces of the trigger in the photo need to be smoothed. The SEAR TIP of the trigger bears the signature of the HAMMER DOG, with engagement uniform across. Contact can be smoothed with a dead square, dead flat white ceramic stone. The Spyderco triangular white ceramic sticks represent a very useful tool for cleaning surfaces----to include the underside of the HAMMER dog----providing you do not alter the angle. A fine Eze-Lap diamond stone is excellent for dressing flat surfaces where no corner is encountered. Unfortunately, most Arkansas stones are too crudely finished for trigger work. This is a case where a finely made synthetic "stone" works better than the natural product.
To reiterate, proceed slowly, assemble and dry fire after each touch. When checking progress, float your trigger finger like you're taking a baby's pulse.
David Bradshaw
|
|
aciera
.375 Atomic
  
Posts: 2,208
|
Post by aciera on Oct 31, 2015 16:23:02 GMT -5
David. On Arkansas Stones.
If you have a diamond flat like from DMT, just get some water and make the Arkansas Stone any shape you want.
Flatten One side and then square the edge.
Sharp edge if you want.
|
|
|
|
Post by whiterabbit on Oct 31, 2015 19:21:11 GMT -5
David, you are the man. Thank you Sir.
|
|
|
|
Post by dougader on Feb 22, 2016 15:52:12 GMT -5
I've never been inclined to mess with a trigger job previously, but since my 480 SBH gripframe has been shipped off to Zane for new walnut shoes, and-especially-since reading here and viewing David's drawings, I think I'll jump in and clean things up a bit before putting it all back together when the walnut stocks arrive from LSCG/Zane.
Thank you, David, for explaining the process so clearly.
Maybe it's time I picked up those shop manuals and a decent set of gunsmithing drivers as well.
|
|
|
|
Post by Markbo on Feb 22, 2016 16:26:02 GMT -5
Can Lee make Stickies? Can we make this a Sticky???
|
|
|
|
Post by dougader on Feb 25, 2016 8:44:21 GMT -5
Another vote for "Sticky" status.  |
|
|
|
Post by BigBore44 on Oct 22, 2016 11:32:01 GMT -5
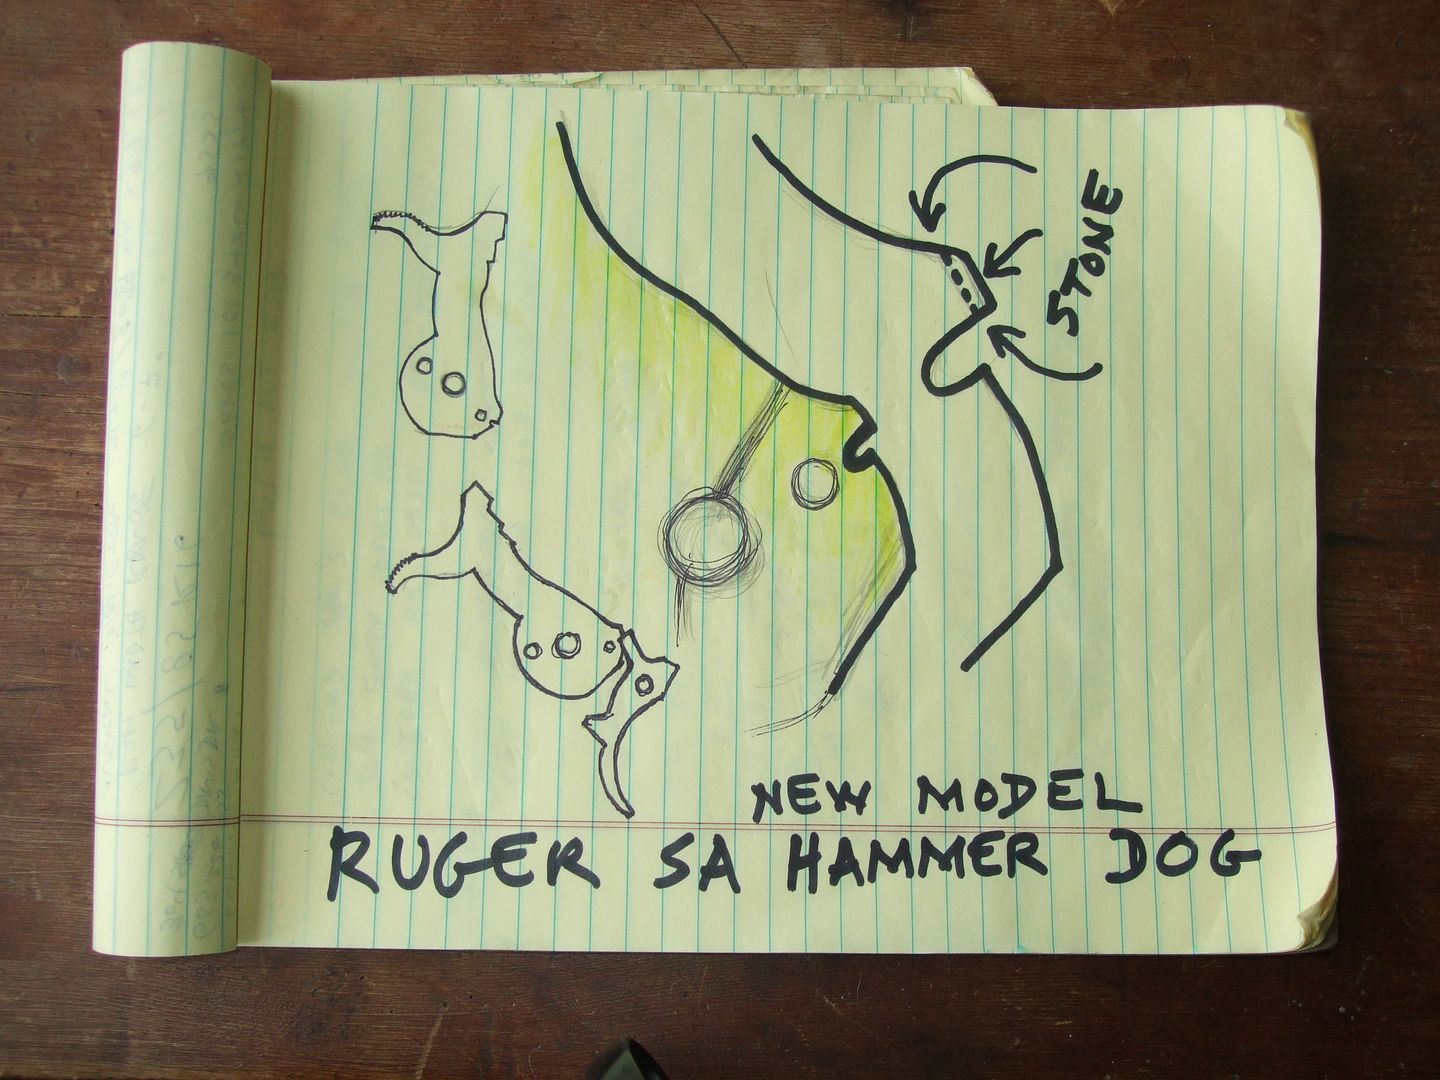
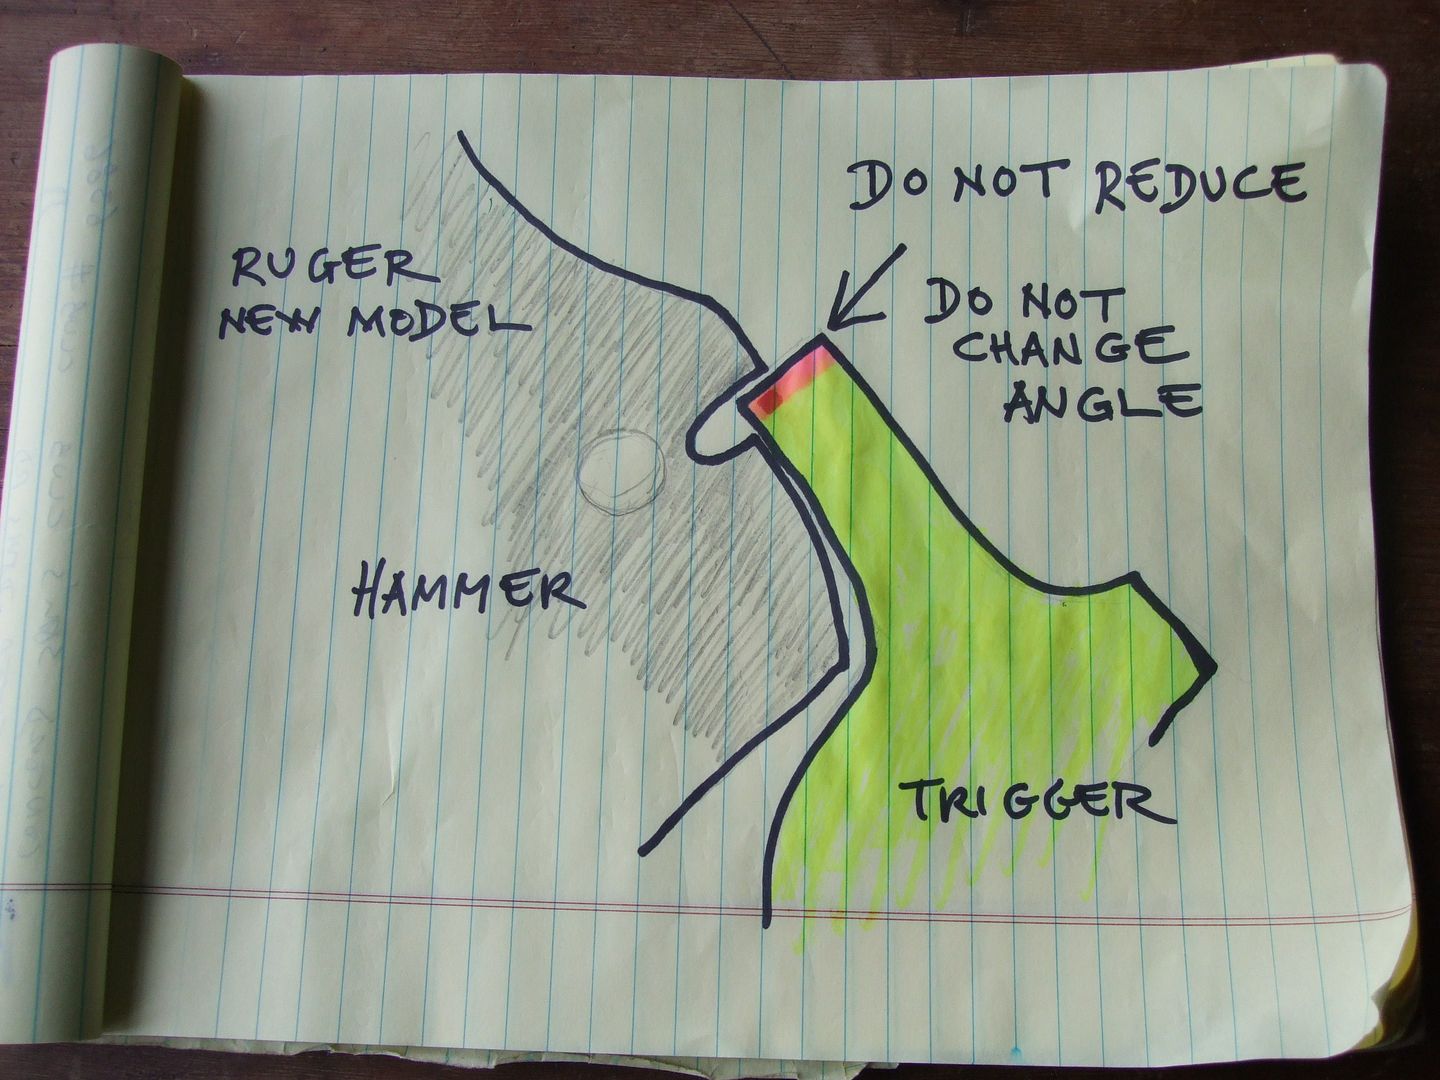
David Bradshaw asked me to post these drawings of what he refers to as a "country simple" New Model trigger job. Enjoy. Photo #1 1) HAMMER: Reduce DOG (full cock lug) on hammer. Proceed with patience. Re-assemble and test letoff frequently.  Photo #2 2) TRIGGER: Polish SEAR TIP only if necessary to remove burrs or roughness. Polish flat below sear tip if necessary to remove roughness. Do not change angle of tip, under risk of losing REGAIN feature of factory engagement angles. Do not reduce sear tip, as this will shorten HAMMER FALL and produce gaposis between hammer and grip frame at COCK. Do not polish any other surface unless you are experienced at this work.  Can someone tell me in the 1st pic, that dotted line on the hammer dog.... What is that dotted line referring to? Is that an area to slightly reduce to lessen trigger creep???
My FT has way too much creep and I would like to try to reduce it if i can find out how and, where to work on it..? All input is appreciated.
Thanks Ray
|
|
|
|
Post by mike454 on Oct 22, 2016 11:54:51 GMT -5
The area to the right of the dotted line is the area where you would take metal off to reduce creep. You want to be careful there. It's pretty hard to get a measurement of how much engagement there is and if you go too far, you just ruined the hammer or worse made an unsafe trigger pull. Also this is for new models only.
|
|
|
|
Post by BigBore44 on Oct 22, 2016 12:05:51 GMT -5
Thanks Mike
Yeah the area near the tip of that center arrow. That's the area to work on. I would just touch/work it a little and re-assemble and try..... Its easy to take more off but impossible to put it back. 
I just wanted to be certain I had my "Country Simple" hat on right today .  
Thanks
Ray |
|
|
|
Post by whiterabbit on Oct 22, 2016 12:28:33 GMT -5
The area to the right of the dotted line is the area where you would take metal off to reduce creep. You want to be careful there. It's pretty hard to get a measurement of how much engagement there is and if you go too far, you just ruined the hammer or worse made an unsafe trigger pull. Also this is for new models only. Is it hard? I cock the reassembled gun, push on the hammer with my thumb. Shouldn't drop. Then I hold the gun by the barrel, grips still off, and bang the butt on a piece of softwood on concrete. Hammer shouldn't drop. Then check pull weight/creep. If good, great! if not, take apart and keep stoning. Seems to work for me... Only real trick for me is balancing trigger return spring and creep. Can get the pull really low and safe, but stays creepy if the stone job sucks and return spring is too light. Same deal, can get the can get the creep to essentially zero and still safe, but to keep it safe need the return spring so strong the pull weight is huge. Finding that perfect balance is, well, perfect. Maybe that makes me bubba, and it may be possible that my way means the gun is unsafe from a "drop test" perspective, but I suspect even a factory ruger could be cocked and dropped onto concrete from 5 feet high and would drop the hammer... |
|
|
|
Post by mike454 on Oct 22, 2016 14:05:59 GMT -5
Not saying the work is hard, just difficult to get a measurement of sear engagement. For me at least
|
|
|
|
Post by whiterabbit on Oct 22, 2016 14:15:37 GMT -5
ah I see. I didn't address sear engagement at all, frankly I see where you are coming from now.
|
|
|
|
Post by BigBore44 on Oct 22, 2016 15:00:56 GMT -5
Well just finished up with the Bisley FT's trigger polishing. I gave it three tickles (polish/install/try) and it's much better. I think another round or two will have it perfect. I took out much of the creep, and now it just seems to have a little take up (?? proper term???) in the beginning but it's way better than before.... Had to stop now so I can figure out what I'm making dad & I for dinner...  Me thinks eggs & Bacon or pancakes & BACON  Least 2 lbs. Bacon not the trigger  Thanks BigBore44 |
|
Paden
.375 Atomic
   Lower Goldstream Creek
Posts: 1,132
|
Post by Paden on Oct 22, 2016 15:39:02 GMT -5
After you've done it once or twice it's no longer intimidating. When I get a factory new one now I don't even hesitate. Factory new hammer dog engagement depth comes in at about 0.022 on the ones I've received. Anymore, without hesitation, I knock that down by about half and drop a trigger spring leg off the peg, then fine tune from there if necessary. My finished ones mic about 0.009 to 0.010. If nothing else, polishing the engagement surfaces to mirror finish (only takes a few strokes on a black Arkansas stone or 400 grit emery) goes a looong way on it's own toward improving the feel, without reducing the engagement at all; factory work comes in with all kinds of coarse tool marks and burrs. On the trigger sear surface I only polish barely enough to remove the gritty factory tool marks. I DO NOT reduce that surface in depth any more than that, I keep it dead flat, and DO NOT change the angle (as per D. Bradshaw'a drawings). All the rest of the work is done on the hammer dog (as per D. Bradshaw'a drawings). I do that on a fine oil stone and finish polish a little bit on the black Arkansas stone. The very narrow edge of the actual engagement surface is challenging to get at...I deburr and polish that edge just a tiny bit with just a couple strokes of 400 grit emery cloth on some narrow flat tool which will fit in there (the edge of a needle file or some such). It's critical to keep surfaces flat, corners square, and not change angles any, but it ain't rocket science and it can be done in about 10 minutes, start to finish. Ain't nothin' to be afeard of!
|
|
|
|
Post by BigBore44 on Oct 22, 2016 16:01:22 GMT -5
Paden I agree. I've been inside'm plenty of times just never really did a "heavy polish" if you will. Usually just take off tool marks etc., but I wanted this Bisley Flattop to be better because I like it A lot and I hate CREEEEEEEEP!!!  BigBore44 |
|