|
|
Post by bradshaw on Nov 14, 2016 9:59:44 GMT -5
To lighten hammer or leave it be?
Faster LOCK TIME is a good thing. It comes at a cost. A heavier mainspring imposes more shock on parts. This is evident in bolt actions with very hard firing pin and cocking piece, which are prone to break and thus should not be dry fired. A heavy revolver hammer or rifle firing pin holds the primer against BLANKING into the firing pin hole. A heavier mainspring accomplished this vital support, which is why Bill Ruger, Jr., put the heavier cap & ball mainspring in the .357 Maximum. The heavier spring, in conjunction with rifle primers, stopped PRIMER BLANKING with the Rocks & Dynamite we poured through prototype SRM .357 Maximums. A blanked primer locks the cylinder and must be sheared by hand rotation.
I put a Freedom Arms Model 83 drilled hammer in the Jim Stroh Shilen barrel .44 Mag, specifically to speed lock time. These hammers are fine up through .44 Magnum, but do not put one in a .454 Casull or other heavy-recoiling cartridge.
Proof that a weak mainspring leads to blanking may be seen in a .357 or .44 magnum revolver, as the primer begins to extrude into the firing pin hole and retard cylinder rotation. Not to be confused with firing pin extrusion around a hammer-mounted firing pin working through an oversize hole in the firing pin bushing or standing breech. I have never encountered fatigue from the old Smith & Wesson drop forged leaf mainspring. Flat mainsprings cut from flat stock have weakened over time. I reckon it’s a matter of material and heat treatment, rather than method of manufacture. Same for coil springs. I’ve never had a Ruger mainspring die, but coil springs in some other makes have crapped the sack.
I prefer an old carbon coil spring to a stainless coil spring in a bolt gun. The glorious Winchester Model 70, no longer a darling of the boutique crowd, continues as an exceedingly fast rifle stroked from the shoulder, which is where a rifleman operates the bolt. One hundred years from now the carbon mainspring will hold sway over its stainless counterpart. I worked the Ruger Super Blackhack coil springs, carbon and stainless, to confirm my suspicion the carbon mainspring is better. I cannot say for certainty that it is. I campaigned the KS411N “Silver Hornpipe” pretty damn hard----the “K” at the front of a Ruger number stands for “stainless.” As with the stainless hammer introduced on the KS411N, I believed the longevity potential of the Ruger chrome-moly parts to be superior. Probably harbor this feeling today. Yet I was unable to make the stainless Ruger parts fail. Others poured many thousands of rounds through the Silver Hornpipe in silhouette, and the reports coming back were universally proud.
It makes no sense, as Mr. Garza warns, to skeletonize a hammer in such fashion as to collect grit in the action. Same for drilling holes in a bolt or receiver. Aside from increased potential for ignition failure, the anorexic part is prone to breakage. Those are parlor guns.
David Bradshaw
|
|
|
|
Post by 2 Dogs on Nov 14, 2016 10:01:40 GMT -5
Doesn't the hammer have to have enough weight to generate enough inertia to set the primer off? Not to wonder away from Mr Fermins thread but I remember seeing a pic of Mr Bradshaws FA 44 mag with a drilled/lightened hammer and he had no issues he said...... I think we will have plenty of power to pop the primers. We can always add a stouter hammer spring. |
|
|
|
Post by 2 Dogs on Nov 14, 2016 10:06:35 GMT -5
I looked back at your .327/32-20 project to see that hammer. I like the looks of that hammer much better than what would be the "dished out" version suggested. I see a lot of those types of hammers on cheap 1911's and such. Did Mr. Keith or anyone involved with his projects record how much weight they took off the hammer? I guess you would need to know how much the hammer weighed prior to surgery? If I understand correctly you will be adding a Bisley spur? Is that correct? If so maybe the spur itself could be made of a lighter alloy and you could cut the weight that way instead of finding a way to lighten it by removing material. Like I said, just chuckin marbles at it since I have several extra rolling around in my skull. Paul, almost certainly we are splitting hairs when we try to lighten things and measure the difference it makes. Note that our own Lee Martin has shot many wonderfully tight 100 groups with a standard action. I appreciate the positive energy of all the comments/ideas. |
|
|
|
Post by 2 Dogs on Nov 14, 2016 10:09:57 GMT -5
Skelatize the hammer for looks if you want but do a tungsten insert in the face for the weight needed to activate the primer if the skelatized look is what you are going after. Just another wild marble shake! What I want to do Rob, is skeletonize the hammer so that it does not show externally. Since I have to make a spur, I will try to make one like the photo of the King Short Action sixgun shown. Kind of a "Bikini" spur you might say. |
|
|
|
Post by 2 Dogs on Nov 14, 2016 10:12:33 GMT -5
Would one of David's skeletonized OM bisley hammers work if the lower portion was taken off and the sides welded up for width? Clements does his own EDM I thought so maybe he could be talked into doing the lightening while he's got it. Just a thought, though that still puts you in the position of working the notches on an expensive hammer... www.clementscustomguns.com/itemsforsale.htmlMaybe the one bottom row, just right of center? I have spoken to Dave a couple of times. The easy thing would be for him to make me a Bisley hammer blank. That is, no notches. Dave said he would make a hammer like that if I wanted. However, It might be a good long time until he got to it. Like all the other top Smiths, he is buried in work. |
|
|
|
Post by 2 Dogs on Nov 14, 2016 10:13:09 GMT -5
Just a guess, but I think you'll find you can lighten a Ruger SA hammer quite a bit before you run into problems. I think so too. |
|
|
|
Post by 2 Dogs on Nov 14, 2016 10:14:08 GMT -5
Definitely gonna keep and eye on this one! Sounds like it will be a most interesting journey! Don't know if you've seen them or not but it's worth the time to search 2Dogs past threads on two other builds he has chronicled here. One is his .327/32-20 build and his .257 Jackrabbit build. 2Dogs has been gracious enough and patient enough to take us along for the ride on his projects. It's educational and at times very entertaining to follow him. He is also instrumental in starting group buys for bullet moulds through Miha that otherwise we would probably never see. Fermin is leaving a path and legacy available for future generations that could stand up to the best of past leaders in the firearms industry. Of course Lee Martin and David Bradshaw has to be included in 2Dogs group. Truly some amazing knowledge among the members of this fine forum. You're making me blush... |
|
|
|
Post by 2 Dogs on Nov 14, 2016 10:15:25 GMT -5
I think I f you take weight from the middle of the hammer it wouldn't effect the weight of the spur or the thrust of its impact. I'm pretty sure we can solve this problem easily enough. Need to find out exactly how hard the Ruger OM hammer is and what tool we can cut it with. |
|
|
|
Post by 2 Dogs on Nov 14, 2016 10:18:30 GMT -5
To lighten hammer or leave it be? Faster LOCK TIME is a good thing. It comes at a cost. A heavier mainspring imposes more shock on parts. This is evident in bolt actions with very hard firing pin and cocking piece, which are prone to break and thus should not be dry fired. A heavy revolver hammer or rifle firing pin holds the primer against BLANKING into the firing pin hole. A heavier mainspring accomplished this vital support, which is why Bill Ruger, Jr., put the heavier cap & ball mainspring in the .357 Maximum. The heavier spring, in conjunction with rifle primers, stopped PRIMER BLANKING with the Rocks & Dynamite we poured through prototype SRM .357 Maximums. A blanked primer locks the cylinder and must be sheared by hand rotation. I put a Freedom Arms Model 83 drilled hammer in the Jim Stroh Shilen barrel .44 Mag, specifically to speed lock time. These hammers are fine up through .44 Magnum, but do not put one in a .454 Casull or other heavy-recoiling cartridge. Proof that a weak mainspring leads to blanking may be seen in a .357 or .44 magnum revolver, as the primer begins to extrude into the firing pin hole and retard cylinder rotation. Not to be confused with firing pin extrusion around a hammer-mounted firing pin working through an oversize hole in the firing pin bushing or standing breech. I have never encountered fatigue from the old Smith & Wesson drop forged leaf mainspring. Flat mainsprings cut from flat stock have weakened over time. I reckon it’s a matter of material and heat treatment, rather than method of manufacture. Same for coil springs. I’ve never had a Ruger mainspring die, but coil springs in some other makes have crapped the sack. I prefer an old carbon coil spring to a stainless coil spring in a bolt gun. The glorious Winchester Model 70, no longer a darling of the boutique crowd, continues as an exceedingly fast rifle stroked from the shoulder, which is where a rifleman operates the bolt. One hundred years from now the carbon mainspring will hold sway over its stainless counterpart. I worked the Ruger Super Blackhack coil springs, carbon and stainless, to confirm my suspicion the carbon mainspring is better. I cannot say for certainty that it is. I campaigned the KS411N “Silver Hornpipe” pretty damn hard----the “K” at the front of a Ruger number stands for “stainless.” As with the stainless hammer introduced on the KS411N, I believed the longevity potential of the Ruger chrome-moly parts to be superior. Probably harbor this feeling today. Yet I was unable to make the stainless Ruger parts fail. Others poured many thousands of rounds through the Silver Hornpipe in silhouette, and the reports coming back were universally proud. It makes no sense, as Mr. Garza warns, to skeletonize a hammer in such fashion as to collect grit in the action. Same for drilling holes in a bolt or receiver. Aside from increased potential for ignition failure, the anorexic part is prone to breakage. Those are parlor guns. David Bradshaw This wont be any parlor gun. Can you imagine the amount of shooting it is going to take just to file in those rear blades?? Then you will have to do all the shooting to see what the effect the gold bar front brings to the table.... Lots to think about as always. Many thanks Mr. Bradshaw! Always informative. Can't beat that been there done that T shirt guy! |
|
|
|
Post by 2 Dogs on Nov 14, 2016 10:26:23 GMT -5
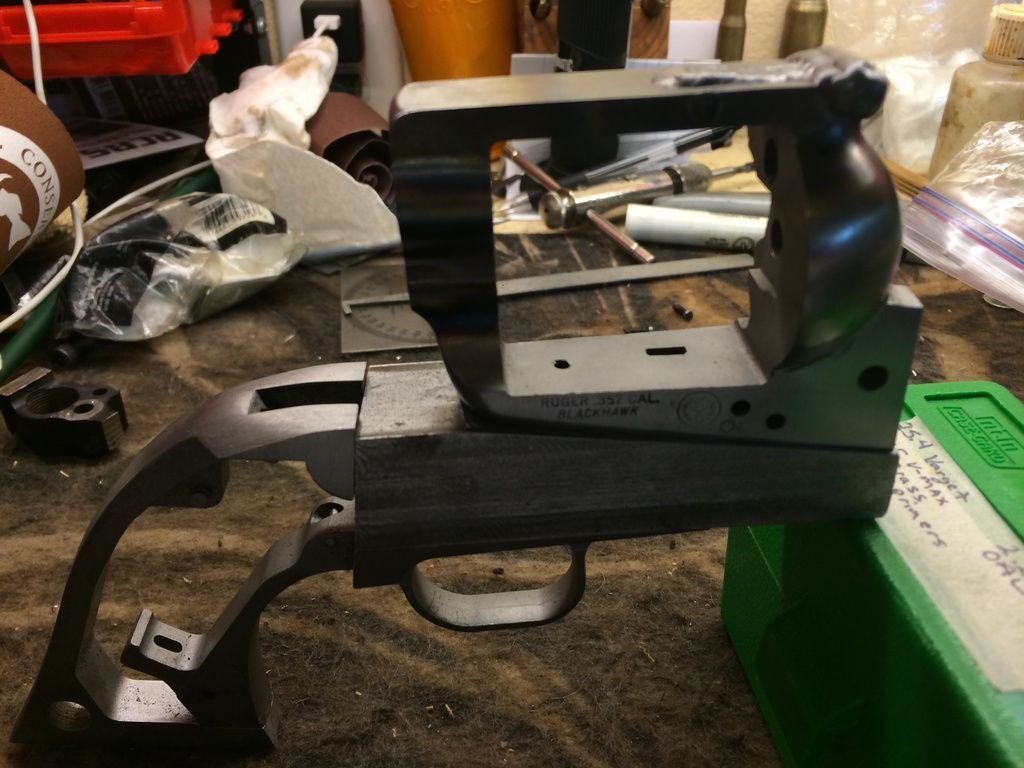
If I didn't miss anyone I will try to continue with the photo essay and a update. Keep in mind, as soon as the work week rolls around again things slow down! Ray is very interesting and incredibly smart young man. He always thinks in terms of how to best hold the work in his machine to make his machine cuts as accurate as possible. When we need to set up a main frame in the mill, the problem is finding a way to hold it. You cant just clamp it in the machine as the frame tapers from back to front. So, a jig has to be fabricated. We knew from our last build we needed this jig already, it is more of a matter of time to build the jig itself. Actually, the jigs are just as interesting and the project. So what Ray has done here, is take the jig we use to deck the Ruger grip frame and turn it over and make a frame holding jig on the other side. Keep in mind, there is ZERO fudge on that angle. You have to admire a guy who wastes no material or energy.   |
|
|
|
Post by 2 Dogs on Nov 14, 2016 10:32:34 GMT -5
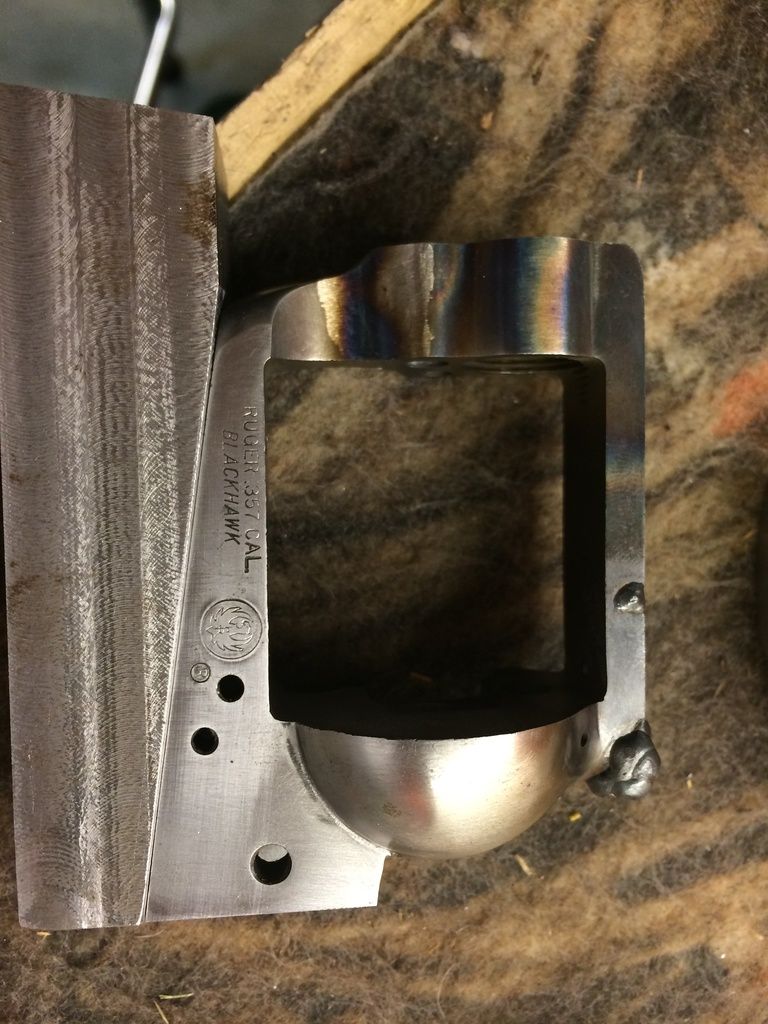
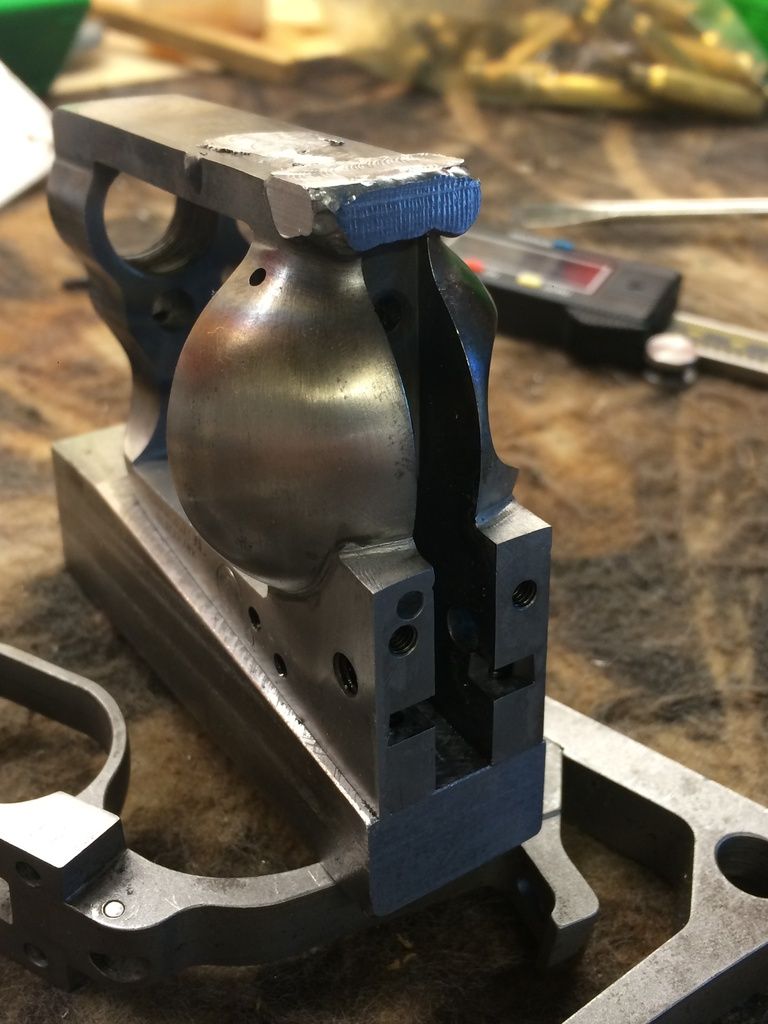
What we need to accomplish at this point, is some clean up of the weld to reveal what remedial welding needs to be done to finish. What we should end up with is a extended flattop frame with no voids or other boo-boos. The other very interesting question is, do we need to anneal this weld? Remember, you have to be able to cut the weld! If by welding you get it so hard you are busting machine tools you have a whole nother problem. If I haven't said it already, we did take out the firing pin bushing assembly before we started welding on it.  |
|
paulg
.375 Atomic
  
Posts: 2,420
|
Post by paulg on Nov 14, 2016 10:44:59 GMT -5
Cool, cool, cool!
|
|
Fowler
.401 Bobcat
  
Posts: 3,671
|
Post by Fowler on Nov 14, 2016 12:01:02 GMT -5
I spoke to e EDM friend of mine. Yes it could be used to hollow out the hammer as we discussed, the trick would be fixturing and drilling the plunge hole to start it. Also needs 3D models to run the machine on. Details. It's a very challenging and expensive idea to pursue frankly for what might be minimal gain but possible.
|
|
|
|
Post by 2 Dogs on Nov 14, 2016 12:16:33 GMT -5
I spoke to e EDM friend of mine. Yes it could be used to hollow out the hammer as we discussed, the trick would be fixturing and drilling the plunge hole to start it. Also needs 3D models to run the machine on. Details. It's a very challenging and expensive idea to pursue frankly for what might be minimal gain but possible. Will council with Harton shortly. Do not want to create a monster! Also sent David Bradshaw a PM on the sight dimensions. |
|
|
|
Post by bradshaw on Nov 14, 2016 17:10:52 GMT -5
Fermin.... on sight dimensions...
Square notch iron sights should be governed by EYE RELIEF (distance between eye and front sight), SIGHT RADIUS (distance between front & rear sights), and FRONT BLADE WIDTH.
1) Eye relief----determined by stance and arm length.
2) Sight radius----determined by sight placement, from length, and barrel length.
3) Sight proportions: an industry-standard width of a square front sight blade is .125-inch (1/8th inch). We may use this hypothetical “average” to determine the rear notch. Manufacturers have a tradition of getting lazy when it comes to details such as grips and sights. The .125-inch front blade is often mated to a .125” rear notch. This works better for a short barrel than a long barrel. Ruger complimented the standard 1/8th inch blade of some early Super Blackhawks with a rear notch measuring .110-inch. The narrow notch eased precise elevation & windage alignment of the front sight. These “old model” Supers did battle with masterfully built S&W M-29s in the crosscut days of silhouette. It was impossible for this shooter to tell which brand was most accurate. In top examples slugging it out @ 200 meters, the accuracy was stunning, and stunningly equal.
For a revolver with 7-1/2” barrel, a rear notch .010-inch narrower than the from blade should cover a spectrum of individuals, ands positions. We may go into more detail later. Since you are making sights for your revolver, I think you should start with, or mock up, a rear notch .015” narrower than the blade. Perhaps even .020” narrower----providing you can file or mill it wider, later on. The notch should be .075-to-.080” deep. Deeper is fine, providing it doesn’t require a taller rear blade, or taller front sight.
More later,
David Bradshaw
|
|


