|
|
Post by Lee Martin on Sept 26, 2013 12:50:42 GMT -5
Step 1 – Cartridge Selection The starting point for any good benchrest rig is the cartridge. Whether it’s 222, BR, or PPC headed chamber specs are a major consideration. When we were building this style of rifle 20 years ago PPC brass was high. Supply was quite limited and when you found it the going rate was $3 per. That led us to the 6 BR and even wildcats like Culver’s 25 Dart and the 6mm Wasp. Those performed beautifully but for competition you’ll want a PPC. Most agree the 6 PPC holds an edge over the BR out to 200 yards. Beyond 300 and folks jump to 6 Norma for the uptick in case capacity (that is if you’re set on 243’s; the 6.5’s and 30 BR have made huge inroads at those distances, especially 600 yards). Since I plan to shoot heavy varmint in 100 & 200 group aggregates I’ve decided to build a PPC (Pindell-Palmisano Cartridge). Brass selection, chamber dimensions, and overall prep take on a life of their own with the PPC. Very few buy out-of-the-box shells and start reloading. Sako and Norma do make pre-formed but it is rarely used in competition. The round works at high pressure and the Norma stock was soft. It wore out faster and tended to lack match-grade uniformity (note my use of the word “was”. The new Norma is supposedly better but I’ve yet to handle any. Lou Murdica reports it’ll run alongside Lapua all day so we’ll see). Sako standardized the 6 PPC USA in 1985 but their version differs ever so slightly from match tolerances. For one the shoulder is five minutes sharper and it headspaces off the outer edge (yes, that’s minutes not degrees). The base is also one to two thousandths bigger so they won’t fit match chambers. Because of these small but significant differences Lou Palmisano asked Sako to add “USA”. In doing so they demarcated the round from comp-grade PPC. 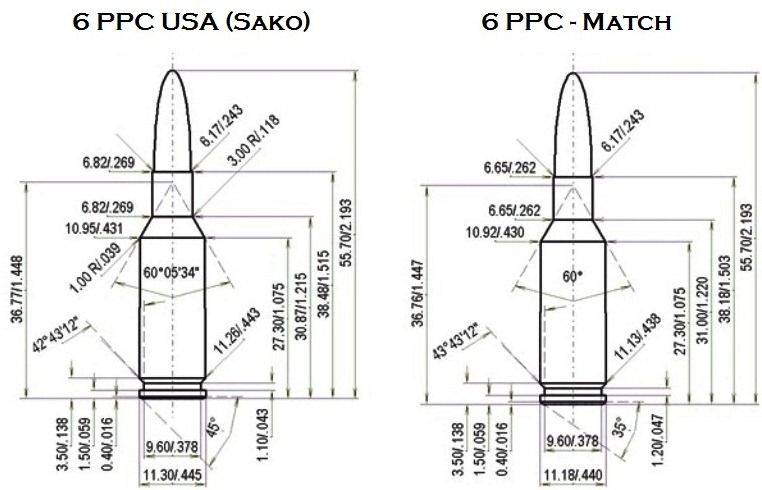 Nearly all match PPC is formed from Lapua 220 Russian. The quality is outstanding and the price is in-line with the Norma and Sako counterparts (I’ll cover the three fire-forming techniques later on). Starting with 220 Lapua the first major decision point is neck thickness. Bullet tension and neck regularity are a must for precision shooting so many 6 PPC chambers are cut 0.262”. But 262 isn’t merely tied to performance, it stems from the old parent brass. Back in the 70’s and 80’s Sako 220 shipped with necks on the order of 0.265” – 0.268”. To clean-up the 0.002” – 0.004” run-out common to those batches the wall thickness was thinned to 0.008” – 0.009”. Now let’s do some reverse math. Say your FB bullet measures 0.2434” at the pressure ring and your trued neck thickness is 0.0088”. 0.2434” + 0.0088” + 0.0088” = 0.2610”. Cut your chamber to 0.262” and the loaded cartridge will be 0.001” under or 0.0005” per side. That’s tight but very desirable for benchrest work. I’ll delve into neck tension and sizing strategies once the rifle is done. For now just note that most competitors shoot 0.262” but there’s a growing trend towards thicker and even no-turn. In fact the winningest benchrester of all time Tony Boyer has competed with 0.265”s and 0.268”s. Lapua 220 uniformity is stellar and can be trued with one pass; assuming it needs to be trued at all. Their earlier production 220 mic’d just under 0.271” with a flat base 6mm. Recently wall thickness increased ~0.0008” so unturned they now measure 0.272”. That yields 0.015” per side so a 0.268” – 0.269” chamber gives ample room for clean-up. Even so most stick with the tried-and-true 0.262”. There’re three reasons why they do: 1) tradition, 2) benchrest smiths usually have a 0.262 PPC reamer, and 3) there’s greater knowledge share on load tuning as conditions change. We’ll be grinding our reamer soon and decided on the following: 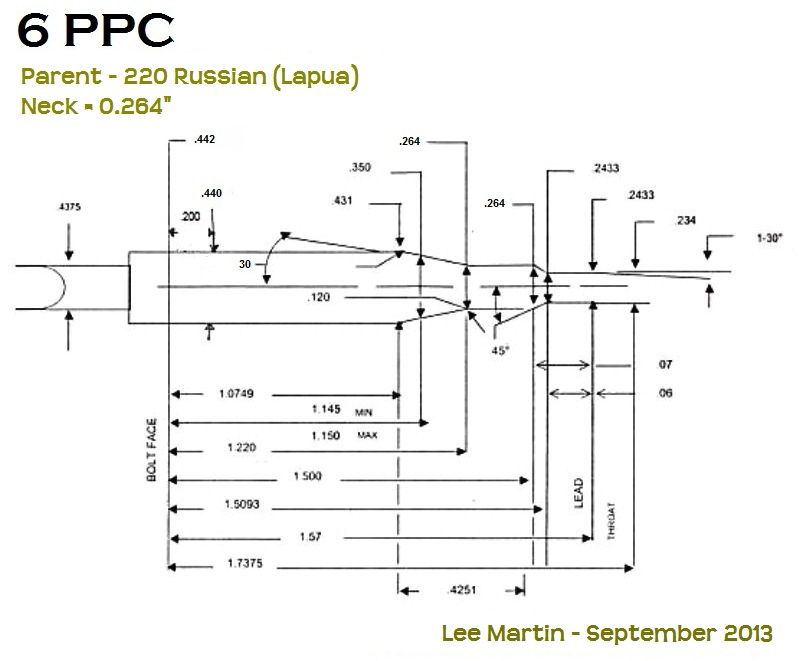 264 isn’t seen much anymore in PPC. Hall of Famer Speedy Gonzales uses 263 and Mike Bryant has been successful with 265. So why will I cut 264? 1) I like one-offs and split the difference between Speedy’s and Mike’s 2) I already have 259 through 263 buttons 3) High neck tension is easier to obtain with the added thickness (some benchrest powders like squeeze) 4) The Lapua will true well before we remove 0.005” per side. There’s no need to take more 5) I won't go thicker than 264 in case Lapua brass dries up (not likely). If I had to form from another make I want buffer if the run-out exceeds Lapua. These specs play out like this: Brass - 220 Lapua Chamber - 0.264" (+/- 0.0005") Neck thickness - 0.0095" Bullet - 0.2435" Loaded neck - 0.2625" Total clearance - 0.0015" A 0.260" ring will give ~0.0025" in neck tension. A tad above average and it should work fine with the powders I intend to shoot (LT-32 & 8208). If I test the VV brands like N133 I may bump it closer to 0.004”. More to come….. -Lee www.singleactions.com"Building carpal tunnel one round at a time" |
|
|
|
Post by Lee Martin on Oct 3, 2013 11:32:48 GMT -5
Step 2 – The Parent Brass It’s important to align our proposed chamber specs with the real thing. Production variability exists, even within the same make of brass. So never trust a dimension sheet when cutting reamers; the parent must be measured and it’s better to do so across a wide sample. Fortunately we’re using Lapua and their boxes are marked with lot numbers. 200 pieces of new 220 Russian were ordered at just under $1.00 per. They’re the universal foundation for 6 PPC forming and have no equal when it comes to quality. 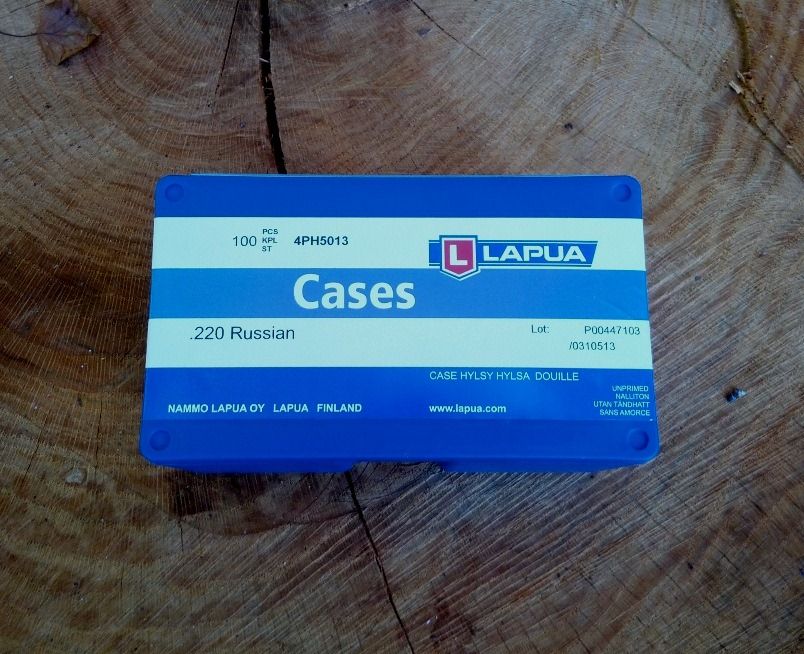 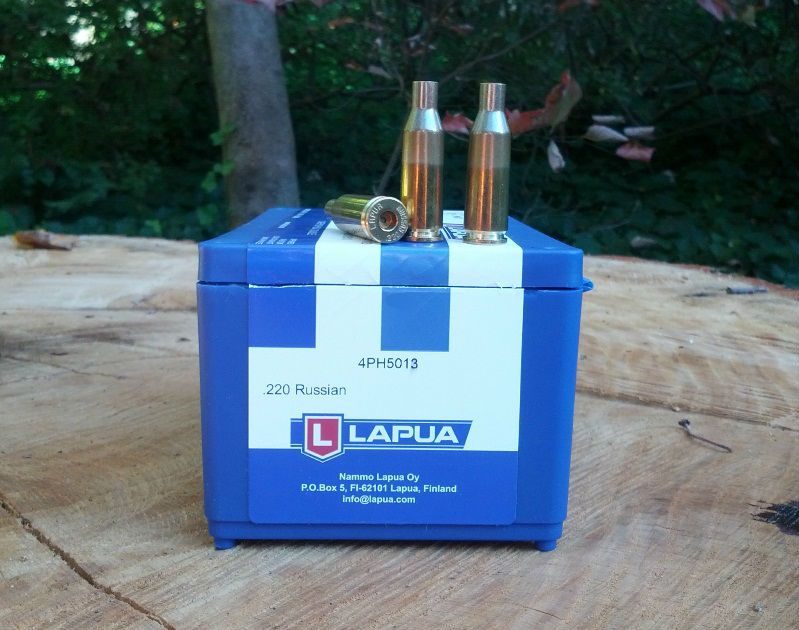 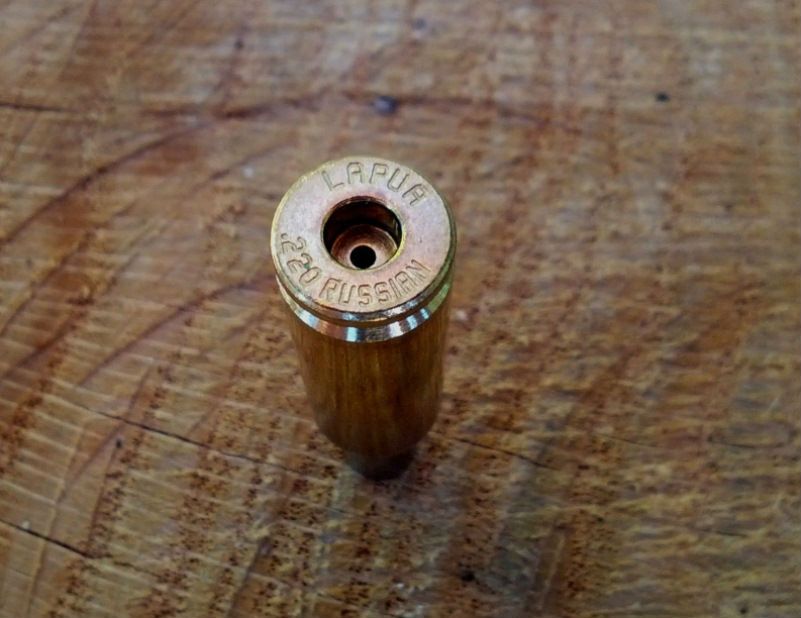 One box was inspected in total for the following: 1) Base diameter 2) Case weight 3) Neck concentricity 4) Shoulder run-out 5) Primer pocket depth 6) Flash hole uniformity The base diameter above the extractor groove ran consistently 0.4395”. My reamer transitions to 0.440” just 0.200” from this point so we’re good on the web. Segregating brass by weight is widely debated. Some say it accurately depicts case volume if the external dimensions run true. Others say it’s a “nit” process that can’t be quantifiably tied to smaller groups. If you have an electronic scale, and most benchresters should, why not? The step doesn’t cost anything and it mitigates another variable. I think it can add value, especially when there’s deviation within a small quantity, say 50 – 100 pieces. I once weighed forty Remington 264 Win Mags, all new and all from the same lot. To my surprise they showed an 11% spread (196 - 221 grains). One box of new 220 Russian was scaled and they fell between 111.5 and 112.7 grains. That’s a 1% delta but if you exclude the outliers it pinches to 111.9 - 112.5...a miniscule six-tenths of 1%. That’s insanely low, even for the highest grade of brass. My little experiment confirmed what many have said about Lapua hulls. Their QA is so high there’s no need to segregate. I played it safe however and paired the 112.1 – 112.2 and the 112.3 – 112.4 batches. 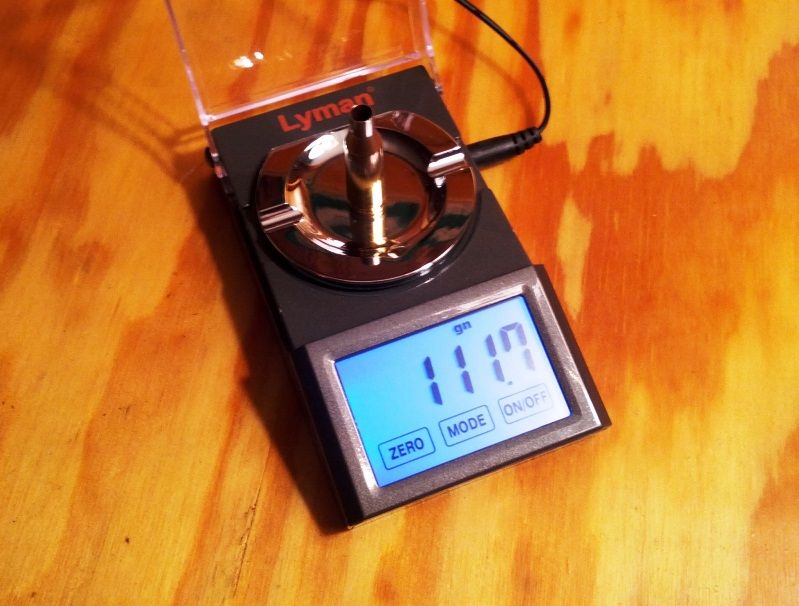 Processing the box 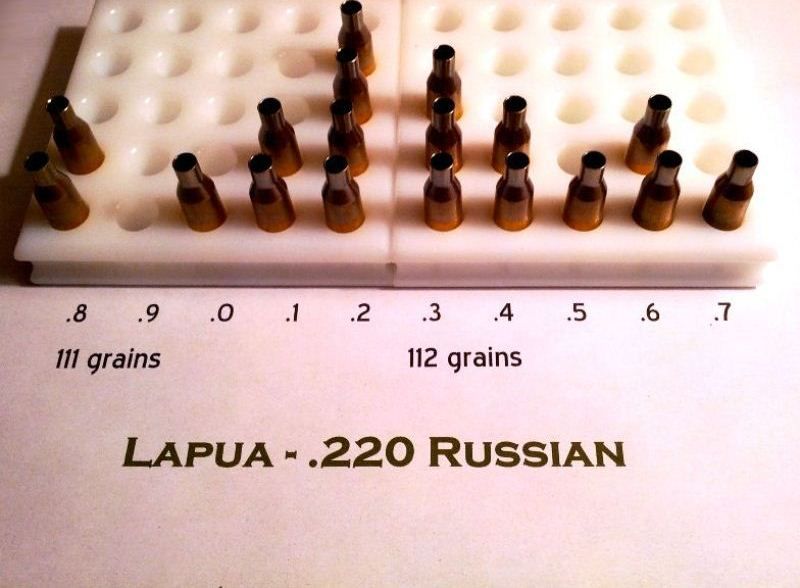 Final distribution 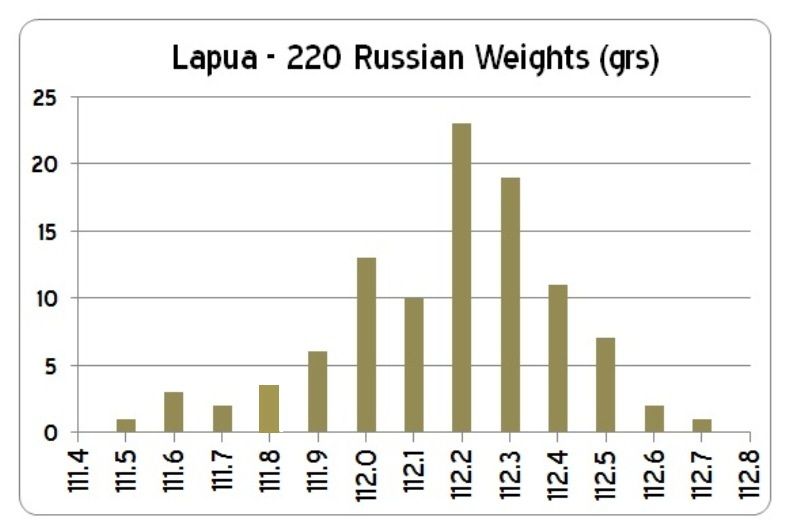 Neck and shoulder concentricity were measured using a Sinclair gauge. The neck run-out averaged a half-thousandth while the shoulder never exceeded 0.001”. 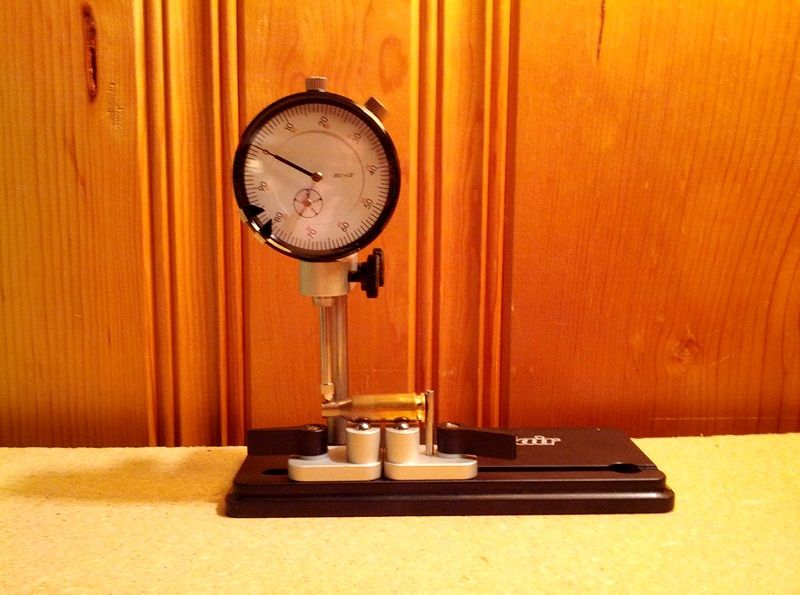 PPCs use small rifle primers which mic 0.121” in height. Ideally you want the cap to seat a little below flush, say 0.002 – 0.003”. For that reason a lot of guys ream the pockets to achieve this spec. Using a depth gauge mine averaged 0.123” so there’s no need to recut them. Now dozens of benchrest articles have been written about flash-hole diameter, edge consistency, and uniformity. Back in the 1970’s Palmisano and Pindell funded a few trials to determine the ideal size. They landed on 0.059” which is less than the standard 1/16” (0.0625”) de-capping pin. Since we’ll be making our own die I can install the correct diameter. We sampled a few pockets under magnification and the Lapua flash-holes are dead on. Small brass flakes or obstructions are common around the hole itself. Unlike domestic brass which is punched, European brands such as Norma and Lapua drill the throughway. While the latter tends to produce a cleaner passage small burrs can result. To eliminate them you’ll need a pin vise and a 1.5mm drill bit (0.0595”). Through very slow hand reaming they’ll true without up-sizing. 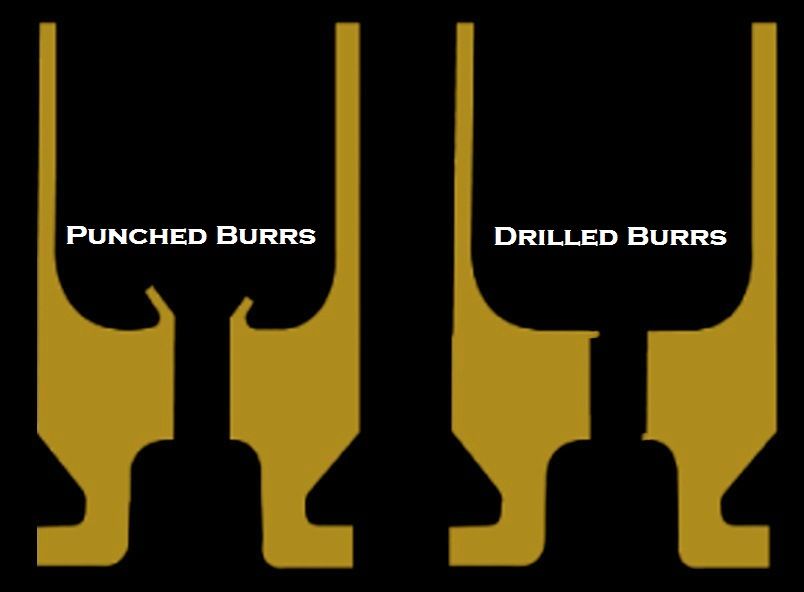 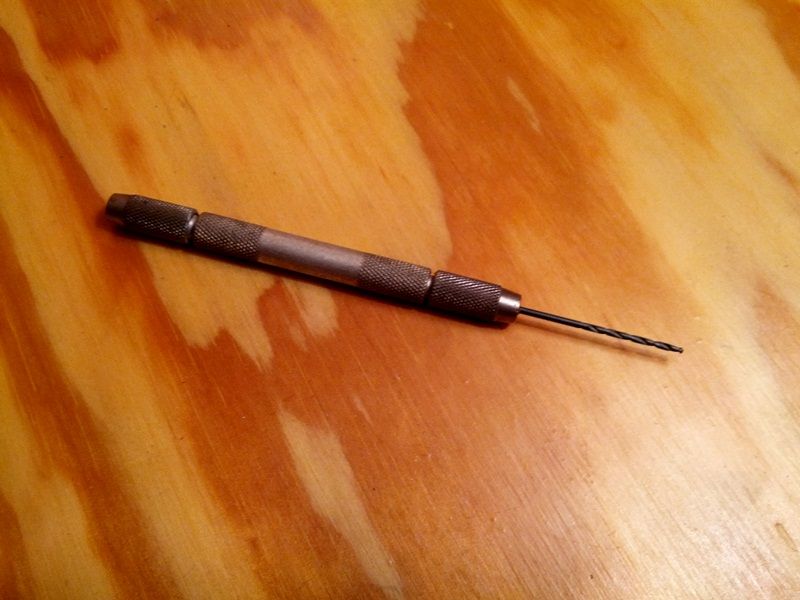 -Lee www.singleactions.com"Building carpal tunnel one round at a time" |
|
|
|
Post by bradshaw on Oct 4, 2013 8:57:57 GMT -5
Great information, Lee. Especially noting extremely low runout on your Lapua shoulders and necks. Accuracy is built from the ground up, and going at it the way Lee and Lee, Sr., do provides a trail for hunting accuracy glitches by a process of elimination. As for bullet selection, the enjoyment of shooting a bullet you make is less important than shooting the bullet that shoots straightest. By comparison, to shoot long range with a revolver is a crude endeavor. The uniting thread is the IMPERATIVEe to PAY ATTENTION at all times.
David Bradshaw
|
|
|
|
Post by Lee Martin on Oct 10, 2013 13:43:39 GMT -5
Step 3 – Revisit the plan, adjust as needed ________________________________________________________ Dad and I reviewed the reamer specs and made last minute changes. In documenting this build I think it’s important to also cover our logic behind “why” and “how”. Here’s some backdrop along with the updated dimensions. While I favor tight chambers I’m concerned about potential bolt click on this PPC. I’ll define that later and instead begin by discussing tolerances. Factory rifles have generous chambers and considering the multiplicity of commercial and hand loaded ammunition it’s warranted. With benchrest rigs the loads are matched to the gun and the sizing die is often honed from fired cases. Couple this drill with a close chamber and good things happen. First the round properly aligns with the bore thus reducing the chance of tilt. An off-axis bullet is almost certain to bleed accuracy. Secondly it extends case life with quality brands staying competitive in upward of 20 reloads. Lapua once tested their brass by neck sizing alone and achieved 200+ firings. No failures to report and while tension started to fade as it work hardened they still held. 6 PPC shooters obsess over shoulder position, neck tension, clearance, datum lines, and of course headspace. With the exception of neck tension “less is always more”. The one dimension that can be knotty if held too tight is the web. Why’s that, isn’t minimal good? Generally it is until you reach high pressure and that’s where many PPC shooters find their optimal tune. Tuning is a process used to pinpoint the preferred nodes. I’ll cover this when we reload but for now equate “node” with prime barrel harmonics; or in layman terms consistent barrel vibration (note - the node isn’t simply charge or pressure specific. It includes seating depth, bullet tension, atmospheric conditions, and a few other variables. All of these add-up to your tune). The high pressure generated by the 6 PPC doesn’t always agree with brass elasticity; at least not when confined to say 0.001” or so of clearance. The close mating points on BR actions further compound this. When the round fires the locking lugs set back against a near-perfect bearing surface. The bolt thrust actually stresses the lugs forcing the brass to expand. A wedge effect results and causes hard bolt lift throughout the cycle (lugs still pressurized against receiver cause the resistance). Bolt click derives more from case sizing than setback. With a tight chamber the brass swells, meets the sidewall, and the bolt recoils. If pressure doesn’t drop fast enough the case won’t retract and relinquish grip. Strain falling just enough to unseat the lugs makes bolt lift seem normal to a point. Brass that fully rebounds allows smooth lift all the way to the top. However, if it binds on the chamber you’ll hear a click. That click is nothing more than the action over-cocking by a hair. Case bind can occur at the shoulder too but is ordinarily found at the web. For these reasons nearly all PPC shooters full-length size. When that alone doesn’t solve the problem the rear of the chamber can be relieved through polishing. If the click persists the brass is excessively work hardened. Most competitors discard them when they reach that state. I plan to FL size during each reload. To play it safe we’re also going to enlarge the chamber at the 0.200” mark. The revised specs go as follows: 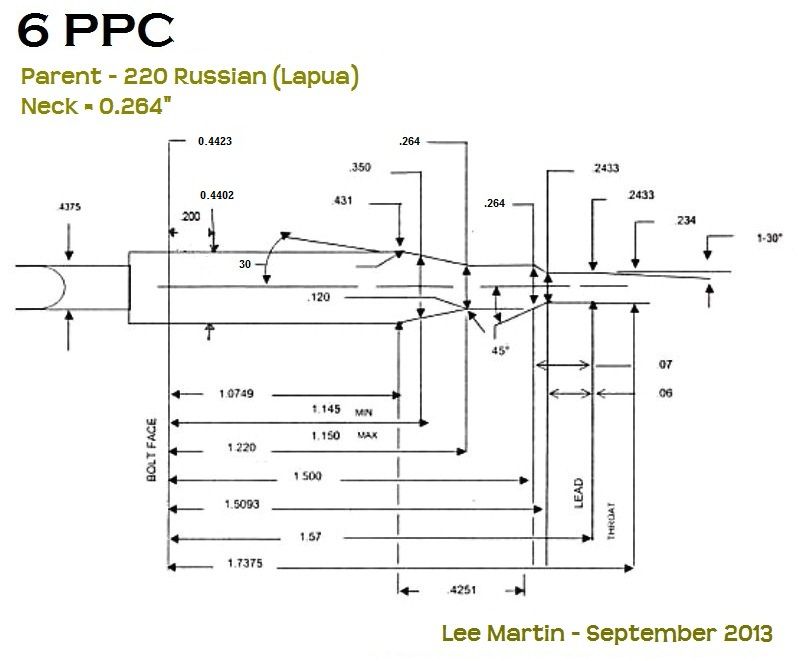 Well that’s enough writing for one week. Dad and I are hitting the bench tomorrow to practice the shooting side of this game. My stainless should arrive soon so we’re close to starting the action. Look for another update in a few days. -Lee www.singleactions.com"Building carpal tunnel one round at a time" |
|
|
|
Post by Lee Martin on Oct 17, 2013 14:36:23 GMT -5
Step 4 – More case forming ________________________________________________________________ You want to base your reamer off of properly necked Lapuas. Here’s the process. Upsizing 220 Russian to 6mm is done on a mandrel. Expander balls can be used except they don’t align well enough for neck turning. We have a few 6mm mandrels that would work but I wanted one dedicated to this PPC. Plus it’s hard to beat K&M’s form die. At $22 it just wasn’t worth the effort to make our own. The die consists of a universal body, a mandrel insert that locks at the top, and a depth plug. 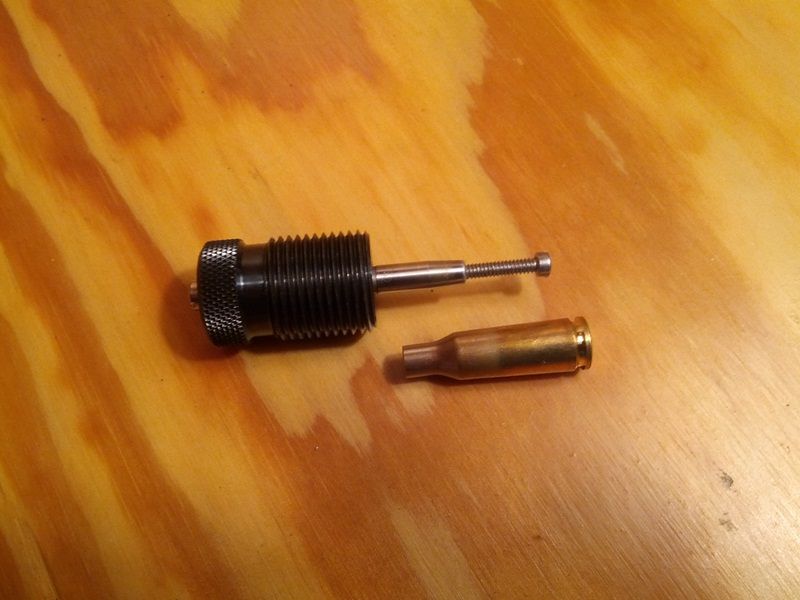 The body screws into most single-stage presses but you have to set the stop first. Failing to allows the case mouth to crush against the die. Position the centering screw to touch the web before the die bottoms out and you’re ready to go. There should be 1/4" between the mouth and base at full ram upstroke. A light amount of lube is applied to the mandrel and inside the neck. I recommend a Q-Tip for the latter. 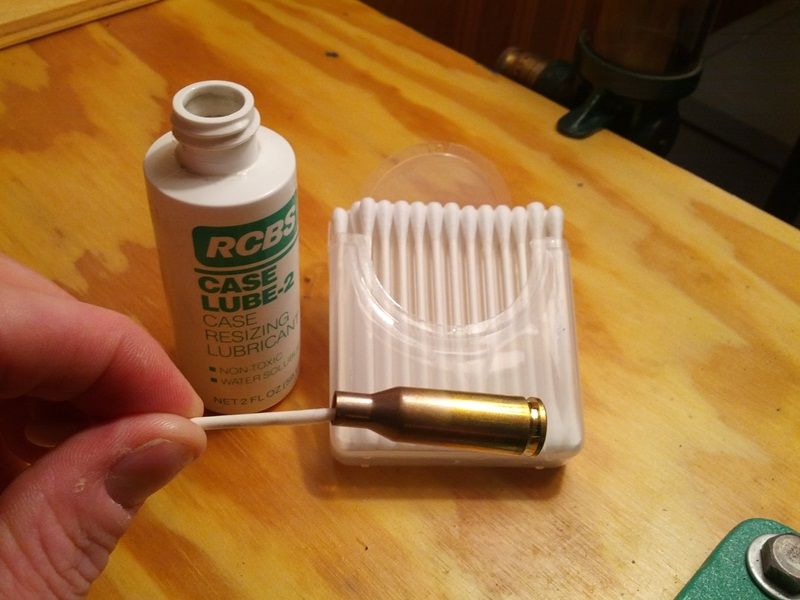 Expanding the necks: 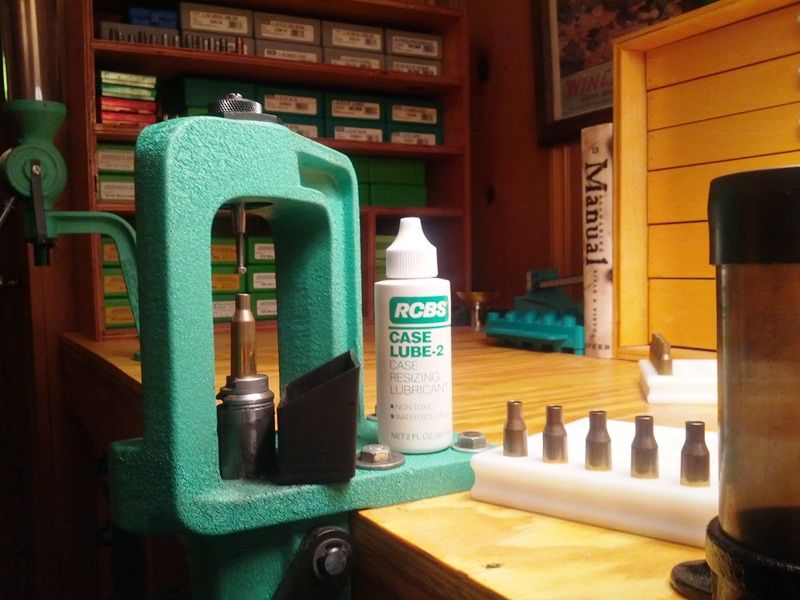 Processing the box. The ones that are mouth-up still need to be formed: 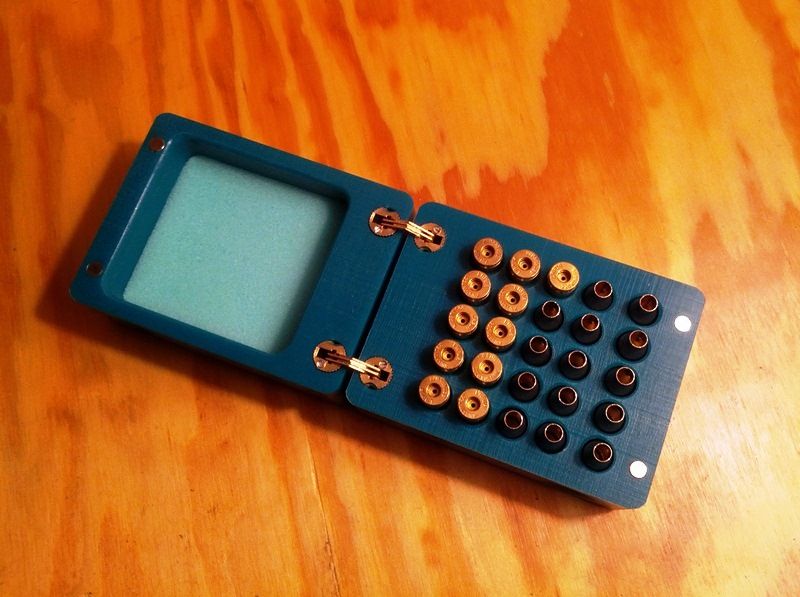 Left – parent 220 Russian, Right – 6 PPC 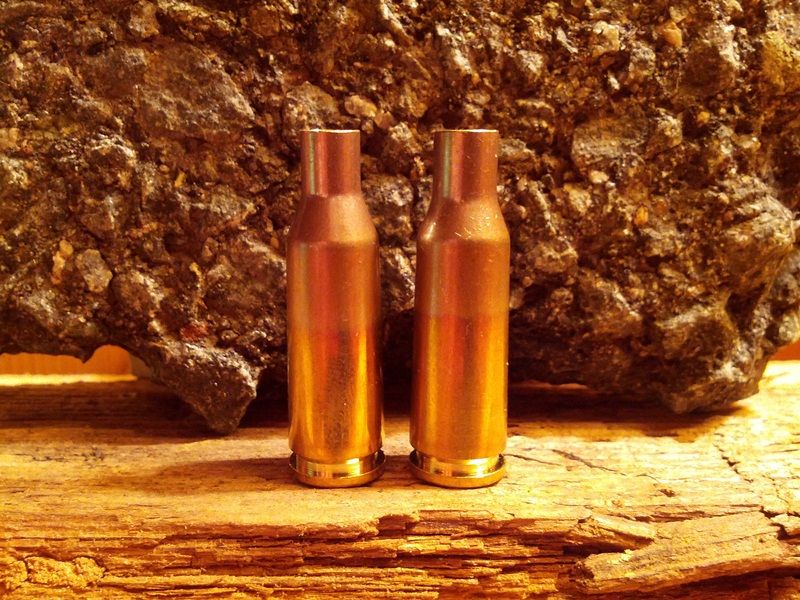 Case turning won’t occur until the reamer is done. We’ll grind the neck 0.264” but I want an actual chamber to pin gauge against. Reamer walk is usually a ten-thousandth or two; certainly not enough to impact final wall thickness. Nonetheless it’s better to measure off steel than paper. Before the comp barrel is chambered we’ll make a bump gauge and a fire-form tube. Those will give the exact dimension of the neck (based on past experience it’ll land somewhere around 0.2641” – 0.2642”). I do want to touch briefly on donuts. Unless you nick the shoulder ~0.002 when neck turning you'll get a high spot. Well let me re-phrase that....a high spot will appear when the shoulder is repositioned and the uncut section is sized. So let’s say you prep the neck as follows: Stock neck thickness = 0.015” Turned neck thickness = 0.010” Total delta = 0.010” (both sides added together) Now pretend your button is 0.264” which is a no tension scenario. The wall is thinned to 0.010” for 0.264", anything more causes pinch. If the shoulder is bumped 0.002” and the first 0.002” of the shoulder itself isn’t thinned you’ll get a donut. Put another way you're running 0.015" worth of wall thickness through a ring designed for 0.010". 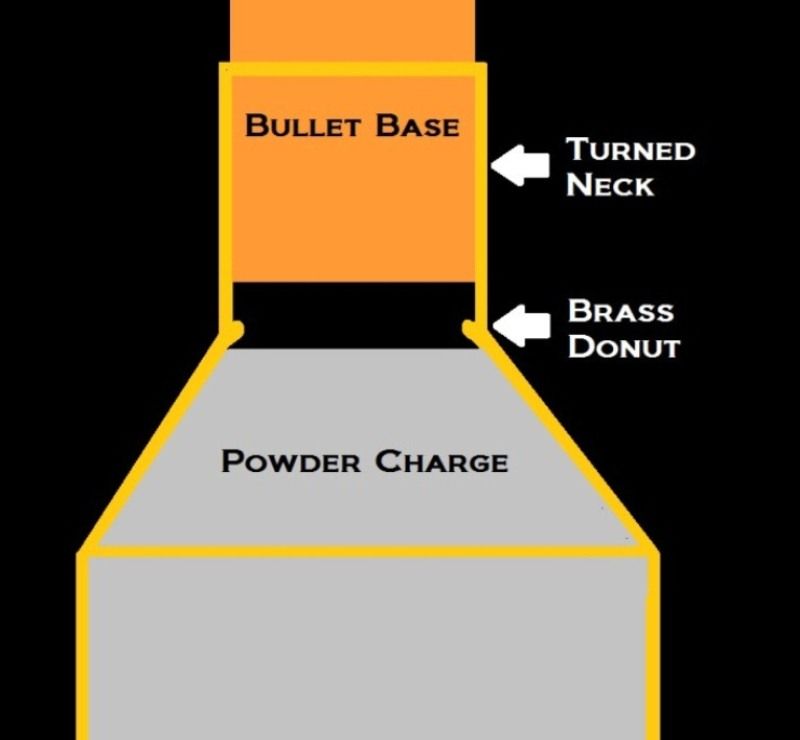 The donut comes from the uncut portion being sized. Since the collar doesn’t budge at 0.264” the brass gets pushed inward. This crease becomes even more pronounced after the first firing. Now there’s differing opinion on whether the donut hurts accuracy. I can’t say whether it does or doesn’t. If your bullet extends into the shoulder though you’ll want to ream it out. Otherwise it’s like adding a second pressure ring. Most PPC shooters use 65 – 68 grain flat base bullets that seat 3/4 into the neck. They never get close to touching the donut. A couple of articles claim the step causes a vortex effect as the powder ignites. Regardless of how it alters gas expansion accuracy doesn’t seem to suffer. In fact, many of the top BR shooters leave the donut and size to just below the bullet’s pressure ring. I plan to undercut my shoulders by 0.003” thereby reducing the chance of donuts. If they arise I'll ream some cases and leave others as is. It'll be interesting to see if there’s any noticeable change in precision (my guess is there won't be). Hopefully this'll shed light on the dozens, if not hundreds, of variables you need to address when entering benchrest. More to come. -Lee www.singleactions.com"Building carpal tunnel one round at a time" |
|
|
|
Post by Lee Martin on Oct 28, 2013 16:01:08 GMT -5
Step 5 – Practice _____________________________________________________________________ Before we begin my PPC I’m putting in as much trigger time as possible. Last Friday dad and I took his 25 Dart to the range and it was the good day to refine technique. The wind was very abrupt, ever changing, and the sun presented some challenges as it cut directly across the bench. HOF’er Tony Boyer offered some pertinent advice on practice conditions in “The Book of Rifle Accuracy”. To paraphrase, if you’re not shooting with wind your skills will languish. A little about the rifle and the 25 Dart. My dad made the shell-holder action in 1992 from 4140 chrome moly (note, my PPC will be a port). The trigger is our go-to 1.5 ounce Jewell and the stock is by McMillan. We considered doing a glue-in but settled on pillar bedding using three posts. The barrel is a button rifled Schneider, heavy varmint contour. Dad also machined the trigger guard, scope base, and the rings out of aluminum. All of this is topped with an 80’s vintage Leupold 36x BR. As you can see it’s the older model with front parallax adjustment (which we prefer). The 25 Dart cartridge has some unique history. It was designed by our late friend Homer Culver in the 1950’s. It’s formed on 220 Swift brass (shortened / improved) and it saw competition back in the day. I can’t say how many he chambered but I believe more than ten exist. Interestingly, Culver cut the Dart and necked it to 6mm in the early 60’s. He called it the 6 Screwball and the round performed well. One night we were in his shop and I asked about the wildcat. Culver pulled a couple of cases and handed them to me. After a few minutes of inspection I said, “Looks like a PPC with a large primer pocket”. Homer just laughed and said “You think?” So how close are they? Both wear 30 degree shoulders, the base diameters are within 0.002” of each other, and the PPC and Screwball measure 1.5” end-to-end. Lou Palmisano and Culver were good friends so the Screwball may have influenced the PPC. That’s no knock on what Pindell and Palmisano brought to benchrest. Their contributions, investments in testing (both time and financial), and knowledge share were significant. I’m only mentioning the Screwball for posterity sake and to give Homer due credit. Just realize that guys like Culver and Jim Stekl introduced “short and fat” to the precision game well before 1975. 25 Dart – Martin action 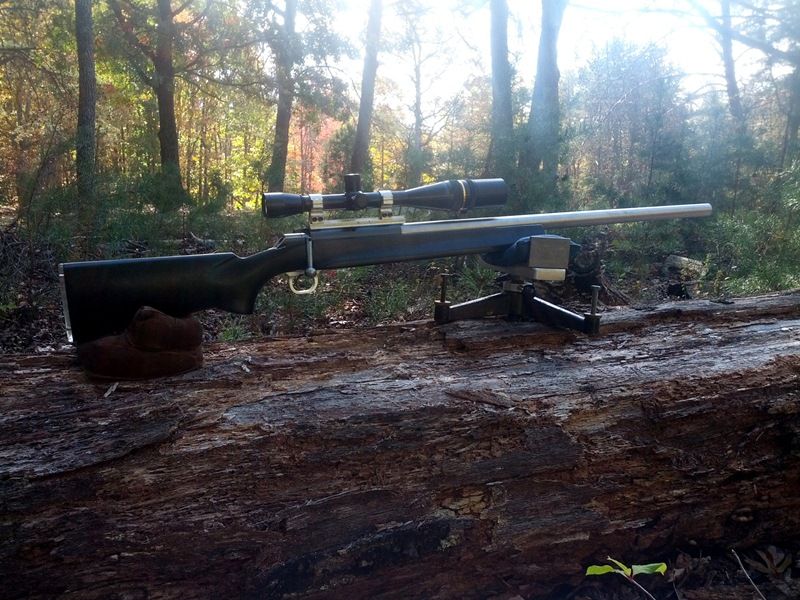 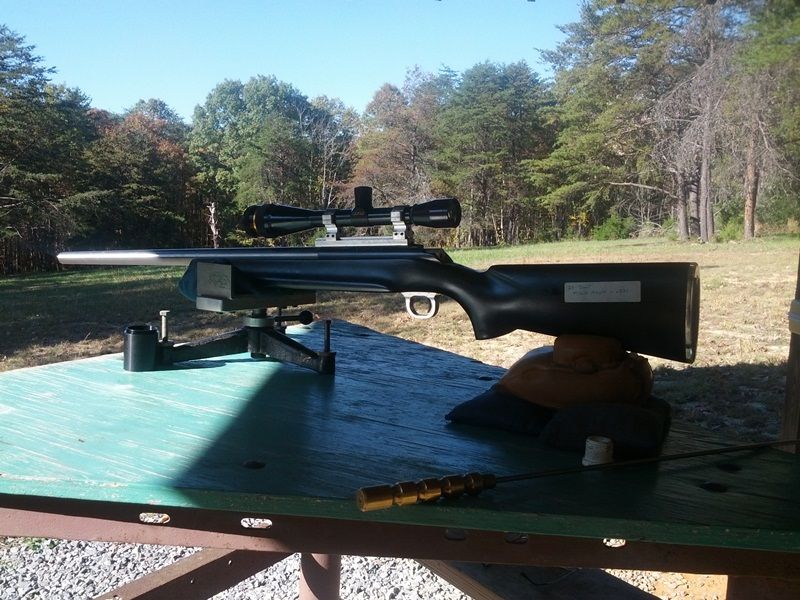 25 Dart – cases formed off of Norma 220 Swift. Necks turned to 0.281”. 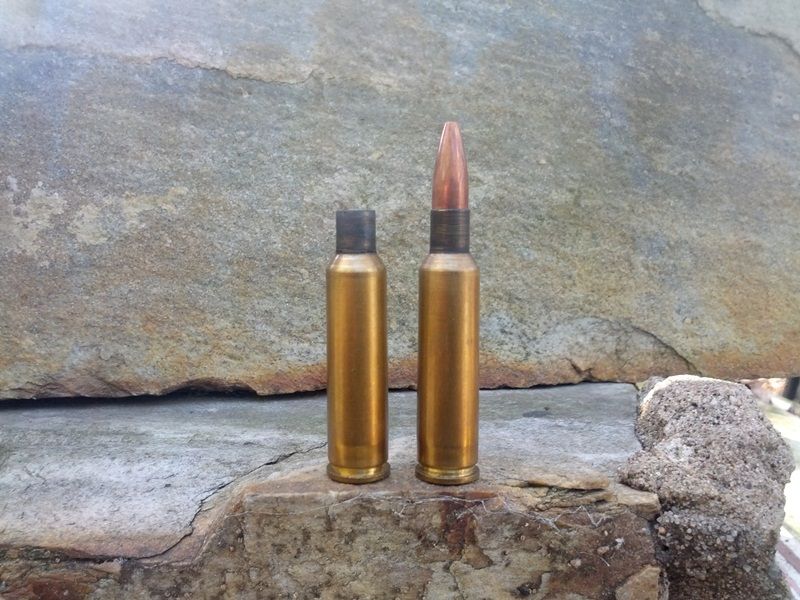 We hadn’t shot our Dart in over ten years. And even after a decade boutique 25-caliber bullets are still limited. So we went with our standby 75 grain Sierra on top of old IMR 3031. Some may poke fun at the components but they routinely put us in the 2’s when conditions held (the gun has even nosed into the 1’s a fair number of times). Loading was done at the bench using homemade dies: 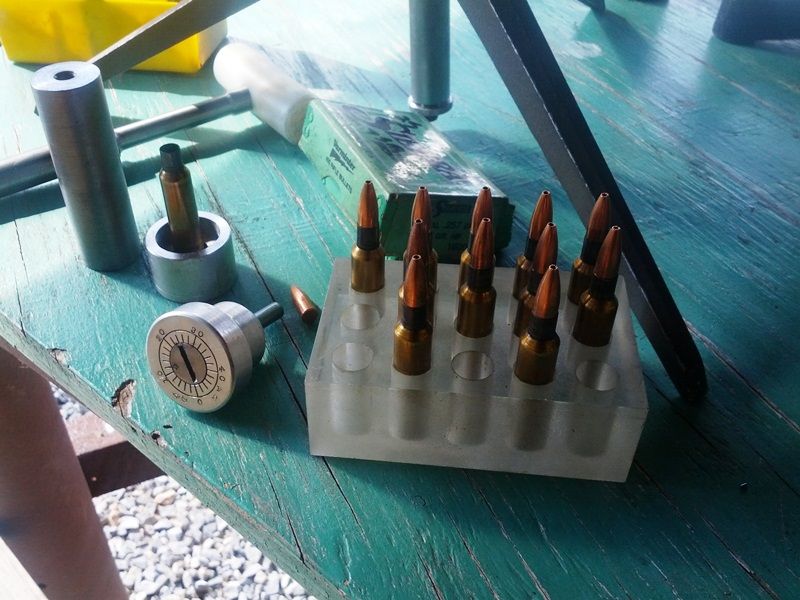 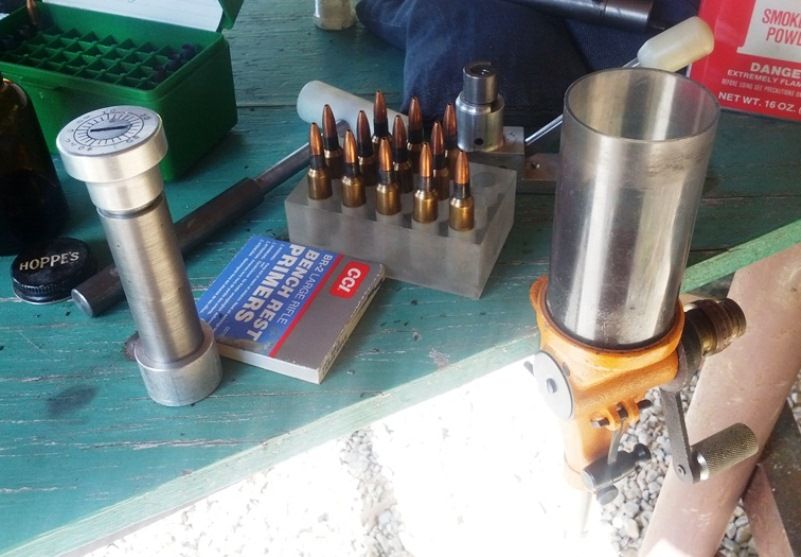 Cartridge block we made out of a piece of acrylic: 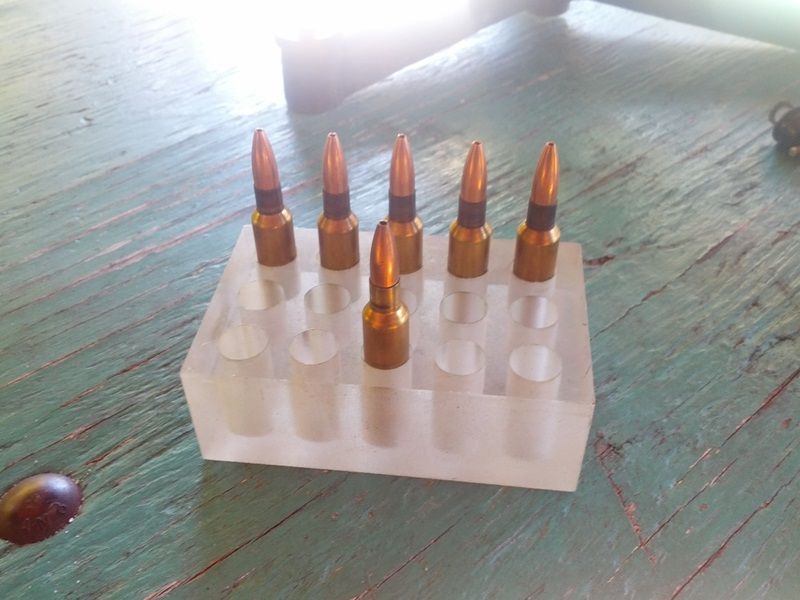 I toyed with shooting free recoil in the 90’s but never committed to the practice. I’ve decided to do so from now on. Here’s video of me settling the gun on the bags for a fouling shot. You’ll notice the only thing I touch is the trigger. My left thumb is upright to the action and 2 – 3” off the stock. The butt plate is a quarter inch from my shoulder. Scope alignment is via my left eye, the right is peripheral and on the wind flags. My cheek appears rested on the tail but it isn’t. There’s roughly one inch of offset. Trying to lay down groups in high wind is humbling. I worked hard to find a set condition but the intensity and direction changed rapidly. These two were my best out of the five I fired: 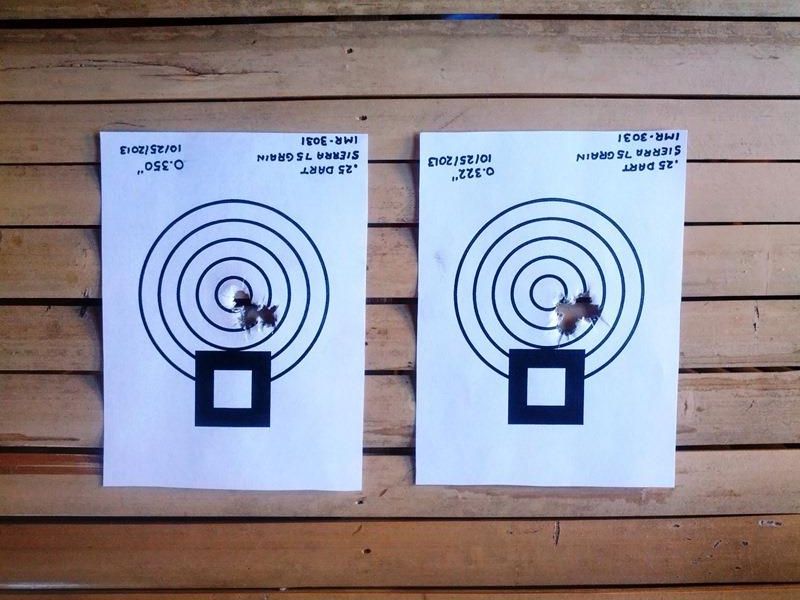 The right target was a letdown and it's all on the shooter. My first four bullets placed beautifully at 11:00 as the wind calmed (I ran them fast). Just as I pulled the fifth I could hear my dad spotting from behind. “Betcha you dropped low and to the right. The wind caught it”. Sure enough that’s where it landed. Excluding that hole I was on-track for low 2’s. It just came down to me not assessing the wind and holding off. You may also notice the gun is pitched in the video. Unfortunately our 100 yard range is slightly downhill and this can interject vertical. This winter we plan to drop the bench 3” and raise the target frame 8” on the other end. This should level the sight line. -Lee www.singleactions.com"Building carpal tunnel one round at a time" |
|
|
|
Post by bradshaw on Oct 28, 2013 17:26:22 GMT -5
As is his trait, Lee Martin comes at us a knight in shining humility. Lee power of observation always obliges a close look at his information. Predicating the validity of information on experience followed by verification. By observing the Martin Process, the handloader----who may never enter benchrest----gains an understanding of attentive loading habits.
David Bradshaw
|
|
|
|
Post by treborsnave on Nov 14, 2013 13:02:49 GMT -5
I'm in the process of putting together a rifle for NRA long range shooting; I'd be fascinated to see your project.
|
|
|
|
Post by Lee Martin on Nov 21, 2013 15:03:58 GMT -5
Step 6 – The Action I’d be lying if I said anyone can afford to get into benchrest. To compete at the highest level you’ll need to invest in equipment. And as with any custom firearm build there’s the part gathering phase. The precision gig is no different. In benchrest the action becomes the jump-in point and logical first purchase. Commercial versions run $1,300 - $2,000 depending on the configuration and that usually doesn’t include the trigger. Some of the more popular models are the BAT series, Kelbly’s Panda (which is a continuation of the Ralph Stolle receiver), and the Stiller Viper. Bruce Thom’s “BAT”: 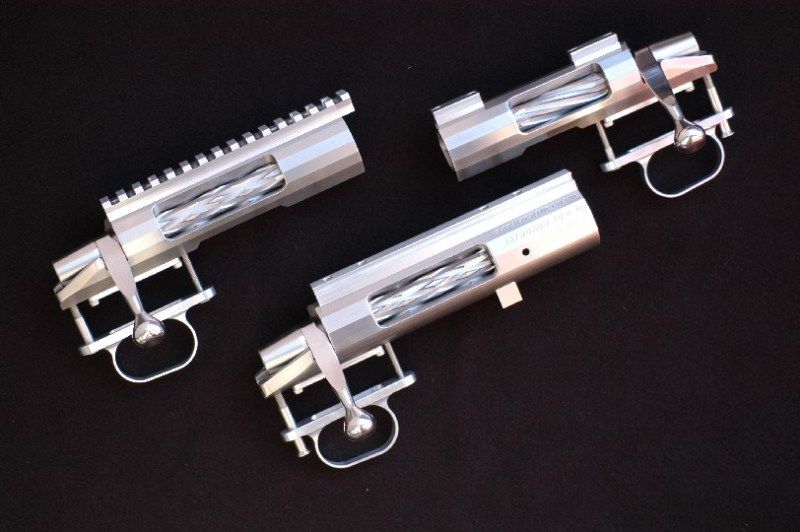 Borden: 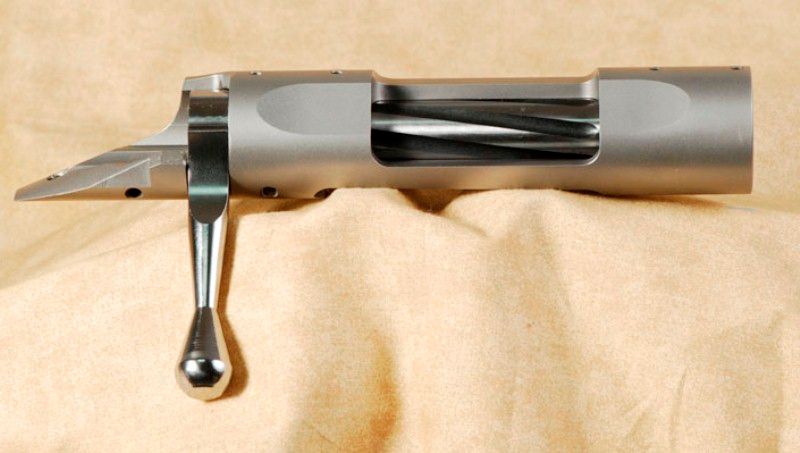 Kelbly’s Panda is born from the Ralph Stolle design. The steel receiver is housed in an aluminum sleeve. This not only saves weight but increases the bedding surface: 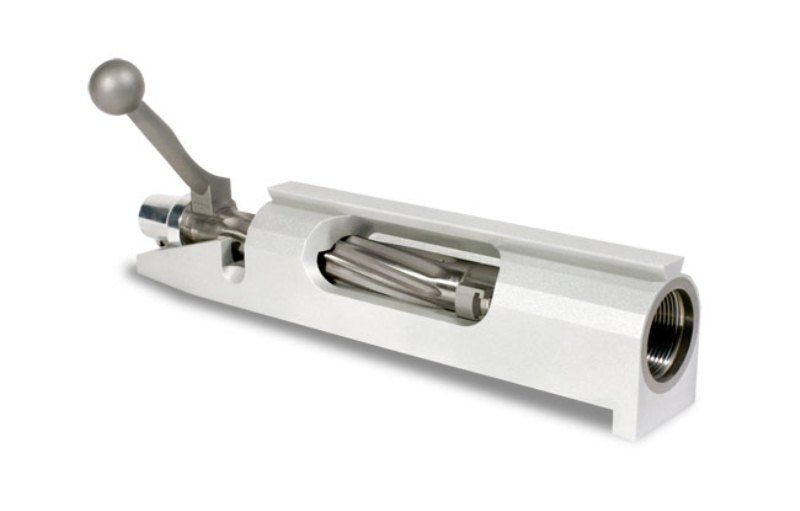 Lawton: 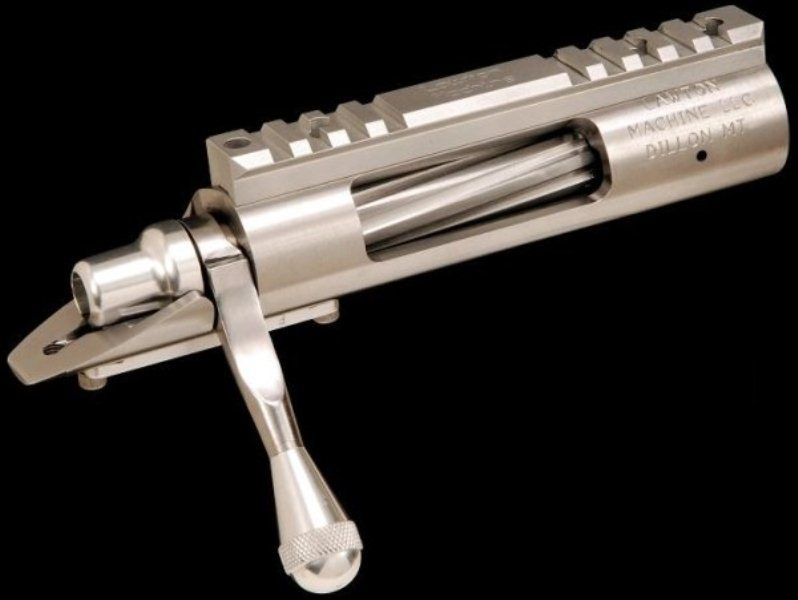 Stiller Viper:  Stainless steel has become the preferred metal, undoubtedly for its corrosion resistant properties. The shift away from chrome moly started in the late 1990’s but 4140 and 4130 are inching back. Another trend has been towards ejector models. With prepped brass the last thing you want to do is ding necks on opening. Early comp actions were fit with extractors and the spent case was removed by hand, ejectors were rarely seen. Nowadays dual port designs and mild angle ejectors better control cycling. Stiller even produces a drop-port action where the empty falls through the bottom of the stock into a padded container. These advances decrease shot intervals and that’s important when running records (note on terminology - “records” are the five rounds that comprise the group. Running shots is done to capitalize on a consistent but narrow set of conditions). 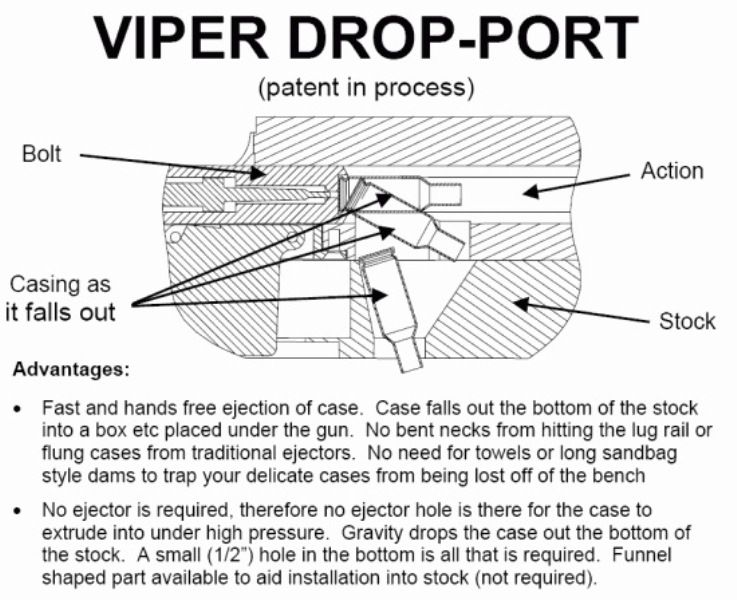 Unlike many of our gun projects I haven’t gone full-bore on this one. That’s by design. I firmly believe it pays to be methodical and deliberate when entering this sport. First acknowledge the learning curve and approach it with cautious optimism. Whether it’s the equipment, shooting style, or load development every decision point must be thought out. That’s why I’ve been careful not to proceed too hastily. Take the adjustments we made to our PPC chamber for example. We could’ve ground one with a very tight web in a matter of days. A set of dies would’ve soon followed. Only after talking with a few benchrest veterans did I become aware of the pro & cons to those specs. Armed with a more complete and practical view of that chamber we made changes. And that brings me to my next alteration. Our action will be made from chrome moly, not stainless as originally intended. I’ll answer the “why?” with one word...galling. Galling is the simultaneous combination of friction and adhesion between metal surfaces. Or put another way its adhesion wear. Stainless’ corrosion resistance comes from a passive layer of chromium oxide. This film combats rust by blocking oxygen diffusion to the steel’s exterior. It further blocks corrosion from spreading into the molecular structure. When stainless surfaces are forced together and the chromium layer is compromised the two can weld together. Upon release there’s a slipping and tearing of the core crystal matrix. This generally leaves some material stuck or even friction welded to the adjacent surface. It’s subtle but evident under magnification: 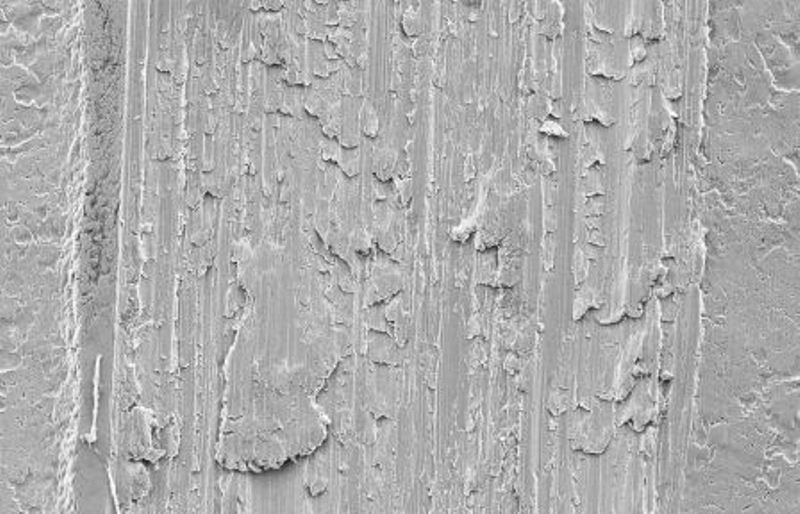 Using different grades of stainless reduces the galling effect. United Sporting Arms fit 17-4 cylinders to frames cast from 416 for that very reason. Lubricating with synthetic grease helps too. But even with these precautions it’s still a concern with stainless. All metals can gall but chrome molybdenum tends to less than other alloys (aluminum is one of the worst offenders). Therefore I’ve decided to machine the receiver from 4140 and the bolt from 4130. The upside? Chrome moly cycles smoother than SS and improves durability in three areas: 1) The bolt lugs 2) The cocking cam 3) The main threads The bolt lugs are a given, the cocking cam and main threads are often overlooked. Let’s start with the bolt. 6 PPC’s run really high pressure, often exceeding 60,000 PSI. Head thrust is significant and when applied to the sort of volume these guns see lug galling is common. The cocking cam is another point of wear. Here the galling occurs when these surfaces are dry and excessive spring pressure/tension is present in the cocking stroke. Lastly, the main threads gall due to tensile strain, case pressure and contraction, and barrel replacement. This is where stainless on stainless can bite you. I talked to two top benchrest shooters and both recommended chrome moly actions and cited barrel mating. With a competition rig you’ll swap barrels 2 or 3 times a season. Over the life of the gun that may equate to 100+ barrels. Make no mistake, tube replacement alone contributes to thread galling. So chrome moly it is and to my surprise some of the leg work was already done. My dad had a main body lathed and precision ground from 4140: 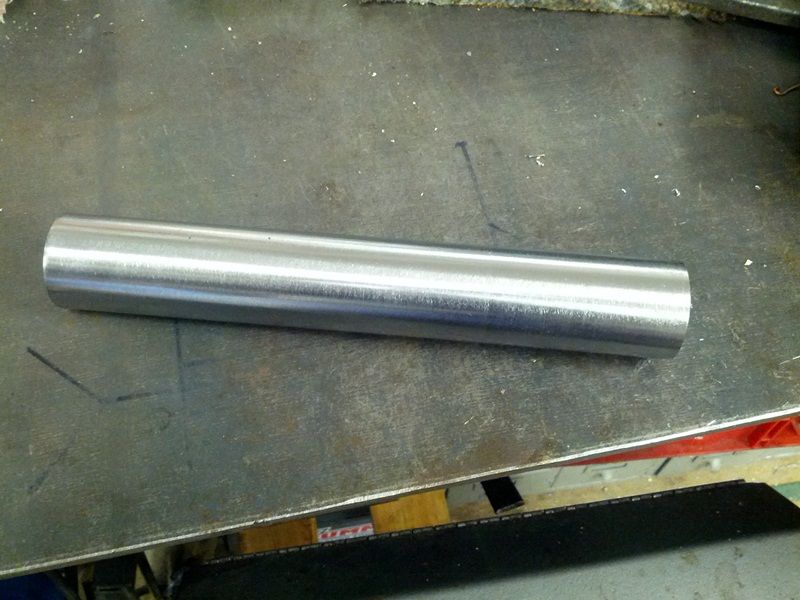 It mic’d within 0.0001” end-to-end (the result of cylindrical grinding; lathes rarely hold that close over 9 inches). I’m finishing-up another rifle now but we’ll start this receiver after Thanksgiving. Photos of each step will be posted once we begin. -Lee www.singleactions.com"Building carpal tunnel one round at a time" |
|
|
|
Post by contender on Nov 21, 2013 18:34:20 GMT -5
I'll jump on the wagon by also wanting to follow this. Keep posting Lee!
|
|
|
|
Post by Lee Martin on Nov 25, 2013 12:57:24 GMT -5
Step 7 – Starting the Action
________________________________________________________________________________________ We got a jump on the receiver this weekend. Since the blank was finish turned to 1.43” o.d. and centered we began drilling the bolt passage: The first pass was with a 23/64” drill followed by a 29/64”: 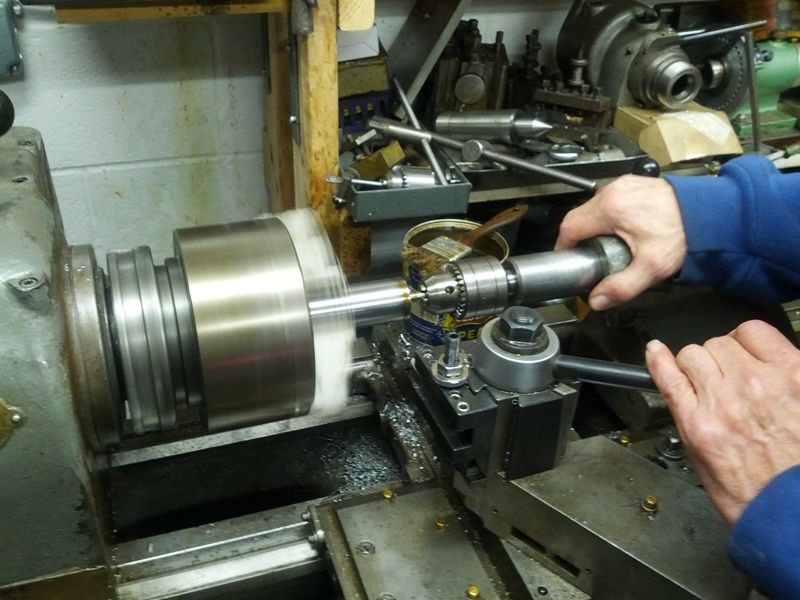 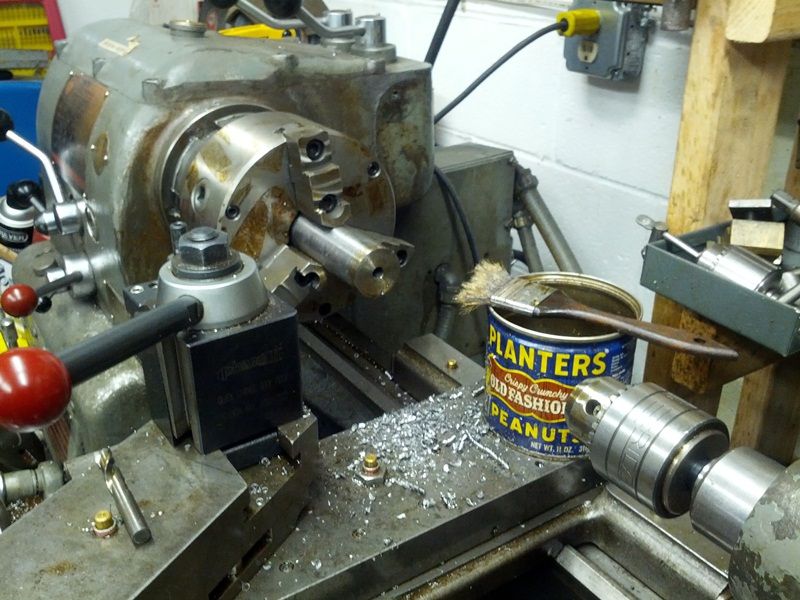 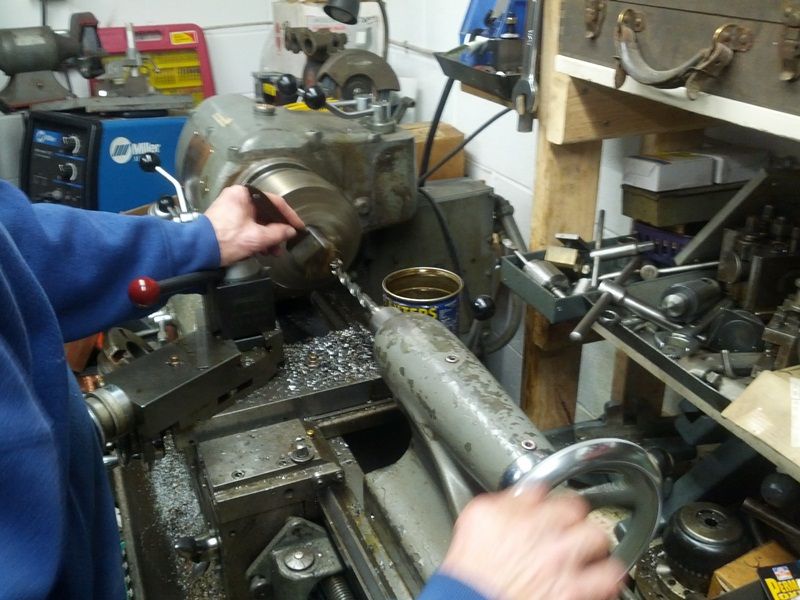 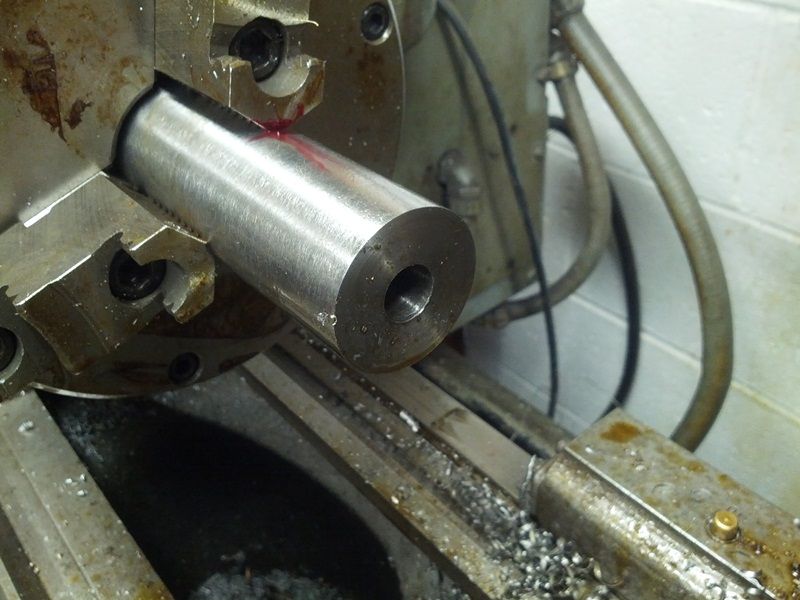 A 31/32” drill hogged out the main ring area: 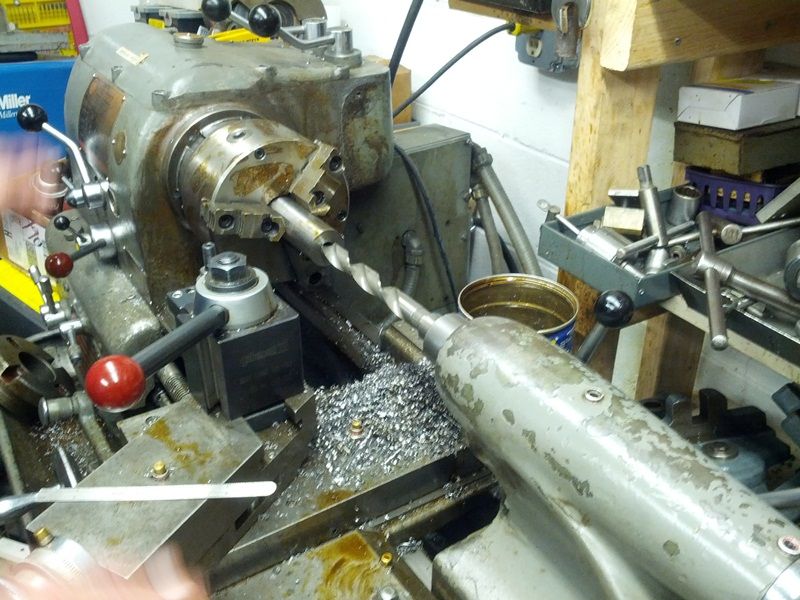 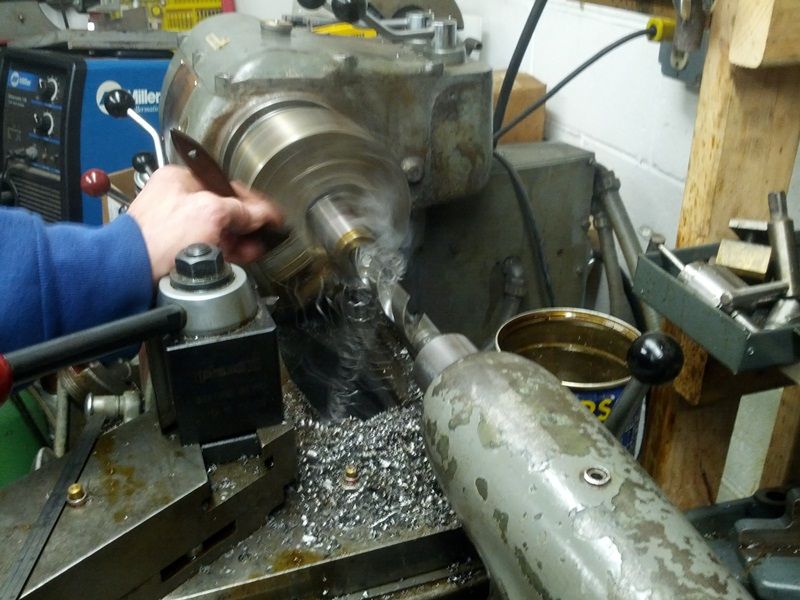 Drills are end tapered so to square the lug seats we used a boring bar. This also allows us to open the hole to a very uniform 1.0”: 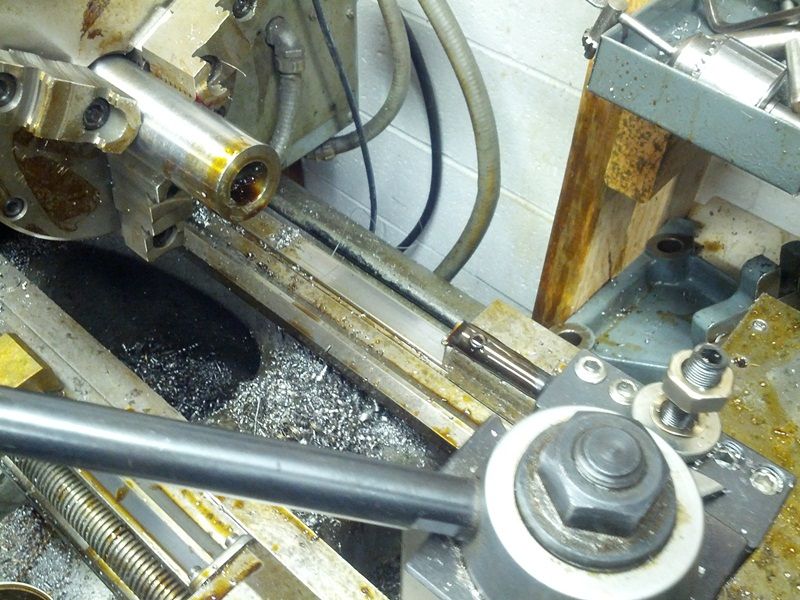 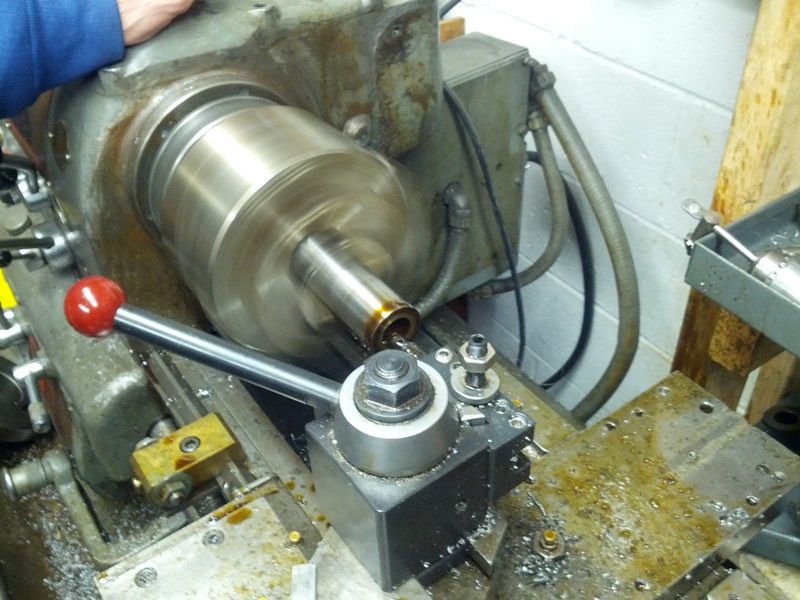 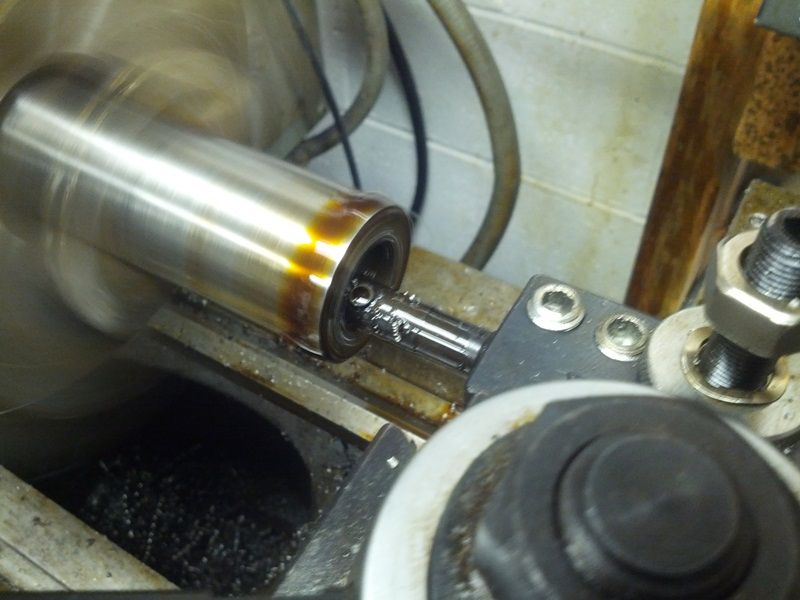 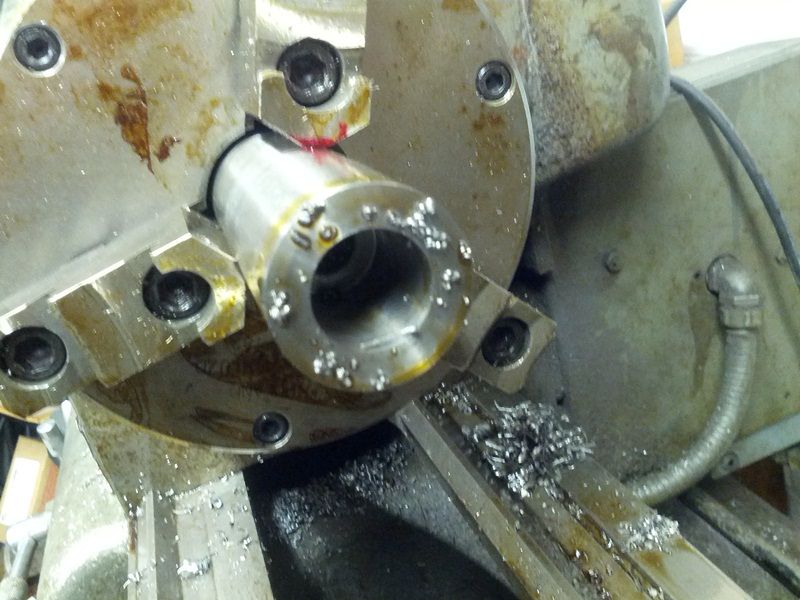 -Lee www.singleactions.com"Building carpal tunnel one round at a time" |
|
cmillard
.375 Atomic
   MOLON LABE
Posts: 1,996
|
Post by cmillard on Nov 25, 2013 13:09:40 GMT -5
love these posts!! great work in progress. keep up the good work lee.
|
|
|
|
Post by Markbo on Nov 25, 2013 13:53:07 GMT -5
Man I am going to enjoy following this one! Lee I have one quick question... why 6mm instead of 6.5? Because you are only going out to 200 yards?
|
|
|
|
Post by bradshaw on Nov 26, 2013 10:42:16 GMT -5
There is ACCURACY and then there is BENCHREST. A key to understanding benchrest is to think of all rifles and ammunition and scopes on the line as identical. Only the shooter matters. As a marksman, that is the way I look at it. And the rule applies all the way to long range work with a revolver. Confidence in one's equipment must be a given. Without that one must be lucky, and luck is a coin with two sides. Luck does not build consistency. Consistency is the product of hard work and breathing in the present.
I do not ply the benchrest game, but I respect it as much as my own crude skill allows. The wind flag may be the hair on my neck but there it is. Lee's post is to be followed by those in mind of the perfect shot.
David Bradshaw
|
|
|
|
Post by Lee Martin on Nov 26, 2013 11:25:08 GMT -5
Markbo...for short range benchrest (100 / 200 yard aggregate) the 6 PPC is king. Other cartridges have been used but to put yourself in a position to shoot zeros & ones you’ll need the PPC. And while these aren’t set in stone here’s why: 1) Volume to bore ratio is near perfect. Coupled with a short body, sharp shoulder, and 0.059” flash-hole you get efficient and consistent combustion. Or as some benchresters would say, “good chamber behavior” 2) Flat-base 6mm bullets in the 65 - 68 grain range and 13.5 – 14:1” twist are magic at 3,300 – 3,400 fps. 3) Using medium burn powders like H-322, 8208, V-133, and LT-32 you can attain wide and repeatable tune windows. Those tunes usually reside at the upper end of the pressure curve though. 4) Commercial 220 Russian brass from Lapua is match quality out of the box (it’s the preferred parent for forming PPC). Neck run-out is so minimal that some guys are now competing with no-turn. The flash-holes are absolutely spot-on and the brass life is unmatched. Buy a lot of 100 and the weights will likely fall within 1 grain (<1%). 5) Match grade 6mm bullets are plentiful. Most are formed from carbide dies using J4 jackets in either straight shank or double radius design (6 – 8 ogive). Top brands include Bart Sauter’s Ultra, Knight, Fowlers, Cheeks, BIBs, and Euber. 6.5mm has definitely taken root in the 600 – 1000 yard arena though. I doubt it’ll nose into short-range but who knows. For one the best barrels you can buy are in 22-cal and 6mm. Ask any of the top barrel makers like Hart, Shilen, Lilja, Bartlein, and Schneider and they’ll tell you the same thing...they can get close on other calibers but 22 and 6 is where their experience and R&D payoff. The other benefit to 6mm is it bucks wind better than 22 yet is mild enough for free recoil. Years ago a few tried the 25 BR in competition. Putting the tune challenges aside, bag management became trickier with the increased recoil (yes, it’s that fine a line. 10% more recoil is an issue when you’re trying to stick 5 shots in the same hole). Now I’m not saying the 6 PPC will always be on top. In the 40’s the originators of the sport started with wildcats like the 219 Donaldson Wasp, 22 Marciante Blue Streak, and the 22 Varminter (which later become the 22-250). Then in 1950 Mike Walker created the 222 Remington and that ruled for two decades. The PPC was born in 1975 and though rounds like the 6 BR and 6x47 have crept in, 95%+ shoot the Pindell-Palmisano 6. -Lee www.singleactions.com"Building carpal tunnel one round at a time" |
|


