

Post by caryc on Mar 20, 2012 11:56:54 GMT -5
This is how I do a blind grip screw. It’s meant to give you the general idea of how to do it. I’m sure other people will do it different ways but this works for me and I have never scrapped a grip yet doing it this way. The spacers that I use on the drill bit can be found in Home Depot or Lowes in the specialty hardware section with all the little drawers. Or you could get regular steel drill stop collars.
I could actually do this in my drill press before doing any shaping while the blank is still flat on the front and back side and using the drill stop on the press. The thing is that a lot of times, I take an angled cut off the back of the grip blank to save as much of the face wood as I can. So, sometimes the starting grip blanks are a half inch on one end and three eighths or a little under on the other end. Of course I could angle the drill press table to compensate for this but I’ve gotten used to working from the back of the grips and I’ve stuck with doing it that way.
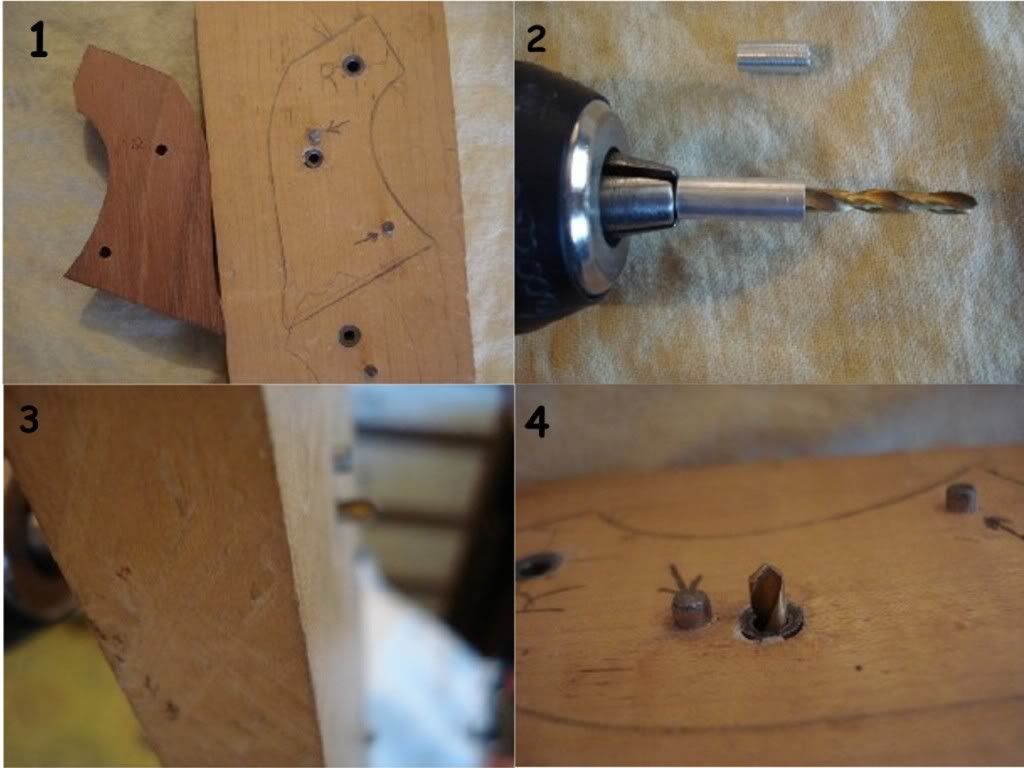
In Pic 1 you can see how I drill my grip screw and medallion holes. Drilling these holes is the last thing I do before applying finish. You can see the tooling pins in the board marked by the arrows. The grip fits over these two pins and I drill through the drill bushings in the board. The pins protrude through the other side of the board also. This allows me to do the opposite side grip.
In pic 2 you can see the 9/64 drill with an aluminum spacer on it. This drill is set to drill to a certain depth only as you can see in pics 3 and 4. I drill this hole approx. .220” deep.
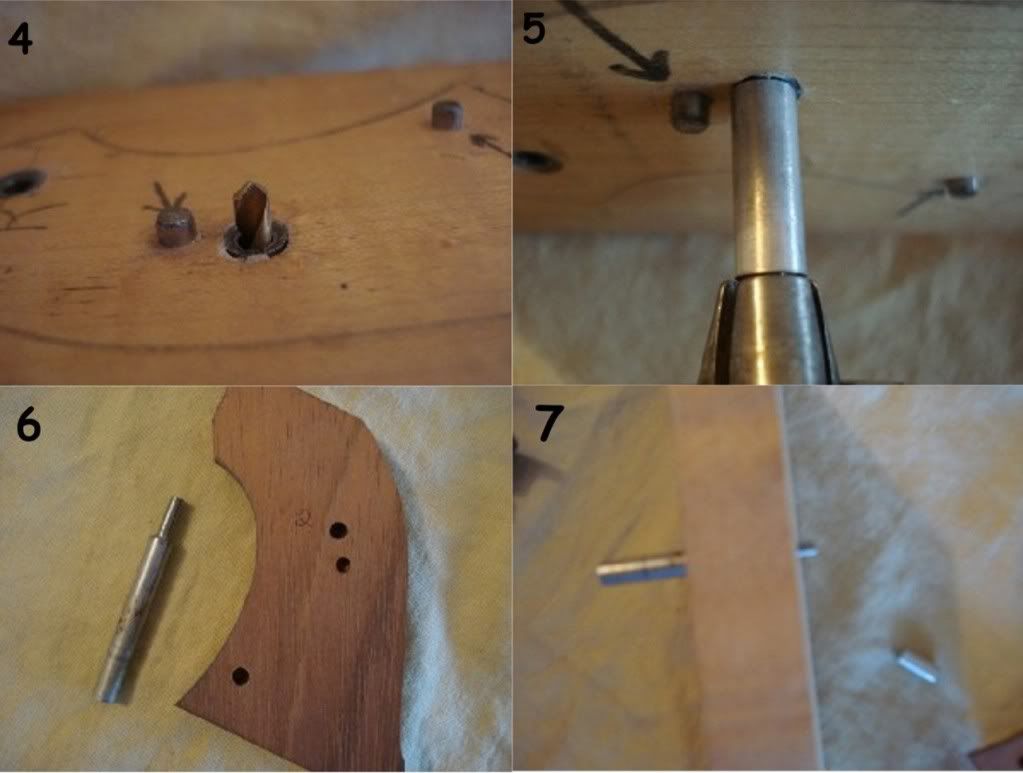
Pic 5 shows the drill with the spacer on it and drilling from the back side. In pic 6 you can see the 9/64 pilot holw in the back of the grips. You can also see a small tool that I made. This is simply a piece of quarter in drill bit turned down on one end to 9/64”.
In pic 7 you see another jig with a quarter inch drill bushing through the board. That small locating tool I made fits through that quarter inch hole with the 9/64” side sticking out.
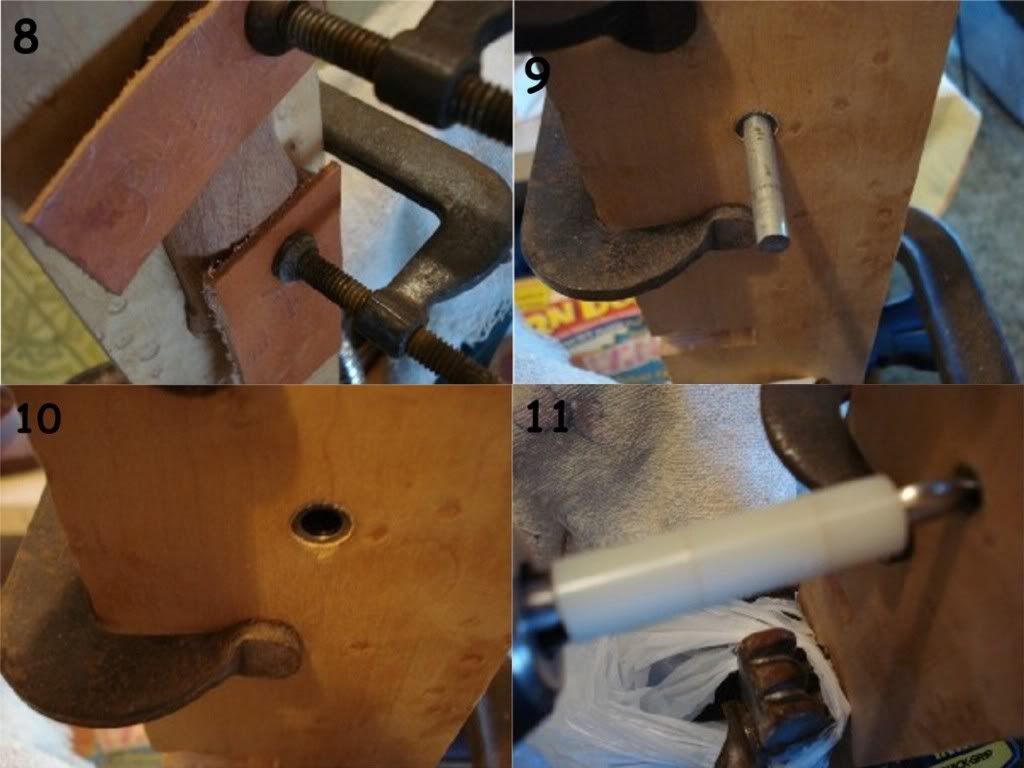
The grip with the pilot hole in it is placed over the 9/64” pin and clamped to the board as in pic 8. In pic 9 you see the tool still in the hole. In pic 10 the tool is pulled out. The 9/64” pilot hole is now centered exactly over the quarter inch drill bushing. Pic 11 shows a quarter inch drill with a spacer on it. This quarter inch drill is set to drill approx. .220” deep though the other side of the board.
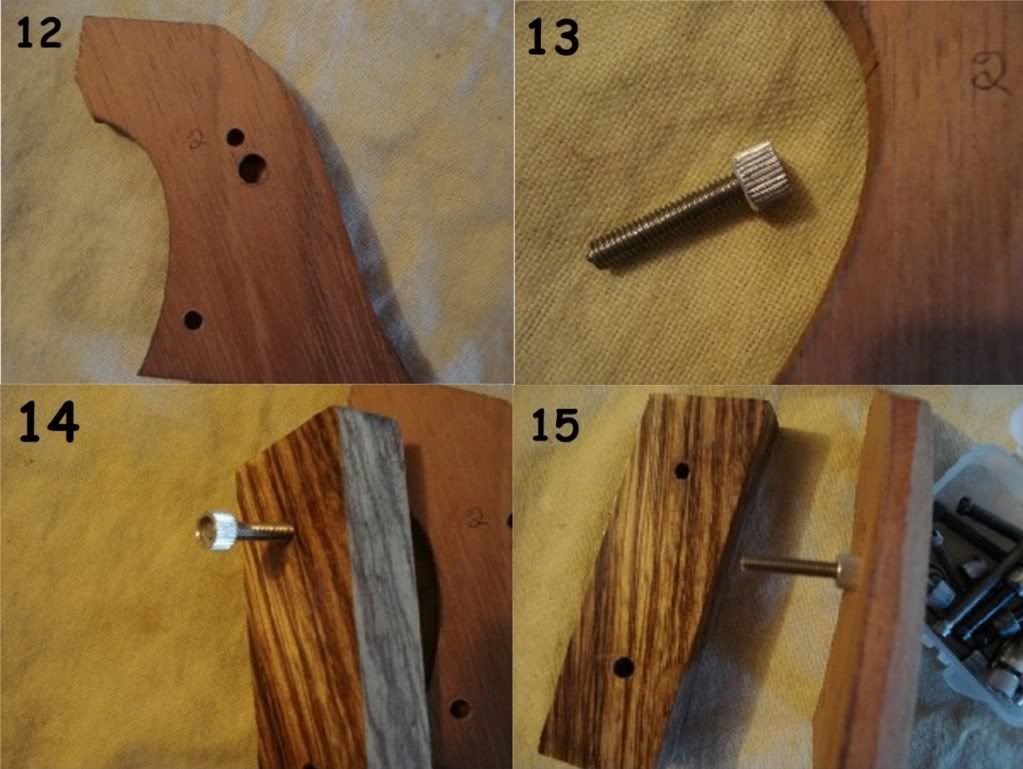
Pic 12 shows the grip with the blind quarter inch hole in it. At this point I give the Ruger ferrule a bath in alcohol, scrubbing it with a tooth brush to remove any oil prior to gluing. Pic 13 shows the ferrule with a piece of #6-40 threaded stock in it. This is just a piece cut off from one of my longer grip screw.
Pics 14 and 15 show a piece of stabilized zebra wood with a hole slightly larger than the 9/64” threaded piece. This can be any hard wood, not necessarily stabilized. This is used to press the ferrule into the hole.
I didn’t use any glue in this photo process but the glue I use is a two part epoxy. At this point, what I do is carefully coat the threads of the small piece of screw with Vaseline and insert it into what is normally the bottom or back of the ferrule taking care not to get the Vaseline onto any other part of the ferrule. I also take a tooth pick and coat the inside of the ferrule hole in the grip with glue
and the outside of the ferrule.
In pic 15 you see the ferrule with glue just finger pressed into the hole to start it.
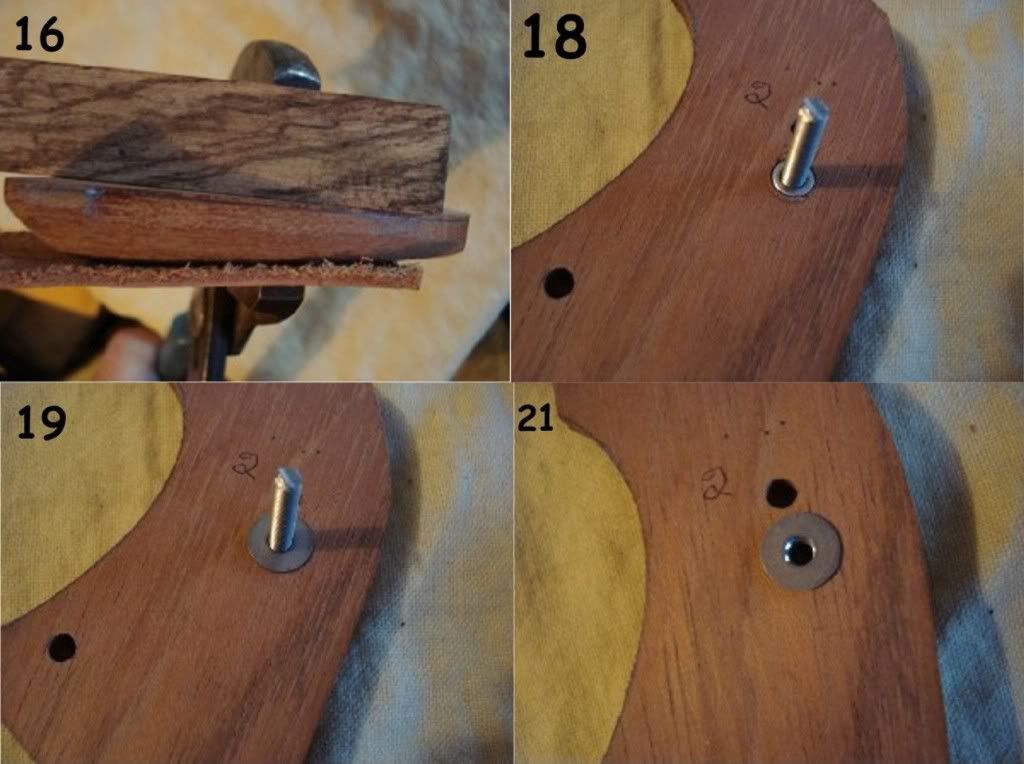
In pic 16 you can see the piece of wood over the threaded piece in the ferrule. I use a piece of leather to protect the surface of the grip and squeeze the ferrule into the grip with a pair of channel lock pliers. Pic 18 shows the ferrule pressed into the hole. This is now allowed to dry overnight. I turn the threaded piece a few times during the first hour making sure no glue has seeped into the threads. Using the Vaseline, I have never had a problem with that. In pic 19 you can see a stainless washer. This is .015” X .380 in diameter. This is sanded on one side to rough it up and cleaned in alcohol. I then apply more epoxy around the ferrule and place the washer over the ferrule just for added protection against the ferrule pulling out. When I first glued a ferrule in like this, I placed a pair of vice grips over the threaded piece and tried to knock the ferrule out. It passed the test all right but I just add the washer as an added protection. I hope this gives you the general idea of how it's done. You can probably figure out your own ways to get there considering what you have to use.
I could actually do this in my drill press before doing any shaping while the blank is still flat on the front and back side and using the drill stop on the press. The thing is that a lot of times, I take an angled cut off the back of the grip blank to save as much of the face wood as I can. So, sometimes the starting grip blanks are a half inch on one end and three eighths or a little under on the other end. Of course I could angle the drill press table to compensate for this but I’ve gotten used to working from the back of the grips and I’ve stuck with doing it that way.
In Pic 1 you can see how I drill my grip screw and medallion holes. Drilling these holes is the last thing I do before applying finish. You can see the tooling pins in the board marked by the arrows. The grip fits over these two pins and I drill through the drill bushings in the board. The pins protrude through the other side of the board also. This allows me to do the opposite side grip.
In pic 2 you can see the 9/64 drill with an aluminum spacer on it. This drill is set to drill to a certain depth only as you can see in pics 3 and 4. I drill this hole approx. .220” deep.
Pic 5 shows the drill with the spacer on it and drilling from the back side. In pic 6 you can see the 9/64 pilot holw in the back of the grips. You can also see a small tool that I made. This is simply a piece of quarter in drill bit turned down on one end to 9/64”.
In pic 7 you see another jig with a quarter inch drill bushing through the board. That small locating tool I made fits through that quarter inch hole with the 9/64” side sticking out.
The grip with the pilot hole in it is placed over the 9/64” pin and clamped to the board as in pic 8. In pic 9 you see the tool still in the hole. In pic 10 the tool is pulled out. The 9/64” pilot hole is now centered exactly over the quarter inch drill bushing. Pic 11 shows a quarter inch drill with a spacer on it. This quarter inch drill is set to drill approx. .220” deep though the other side of the board.
Pic 12 shows the grip with the blind quarter inch hole in it. At this point I give the Ruger ferrule a bath in alcohol, scrubbing it with a tooth brush to remove any oil prior to gluing. Pic 13 shows the ferrule with a piece of #6-40 threaded stock in it. This is just a piece cut off from one of my longer grip screw.
Pics 14 and 15 show a piece of stabilized zebra wood with a hole slightly larger than the 9/64” threaded piece. This can be any hard wood, not necessarily stabilized. This is used to press the ferrule into the hole.
I didn’t use any glue in this photo process but the glue I use is a two part epoxy. At this point, what I do is carefully coat the threads of the small piece of screw with Vaseline and insert it into what is normally the bottom or back of the ferrule taking care not to get the Vaseline onto any other part of the ferrule. I also take a tooth pick and coat the inside of the ferrule hole in the grip with glue
and the outside of the ferrule.
In pic 15 you see the ferrule with glue just finger pressed into the hole to start it.
In pic 16 you can see the piece of wood over the threaded piece in the ferrule. I use a piece of leather to protect the surface of the grip and squeeze the ferrule into the grip with a pair of channel lock pliers. Pic 18 shows the ferrule pressed into the hole. This is now allowed to dry overnight. I turn the threaded piece a few times during the first hour making sure no glue has seeped into the threads. Using the Vaseline, I have never had a problem with that. In pic 19 you can see a stainless washer. This is .015” X .380 in diameter. This is sanded on one side to rough it up and cleaned in alcohol. I then apply more epoxy around the ferrule and place the washer over the ferrule just for added protection against the ferrule pulling out. When I first glued a ferrule in like this, I placed a pair of vice grips over the threaded piece and tried to knock the ferrule out. It passed the test all right but I just add the washer as an added protection. I hope this gives you the general idea of how it's done. You can probably figure out your own ways to get there considering what you have to use.


