|
|
Post by newrugersafan on Mar 6, 2011 22:09:20 GMT -5
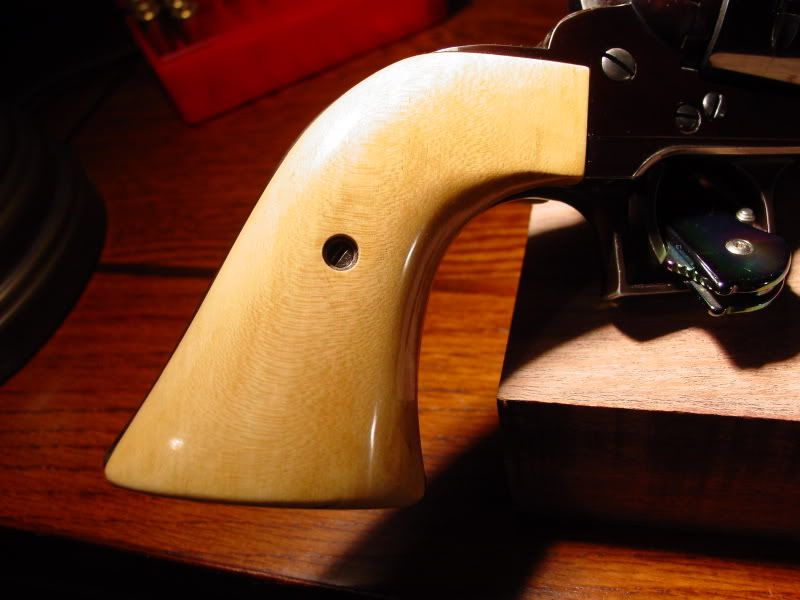
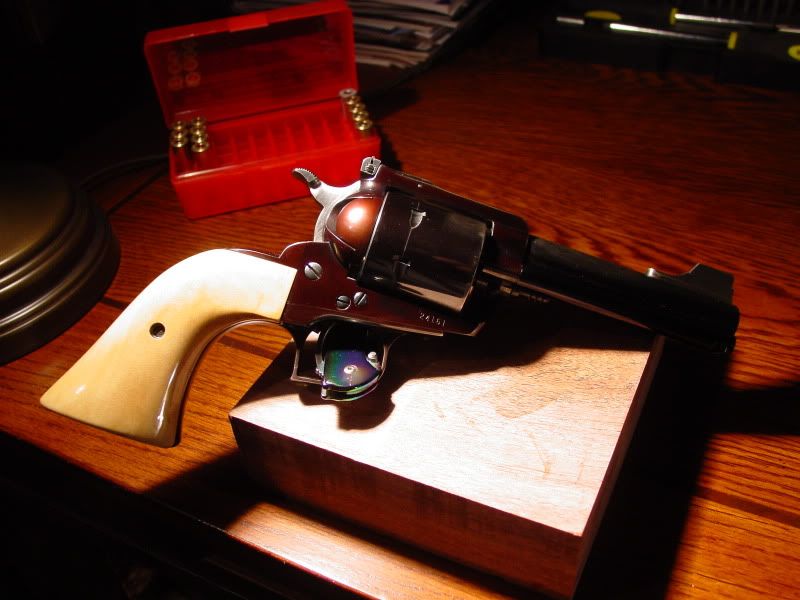
I'm starting to enjoy this grip making stuff ;D  ;D. This gun really needed a new set of grips the Ruger provided ones were poorly fitted and it would bite me on occasion.   I'm going to shoot this as is for a while and make sure they don't have any spots that need attention. If every thing goes well I will add a few more coats of Tru Oil and install the Black Eagles. This wood was a more cream colored with a lot of grain probably not # 1 stuff but it suits the gun well. Mike |
|
|
|
Post by zac0419 on Mar 6, 2011 23:44:14 GMT -5
Really really nice. I love the look of holly on blued guns. Nice pictures too.
|
|
shadow
.30 Stingray

Posts: 135
|
Post by shadow on Mar 7, 2011 0:00:24 GMT -5
Mike ...... nice lookin' grips. I actually like the cream colored Holly, it gives the appearance of aged Ivory. Very nice job!
Shadow
|
|
Len
.30 Stingray

Posts: 358
|
Post by Len on Mar 7, 2011 8:59:28 GMT -5
Mike great looking gun and grips. I have a 1967 vintage Super coming in thinking of modifying it shorter barrel sight grips etc. What has been done to yours and how does it balance with the shorter barrel. Would you do anything different?
|
|
|
|
Post by Mountaineer on Mar 7, 2011 10:50:31 GMT -5
Wonderful work, Mike! You've inspired me to take on a project of my own later this summer (I hope).
So 'splain something to me: how do you install the grip screw escutcheons? Specifically what type/size drill bit do you use, and how do you anchor the escutcheons, etc?
I think Cary C. or someone may have gone into this once in the past, but I wasn't paying close attention...
|
|
caryc
.375 Atomic
  
Posts: 1,055
|
Post by caryc on Mar 7, 2011 18:42:37 GMT -5
Wonderful work, Mike! You've inspired me to take on a project of my own later this summer (I hope). So 'splain something to me: how do you install the grip screw escutcheons? Specifically what type/size drill bit do you use, and how do you anchor the escutcheons, etc? I think Cary C. or someone may have gone into this once in the past, but I wasn't paying close attention... Let me first say that I agree with the others. He did a very good job on the grips. Now as to the escutcheons or ferrules, they don't need to be anchored in the holes. They are a press fit in a regular 1/4" hole. Below you'll see a pic of the counterbores that I use. The smaller quarter inch one is for the ferrule holes and the larger one is for medallions. For the ferrules, I drill a 9/64" hole first, the use the counterbore with the 9/64" pilot in it to drill the 1/4" hole using the stop on the drill press for depth. There is a step drill that Brownells sells that is supposed to drill the screw and ferrule hole at the same time. But I heard people say they had problems with it because of a shoulder that only let's you go so deep. I have never used one myself preferring the counterbores. Or you could do it the hard way like I did it on my first set of grips. Clamping stops on the drill press table to locate the hole, I drilled the small hole then changed to the 1/4 bit and just drilled the larger hole on top of it. Or do the same thing with a hand drill motor if your steady enough. Just don't ruin a set of grips that you took a lot of time to make. The best advice I can give any one making a first set of grips is take your time. Hurrying to get it done will have you end up with firewood and a beer in your hand with no plans to try that again. ;D  |
|
|
|
Post by newrugersafan on Mar 7, 2011 20:08:05 GMT -5
Thanks everyone,
Len,
It's been cut down to 4 3/4" and has a Stroh screw on front sight with replaceable blades they have an allen screw in the front to remove the blade. It is more handy in the shorter length barrel and does feel good in the hand. I have not had it long and the work was done by a previous owner. I have been wanting a short barrel Super for some time, I was going to get a shooter grade gun and have it cut down so it worked out well. If I had had it done I think I would have cut it to 5 1/2" to help balance out the steel grip frame. This one has an aluminum ejector housing that I may change to steel to add a little more weight to the front.
Mountaineer,
Cary has good advice, I don't have the step bits or the pilot bits ( although I'd like a set ). I have been useing a Forstner bit in 1/4" for the ferrules. I drill the 1/4" hole first then finish with an 1/8" bit, the Forsner bit leaves an indentation in the center which allows me to center an 1/8" bit to complete the hole. I have a drill press but I have been useing a hand drill for the ferrules. I use the drill press with a 1/2" Forstner bit for the medallions same process, drill the large hole first and finish with a smaller bit for the shank on the medallion. I also need to get a 9/64" bit as the 1/8" is a tad small, I just ream it a bit.
I'm just doing it for fun so I can go slow and easy. I will say that the Forstner bits do a great job and leave a very clean edge.
I have to come up with a thickness that feels good in the hand and dimension the blank to the minimum thickness needed. I had these about done when I decided they were to large in the middle. I got a rasp out and removed more material from the front and back edges and through the middle of the grips an 1/8" makes a big difference in the feel, I think I going to keep the top at just past the grip frame and the bottom at 1/2" and put an even taper from top to bottom. I removed most of the material with a 12" disk on my sanding center, if I do many more I'm going to get a random orbital drum sander. The disk sander takes off wood (and skin ) very quickly !!! I'd like to get the process down so the hand work is minimal, with final shapeing and sanding by hand.
I do enjoy the process and it's fun to see the grip take shape, thanks for the encouragement.
Mike
|
|
steve
.375 Atomic
  
Posts: 1,547
Member is Online
|
Post by steve on Mar 7, 2011 23:52:25 GMT -5
Beautiful job............I can't believe nobodys meationed that pretty plum color!!!!
|
|
Len
.30 Stingray

Posts: 358
|
Post by Len on Mar 8, 2011 9:50:10 GMT -5
Thanks Mike
I am thinking CLC spaulted maple grips, 5.5" barrel Weigand or Stroh front sight, Bowen rear sight, Horvath action job, possibly a Belt mtn cylinder pin.
Oh the anticipation!
|
|
caryc
.375 Atomic
  
Posts: 1,055
|
Post by caryc on Mar 8, 2011 12:16:05 GMT -5
I removed most of the material with a 12" disk on my sanding center, if I do many more I'm going to get a random orbital drum sander. The disk sander takes off wood (and skin ) very quickly !!! I'd like to get the process down so the hand work is minimal, with final shapeing and sanding by hand. I do enjoy the process and it's fun to see the grip take shape, thanks for the encouragement. Mike It sounds like what you want is an oscillating spindle sander. It's the real work horse in my shop. I can make a pair of grips starting from flat wood in about 2 1/2 hours now. This is what I use.  |
|
|
|
Post by pvtschultz on Mar 8, 2011 13:40:33 GMT -5
Very nice looking grips if I do say so myself! I wish that I had Cary's talent with a spindle sander! I decided to go another route with my adventures and automated the first few steps of grip carving. I don't have this one exactly, but it is similar.  |
|
|
|
Post by s0therngunner on Mar 8, 2011 21:39:22 GMT -5
|
|