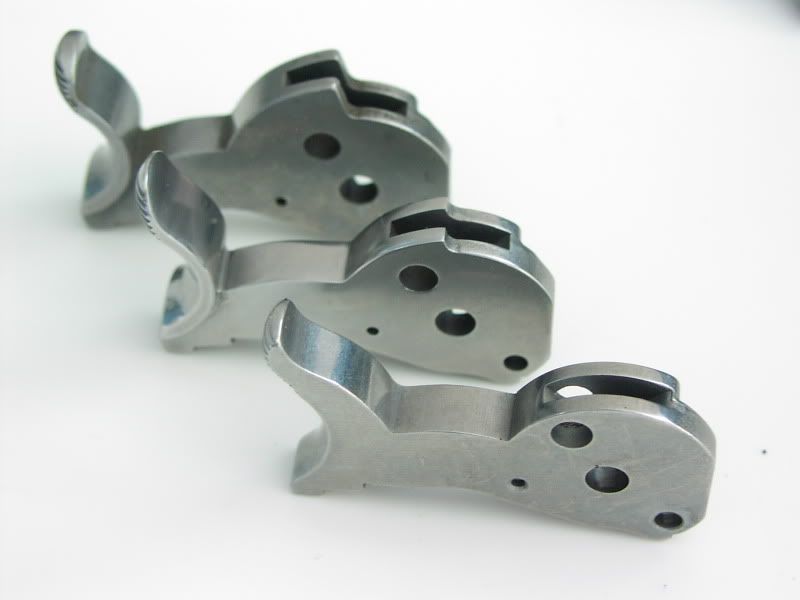
Can anyone point me at a Bisley hammer/trigger kit for a ruger flattop? I've found several, but can't tell if they are for the smaller frames.
flyfisher,
As others have said, yes they work fine in the flat top mid-frame or large frame, no worries. The only Bisley hammer that won't work is the single six small frame but you won't see many of those anymore; no longer made for some time now.
I've done several Bisley hammer/trigger installations in the standard grip frame. And in fact have several sets ordered and on their way. Will sell u a set at my cost plus shipping if interested.
As mentioned already, a simple hammer modification is required and the trigger can be shortened in front or the grip frame trigger slot lengthened 1/8".
New Model .22 Single Six with Bisley trigger (lengthened trigger slot), Bisley hammer with modified spur,

________________________________________
#1. REPLACING JUST HAMMER and/or PAWL:
Recognize, you do not need to hassle with the PESKY LOADING GATE SPRING, pull the trigger pin, trigger OR transfer bar JUST to remove the hammer and pawl. Once you remove the grip frame, the hammer pin is the only other part you need to remove. Then just pull the hammer back and all the way down, then depress the hammer plunger in the base of the hammer with a small tipped screwdriver to clear the trigger extension where the transfer bar connects to it. Let the hammer & pawl fall out. Install in reverse! Piece o’ cake.
NOTE: While you have the grip frame off, it's always good to examine the upper end of all the grip frame blind screw holes for thread shavings that weren't cleaned out from the factory and get crammed in there by the screws.
Also check the two trigger guard screw holes where they are exposed by the milling cut if your grip frame has the two projections that go into the main frame. Almost always there will be a huge flat 'roll-over’ burr in each hole from the milling cuts that expose the holes. If they are present they generally cause the 1st 1/8" of removing those two screws to take extra effort to unscrew. You'll need to break off the burrs and pick them out with a dental pick or equivalent tool.
The newer guns no longer have these projections and milling cuts, but both early and late frames can have rollover burrs in those two screw holes from drilling the hammer pin hole.
#2. AFTER CHANGING hammers in New Model Rugers, the first thing to check is the transfer bar clearance with hammer for reliable firing pin function.
TO TEST:
With hammer fully cocked, press on the transfer bar to extend the firing pin and observe how far thru the recoil shield it protrudes. Now drop the hammer, keep the trigger pulled back and observe the firing pin again. If it doesn't protrude the same amount, you need to remove just enough metal from the hammer nose so the transfer bar is pushed tight against the firing pin and hammer channel. If you remove too much, the transfer bar will not perform its safety function. If firing pin protrudes the same amount, the problem is too weak of a spring. Also make sure hammer has no friction or contact with grip frame ears around its base to slow its fall; another potential issue when making hammer changes.
At the range, double check the safety function by loading a live round under the hammer, point down range, cock the hammer, hold with thumb, release the trigger to uncock the hammer, take finger off trigger and release your thumb so the hammer falls. The round will not fire if safety transfer bar is functioning correctly.
#3. MODIFYING BISLEY HAMMER FOR STANDARD OR BIRDSHEAD GRIP FRAME:
Before you trace your old hammer, make sure it fits flush with the grip frame ‘ears’.
Use the hammer pivot pin to hold the original and new hammers together and scribe both sides, then grind, file, sand and re-blue the portion you filed away (if blued).
I "hog out" most of the metal with an 1/8" x 1" Dremel course stone; hammer in a vise. Then true up the course grinding by 'draw filing' with a small double cut triangular file and then square up the corner. Finish with 400 grit paper wrapped around a 1/4" x 1/2" alum sanding block with flat surfaces, and re-blue with Brownells OxPho blue. That will match the factory finish which is left a bit course. For a higher polish, follow up with 800 grit and 1000 grit. Polish with a Dremel flannel wheel using white rouge made for polishing stainless steel. Then blue.
Notice that mine has part of the flare on the hammer spur removed as well to look more like a Super Blackhawk hammer.
I usually take about 1/16" off the back of the hammer shank below the spur because they stick out from the frame recoil shield too far for my taste, but don't go too far or the hammer plunger/spring hole will be exposed. You'll notice the newest production hammers have narrower shanks.
#3. Replacing the grip frame:
Install all five screws but do not cinch them tight. Align the grip frame edges flush with the cyl frame by tapping with the butt of a plastic handled screw driver. Tighten one trigger guard screw, then front screw and then one ear screw. Then tighten them all.


Stock Bisley hammer in rear, modified Bisley center and standard hammer in front (G2’s photo):

Jim