gregs
.30 Stingray

Posts: 457 
|
Post by gregs on Apr 27, 2020 7:51:40 GMT -5
Well, I just finished my second set of grips. Being as I've got probably 40 hours if not more of hard knocks experiance in two sets grips I figured I'd ask the gallery of fellow affectionadose here before I dive off the deep end. The first set started off as a block of old (read harder than a piece of R60 D2 Tool Steel) that I got almost to a finishing point for a FA Model 83 when I broke through the grip locating pin hole. Hmmm. The second set I finished the other day on a scrap of walnut er for my Ruger NMBH Bisley which has kinda been a test bed for the past few years. As I get ready to revisit the FA Model 83 in 475LB again, I have a nice piece of Turkish walnut picked out to replace the comfortable but ugly as si Pachmeyer grips. My question is, should I prep the wood and send it.out for stabilization due to the recoil or is walnut strong enough to handle the abuse? I'd hate to waste my time and the wood for something that won't handle it's intended use. Greg imgur.com/gallery/vqb2swQi.imgur.com/97TTrXi.jpg |
|
|
|
Post by potatojudge on Apr 27, 2020 8:07:25 GMT -5
I don't think they need to be stabilized unless there's defects in the grain. If the wood is solid start cutting.
Did your grip escutcheon break through the old grips as you tightened the screw?
|
|
|
|
Post by contender on Apr 27, 2020 9:26:26 GMT -5
I TINKER with making grips occasionally.
I started with a soft wood, (cedar) then switched to some plain walnut,, and asked questions of other grip makers. I did all this as I was learning, before tackling my American Holly.
As noted,, most often, stabilizing is mainly for wood that may have "defects" which give it a unique & often beautiful look when finished. (Think spalting here.)
And as for breakage,, the usually weak areas are the grip screw,, easily fixed by adding an internal spacer, or the corners at the edge of the butt. Allow a little extra time & effort in these areas & all will be fine.
|
|
gregs
.30 Stingray
Posts: 457
|
Post by gregs on Apr 27, 2020 11:07:34 GMT -5
Yes, the original factory Bisley grip escutcheon pulled through the back. On closed examination, the cast grip mounting surfaces were very uneven and got a draw file 'decking' confirmed with a straight edge. For future decking operations, I'll make a holding fixture to make it a more accurate and less tedious on a friend's mill. Again, I didn't think it it would be to difficult until I had to remove alot of material the top of the grip frame in the area between the front and rear straps.
Contender, in refrence to the spacer, I placed my screw hole pretty close to mainspring/stirrup. I don't think I'll need one for these as there in still alotta forest left but if I did, it would have to go on the back half of the screw hole only otherwise it interfere with the mainspring. Is this where spacers are normally placed?
If faced with having to deck a grip frame again without a mill and fixture, I opt for the field expiediant method of bedding with Accraglass or Marine Text as I did with some Hogue's on a S6.
|
|
|
|
Post by contender on Apr 28, 2020 8:06:15 GMT -5
The pulling through of the grip escutcheon, on either side is not uncommon. That's why all my Rugers get spacers when I get them,, to PREVENT this from happening. Nylon spacers are a cheap addition to these guns. And I often find that the space they fill is a wee bit smaller than the spacer. So I take the 1/2" SPACERS,, GENTLY hone about .003 to .005 off the spacer and the grips fit snugly. The grip screw hole location on the factory guns easily allows all this w/o interference with the mainspring. I use a factory set of grips during lay-out to locate the screw hole,, and then I move it a wee bit away from the mainspring, "just in case"! Never had any issues doing it that way. Remember,, you are making the grips,, and you can locate the grip screw hole where it needs to be.
And to me,, a plus is the spacers add a small amount of support to the overall grip installation.
Did I ever tell y'all about the factory stags that someone had over tightened & caused a grip screw pull through? Someone repaired it using epoxy & a quarter on the inside,,, ! Looks like hell when you look at them. If I didn't,, I can post a picture,,,!
|
|
|
|
Post by cas on Apr 28, 2020 13:09:13 GMT -5
I'd like to make grips. But I don't like making grips.  I've made 1 1/2 sets of grips, and reshaped and re-contoured a few, and found it a bit nerve racking. (the re-countouring more so because they were expensive or irreplaceable grips) |
|
|
|
Post by 41freak on Apr 28, 2020 15:02:38 GMT -5
When making your own grips how thick are you starting with on the slabs?
|
|
|
|
Post by contender on Apr 28, 2020 21:38:37 GMT -5
I generally prefer 5/8" thick slabs to start,, but have used a few with only 7/16" thick. Having more wood to mess with allows for more fitting.
|
|
gregs
.30 Stingray
Posts: 457
|
Post by gregs on Apr 29, 2020 0:10:46 GMT -5
About 5/8-3/4" each blank.
|
|
|
|
Post by Big Bore on Apr 29, 2020 6:19:34 GMT -5
I start with 3/8" most of the time. I've only made about 10 sets of grips so far and I completely understand why professionals charge what they do. For me... Making a functional set of grips that fit good and look decent...no problem. Making a functional set of grips that fit great and look great...moderate problem. Making a perfect set of grips all around...impossible. I do enjoy making them though. That and holsters. My most recent set.  |
|
|
|
Post by contender on Apr 29, 2020 7:32:11 GMT -5
"Making a perfect set of grips all around...impossible."
For you & I,,, this may be true. But Cary Chapman seemed to manage it quite well. I ALWAYS appreciated his patience in answering my questions on how to make grips.
|
|
|
|
Post by 41freak on Apr 30, 2020 18:41:40 GMT -5
So if I split the difference of 5/8" and 7/16" I should be good @ 1/2" I have a spare grip frame and I think I will try and make a set. Thanks
|
|
caryc
.375 Atomic
Posts: 1,039
|
Post by caryc on May 4, 2020 9:04:55 GMT -5
"Making a perfect set of grips all around...impossible." For you & I,,, this may be true. But Cary Chapman seemed to manage it quite well. I ALWAYS appreciated his patience in answering my questions on how to make grips. Thanks for the kind words Contender. I haven't posted this for a while so I'll post it again here for anybody that hasn't seen it before. At this link is a step by step process on how I make a set of rams horn grips. It's also the way I make a set of wood grips. www.clccustomgrips.com/RamBuild.htmlDeciding that I wanted an easy way to make grips and having worked in a few aircraft job shops, I decided that tooling holes and jigs was the way to go. So, the first thing I did was make a template of 1/4" lexan that fit on the grip frame. The top of the templates were fit precisely to the grip frame but the rest of the outer perimiter was maybe 1/32" over for hand fitting the grips to a grip frame. I used the location of the grip location pin hole as one of the tooling holes and placed the other tooling hole where you see it on the template. No real precision on placing that hole just put it in a meaty part of the grip. Those two tooling holes insured that every step that I did always turned out correctly. Then I created the wooden drill jigs from the lexan template. The drill templates have hardened steel drill bushings in them. Those tooling holes also allowed the grip blank to be put on to other jigs for sanding various parts of the grips. Once I got all the tooling done, I could make a set of grips in about three hours time. Of course that time didn't include the finish on wood grips or polishing on horn grips. The picture you see below is a little jig I made for sawing the blanks into a taper as you see. I did this so when I found a good set of blanks with beautiful grain, I sawed the excess material off the backs of the grips so I wouldn't lose all the good grain off the front when shaping the grips. This whole process made making a set of grips pretty easy.  |
|
caryc
.375 Atomic
Posts: 1,039
|
Post by caryc on May 4, 2020 11:10:28 GMT -5
Well, I just finished my second set of grips. Being as I've got probably 40 hours if not more of hard knocks experiance in two sets grips I figured I'd ask the gallery of fellow affectionadose here before I dive off the deep end. The first set started off as a block of old (read harder than a piece of R60 D2 Tool Steel) that I got almost to a finishing point for a FA Model 83 when I broke through the grip locating pin hole. Hmmm. The second set I finished the other day on a scrap of walnut er for my Ruger NMBH Bisley which has kinda been a test bed for the past few years. As I get ready to revisit the FA Model 83 in 475LB again, I have a nice piece of Turkish walnut picked out to replace the comfortable but ugly as si Pachmeyer grips. My question is, should I prep the wood and send it.out for stabilization due to the recoil or is walnut strong enough to handle the abuse? I'd hate to waste my time and the wood for something that won't handle it's intended use. Greg imgur.com/gallery/vqb2swQi.imgur.com/97TTrXi.jpgIt just dawned on me that I didn't answer your actual question. The only wood I ever stabilized was the spalted maple and that's because in it's original form it is much too soft for gun grips. Spalting is actually the wood rotting. For stabilizing you must stabilize the wood blanks before you make the grips. I always made my spalted wood blanks at least 5/8" thick. That is because stabilizing may warp the blanks so after stabilizing you need to sand one side back flat before starting to make grips from it. You won't have any problems with the grip hole busting through as long as the grips fit on the grip frame with no forcing of any kind. In other words don't try to get a set of grips to fit flat on a grip frame by over tightening the grip screw. Always make sure the grips fit properly first and use a grip screw spacer. I'm pretty sure I was the first grip maker that included grip spacers with each set of his grips. I would not make a set of Bisley grips unless the customer sent me his grip frame for fitting. The reason for that was that all Ruger's bisley grip frames were notorious for having a high spot on the frame. You can see it in the picture. Moving that piece of tool steel up on the frame it would always catch on the high spot that you can see in the pic that I have already ground down. On the stainless bisley frames there was no problem but on the blued bisley frames, I would just touch up the spot with a little cold blue. That spot was not seen when the grips were on the gun anyway. I loved it when Hamilton Bowen sent me a grip frame for fitting grips for one of his customers because he decked most of the frames and did a beautiful job of it. No problem fitting grips then. 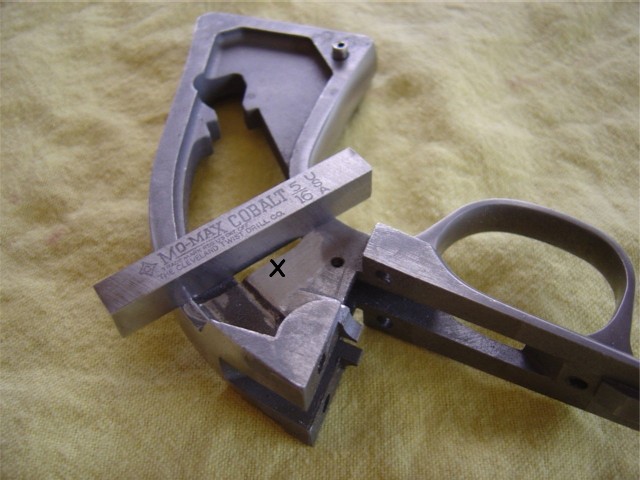 |
|
|
|
Post by contender on May 4, 2020 20:18:59 GMT -5
As always,, EXCELLENT info Cary! Pay attention folks,, a master has shared with us!
|
|


