|
|
Post by Lee Martin on Jul 27, 2015 19:14:53 GMT -5
Trunnion rest, revolver contacts cylindrical rest----in this case rolled industrial nylon belting----at barrel and frame. Depending on rest material, trigger guard also may contact rest. Grasp of grip is same for single action and double action fire, with one exception. One hand: thumb rests on middle finger. with two hand hold----thumb-on-thumb----it doesn't matter which thumb is on top. Distal joint of trigger finger on trigger. If you shoot better with the tip of your finger on the trigger, or the center of the pad, go for it. Try 'em all and believe the target 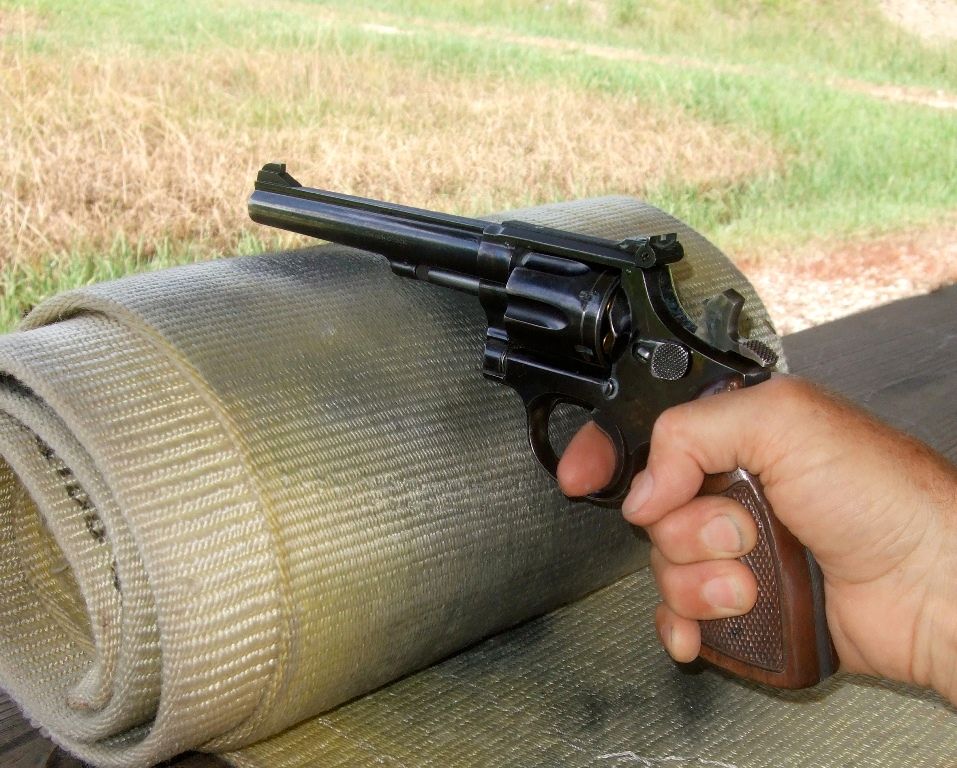 Two hand hold, thumb on thumb. Although it may not appear so, frame contacts rest, along with barrel. Note finger is well onto trigger. 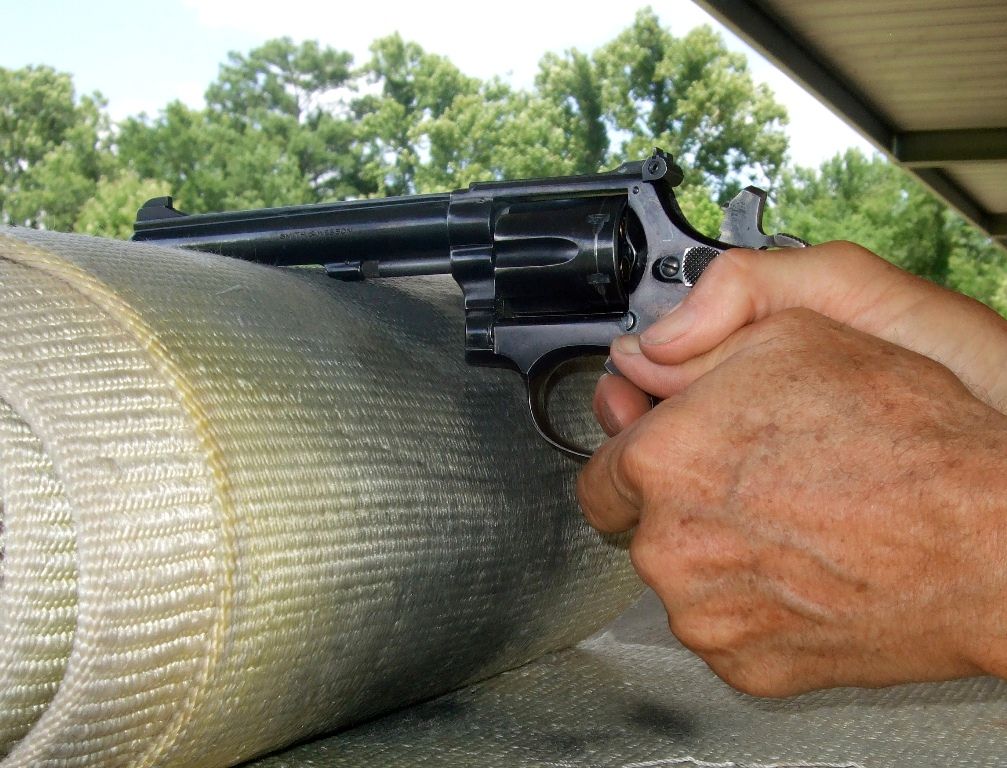 Actual trigger contact lands on pad of finger with joint at edge of trigger. 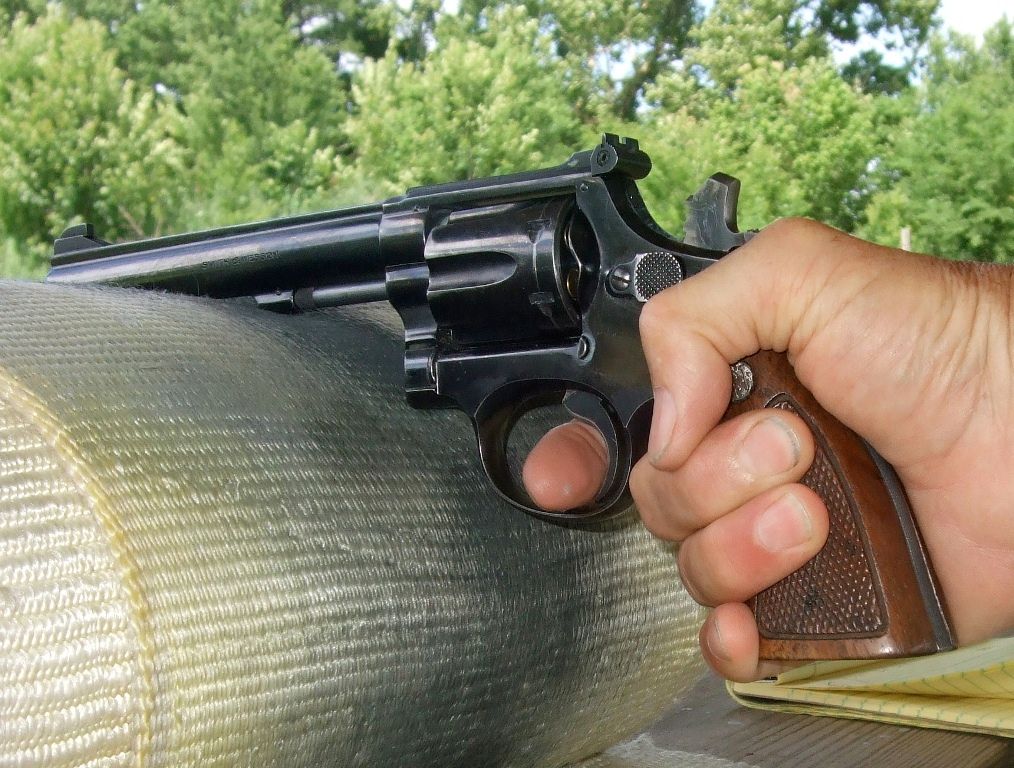 K-22 at board on 15 yard target. Trunnion rest. 5-shots in 0.6-inches; bottom hole is a double. CCI Mini mag copper plated 40 grain round nose. 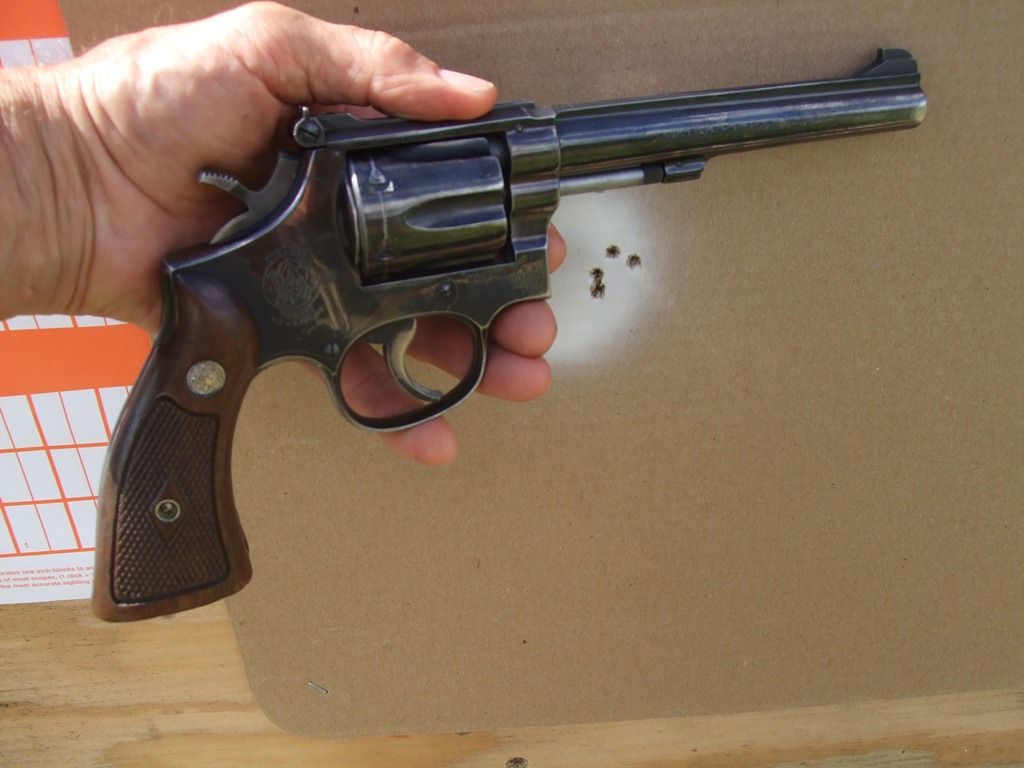 CCI Min Mag 40 RN. Short yardage----45 or 50 feet----is a good place to start targeting. Front sight sketched to show sight picture and width of front sight as it appears on target. 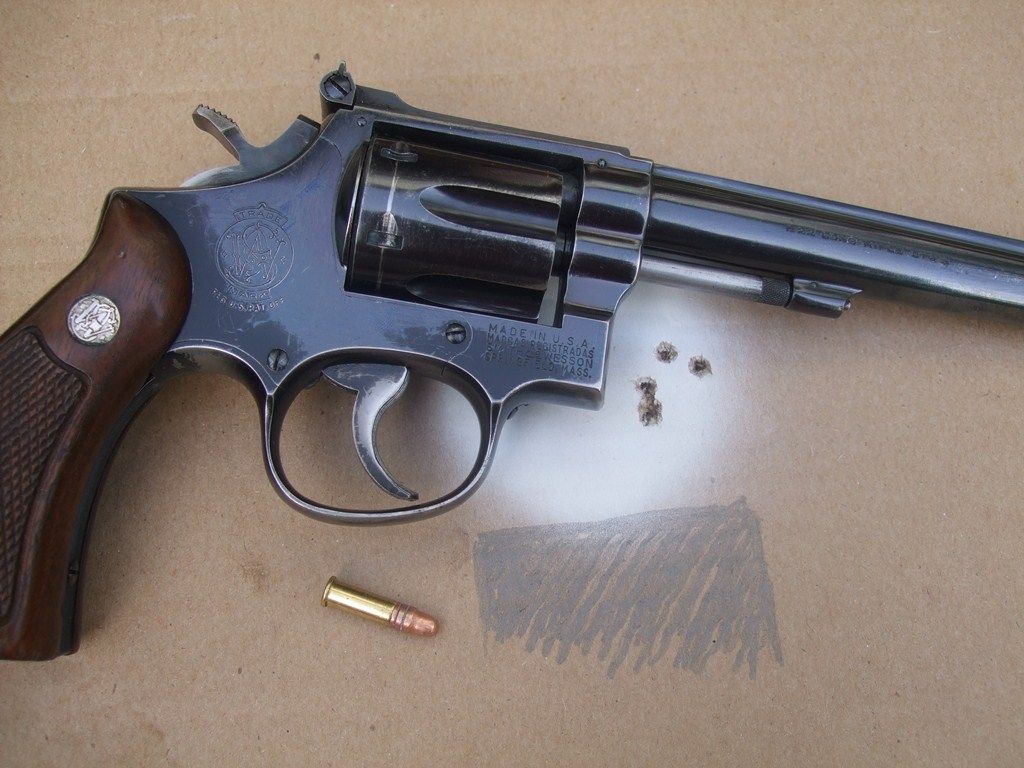 K-22 at board with 15 yard target. Federal Gold Match .22 Long Rifle standard velocity 40 grain lead Round Nose. Trunnion rest. center hole is a double. 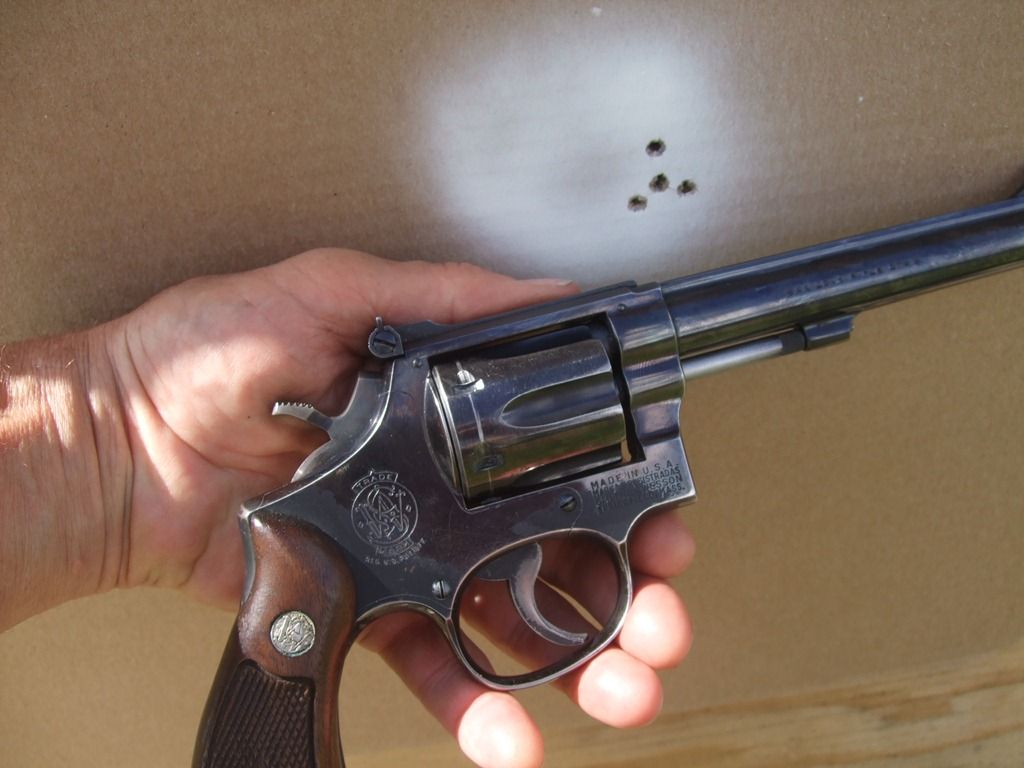 Federal Gold Match 40 RN standard velocity Target. Center hole wear two bullets. 5x5=0.6" @ 15 yds. Elevation: 10 clicks above bottom detent: 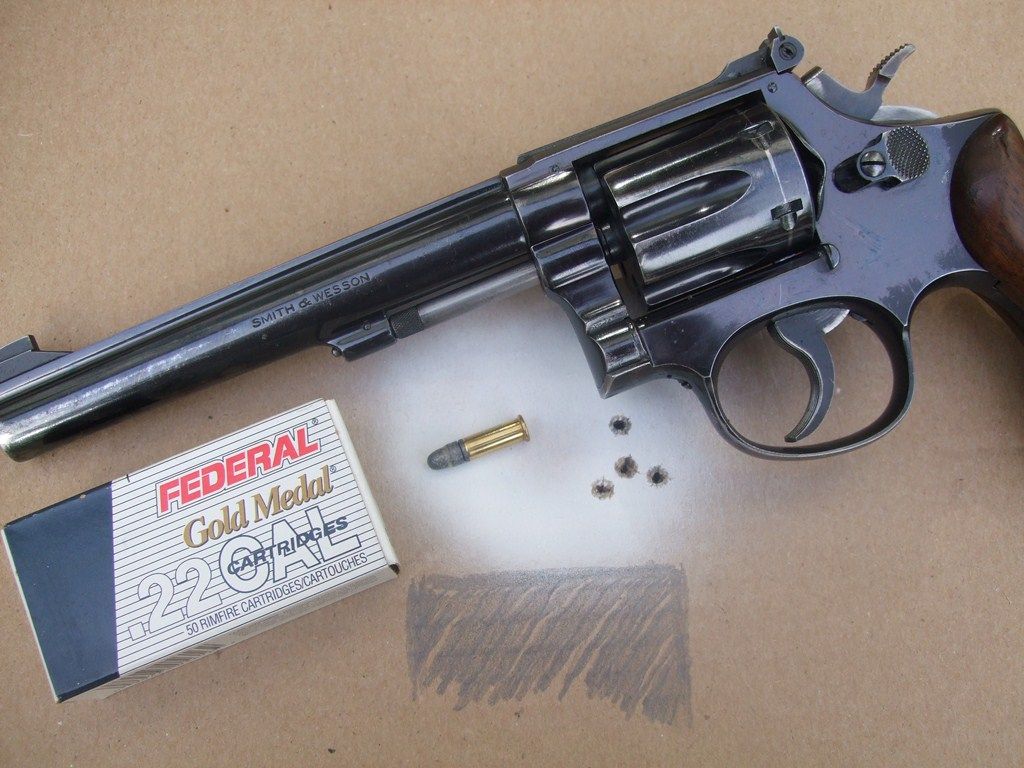 "Hook 'em Horns" hand sign----aka bullroar signal----preferred for control of cylinder during extraction & ejection.  Index and pinky brace frame while middle and ring fingers hold cylinder open.  Muzzle vertical to eject downward. Prevent debris from gathering under star, and prevent shells from hanging up under star.  Thumb press 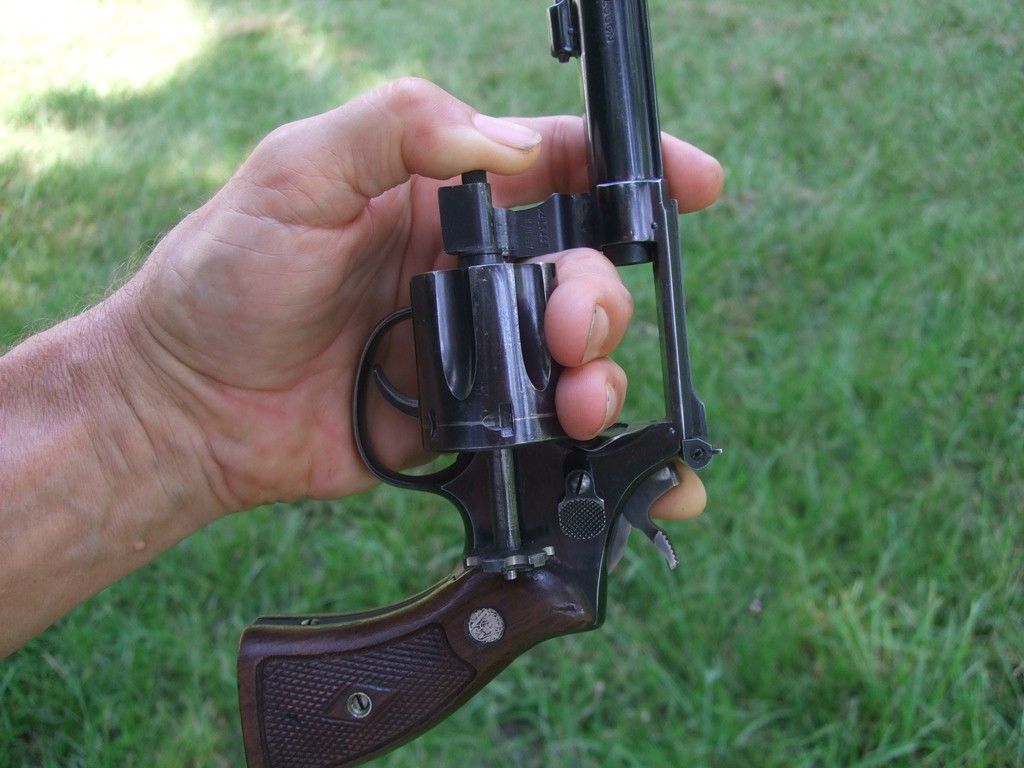 100 yards, white bullseye to compare group size between painted bullseye and plain cardboard. trunnion rest, 6 o'clock hold, CCI Mini Mag copper plate 40 RN. elevation 15 clicks. 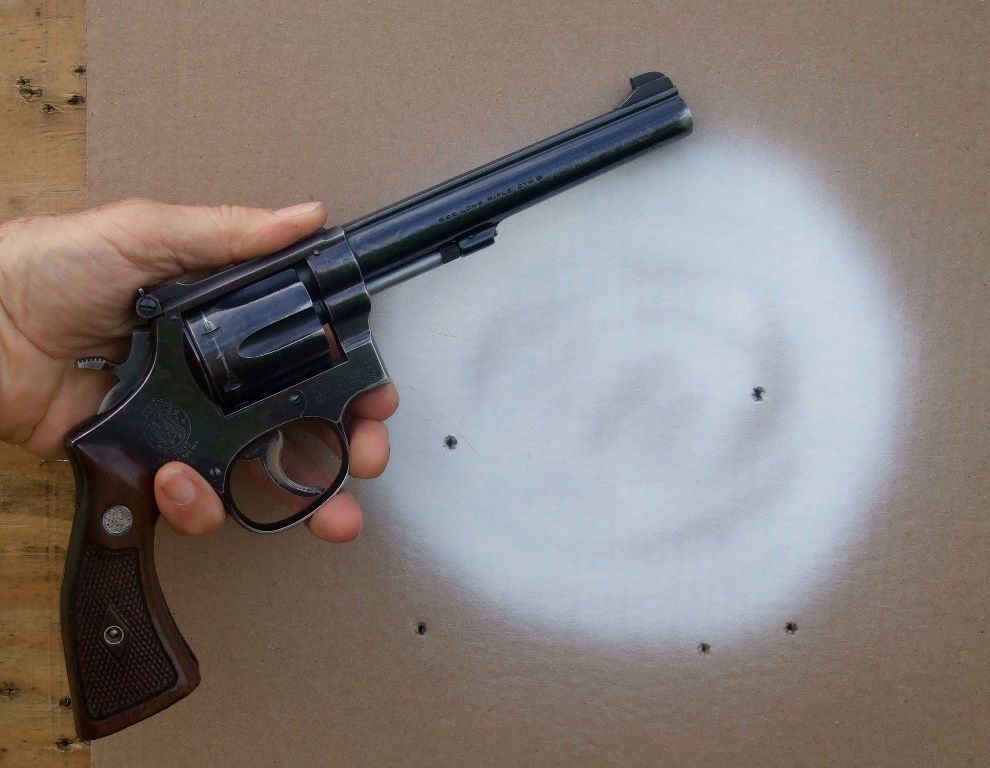 Front sight about 12-inches wide at 100 yards. 6 o'clock hold, trunnion rest: 5x5=6.1" @ 100 yards. 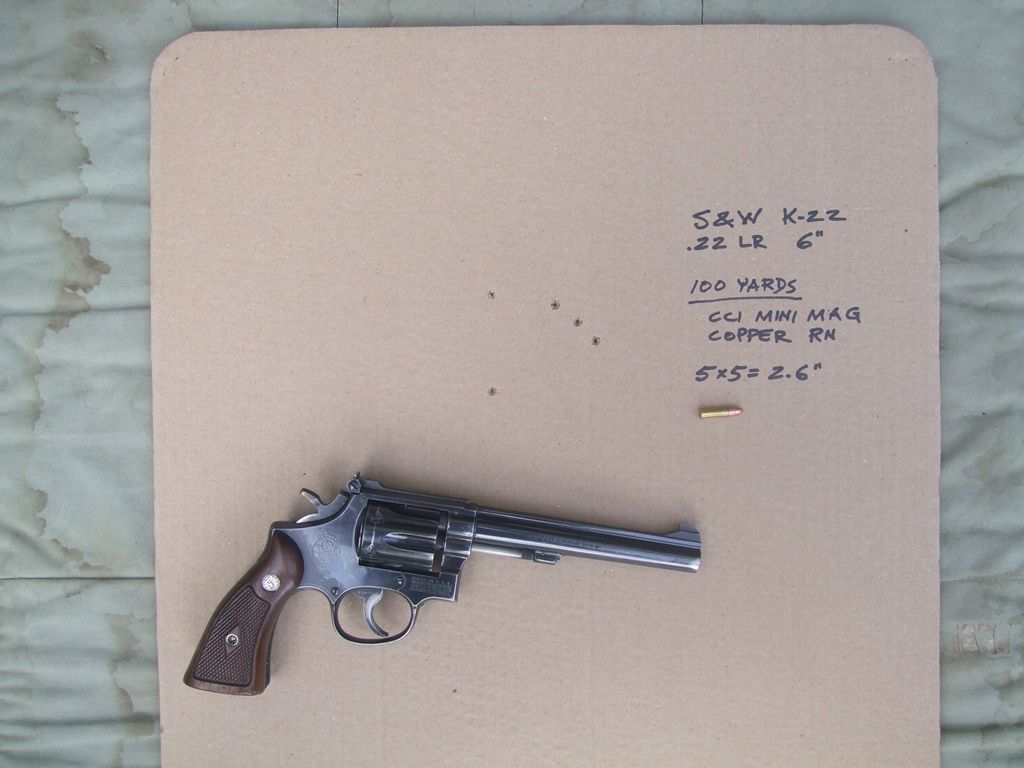 Plain cardboard, 100 yards. Trunnion rest, CCI Mini Mag 40 grain copper plated RN. 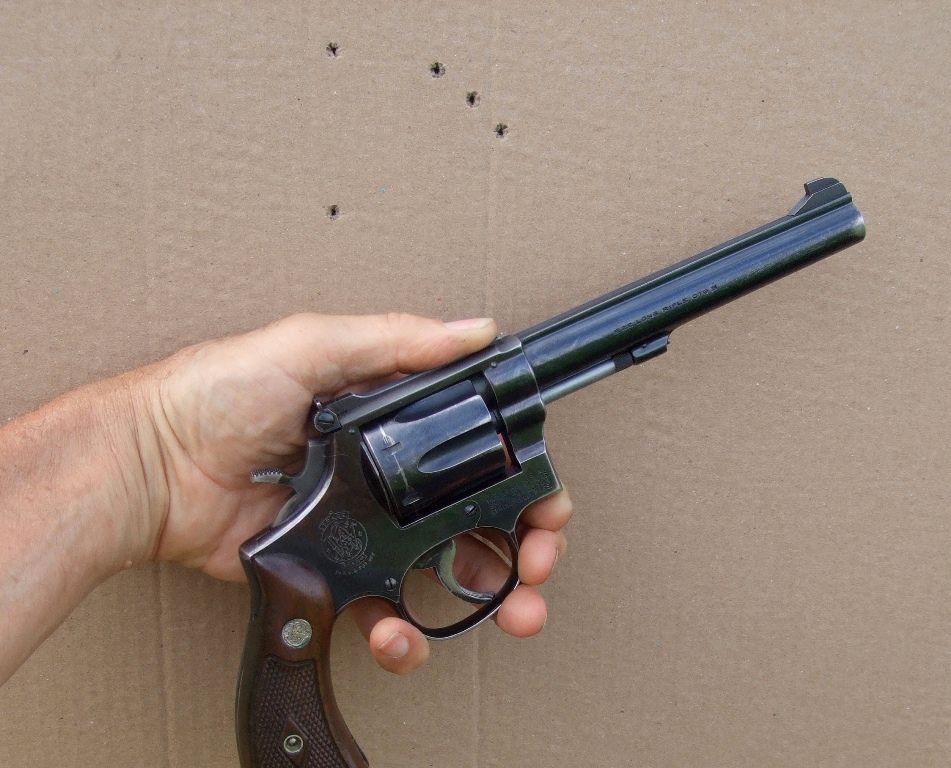 Why is the group fired on plain cardboard tighter than the group on the painted bull? To shoot for accuracy on a plain target with iron sights removes the bullseye as a magnet for your focus. With plain cardboard as a target, 5x5 into 2.6-inches at 100 yards. is it any wonder trust has never been an issue with this K-22?  -Lee www.singleactions.com"Building carpal tunnel one round at a time" |
|
|
|
Post by oregon45 on Jul 27, 2015 19:51:20 GMT -5
Outstanding shooting!
|
|
|
|
Post by paul105 on Jul 27, 2015 20:40:23 GMT -5
David, Thoroughly enjoy your posts. Also a big fan of the K22. I have three. Two are older. IIRC, one is late 40s and the other is early 50s. The third is a -6. The two older K22s are driving me crazy. Both guns bind (randomly) in both single and double action. One worked fine and and was a joy to shoot for a while then  ? Extraction is also difficult with both guns. Would appreciate any thoughts or references to a smith that could diagnose/fix. Thanks, Paul |
|
|
|
Post by AxeHandle on Jul 28, 2015 7:24:00 GMT -5
Old S&W shoots pretty good. What I really see in these pictures are the palms of the hands. Reminds me of mine after sitting at a desk with a pencil, pen, and keyboard for 37 years. I had knots in the palms of my hands that the doctor said were a result of diabetes. 30 months of 20-30 hours a week on the range and at least 20,000 rounds a year and they now look like they did when I spent all day every day with screwdrivers and wrenches climbing around on F4s. In 30 months went from being physically done after 30 rounds to being able to shoot a 270 round point match in a day. The boys on the range thought I could shoot when I arrived 30 months ago. I've raised the shooting performance of the entire range staff to a new level. I shoot better too!  |
|
|
|
Post by AxeHandle on Jul 28, 2015 7:26:35 GMT -5
Check the crane on those binding guns. A slight bend will make tightness come and go.
|
|
|
|
Post by bradshaw on Jul 28, 2015 18:29:59 GMT -5
oregon45.... blind luck.
paul105.... your K-22's from late 1940's and early 1950's may suffer from warped ejector rod.
* With revolver on table, hold cylinder open and spin. Any runout of the elector rod should be plainly visible. To loosen or tighten an S&W ejector rod, the cylinder should be in the yoke to support the rod. A bent rod drags on the spring loaded stud contained in the lug under the barrel. A badly bent ejector rod may even contact the barrel, impeding rotation.
* A bent ejector rod will bind in the yoke on the extraction stroke.
* Spin cylinder in frame to check for bind between cylinder face and barrel face. Insert feeler gauge in cylinder/barrel gap and cock hammer far enough to release cylinder stop. Rotate cylinder by hand.
* With cylinder open, pull back on THUMBPIECE and dry fire. Any bind here originates inside the frame.
The warped or sprung yoke (AxeHandle mentions) may result from the "Hollywood snap"----flipping the cylinder into the frame ala celluloid gangsters James Cagney, Frank Sinatra, and Victor Manure.
Check to see where bind originates.
Chambers of a .22 rimfire revolver foul, which causes stiff extraction and loading. Periodic pass of a firm fitting bronze or copper brush----with or without solvent----restores smooth chambers. Some rimfire ammo fouls notoriously, while other rimfire continues to chamber and extract cylinder after cylinder.
David Bradshaw
|
|
|
|
Post by paul105 on Jul 28, 2015 20:53:32 GMT -5
Thanks David an Axe.
I'll dig them out tomorrow and run thru above. Pretty sure I checked most of above before, but memory isn't what it used to be. The late 40s gun is very accurate, not so sure about the early 50s one.
Will post update.
Paul
|
|
|
|
Post by bradshaw on Jul 28, 2015 21:45:26 GMT -5
Paul.... please post some photos of your K-22s. If old Al Plaas of Smith & Wesson was around, he'd have those two oldies singing in an instant. You might give Jack Huntington a call. I am not tuned in to a directory of S&W maestros. These are Steinway revolvers; tuning cannot be left to a cannibal.
There is one component I did not mention: the gas ring. There have been various configurations. I haven't heard of a gas ring working loose on a K-22, suppose it is possible. I've blown 'em loose on the Model 19 with .357 Mag. Al Plaas simply counterbored the cylinder and swaged in a special gas ring, which could not be blown out. Of course, any creep forward of the gas ring creates true ZERO endshake, binding the cylinder against rotation.
Throwing the gas ring into discussion as a remote possibility. A sprung frame or yoke, or bent rod must first be eliminated as suspects. Of course, pistol whipping, dropping a revolver on a hard deck, driving over it, these activities may throw the instrument out of tune.
Would also like to hear from shooters of newer Model 17's and the stainless M-617.
David Bradshaw
|
|
|
|
Post by paul105 on Jul 29, 2015 14:31:02 GMT -5
The gun with the after market grips has a serial number of 161xxx and IIRC dates to 1948 or '49. Serial number on the one with the S&W grips/adapter is 213xxx and was made in the early 1950s. Mfg dates are based on info I got from members on the S&W forum. Both guns pass all tests suggested above. I'll take them both to the range this afternoon and try some new Norma ammo I bought recently. I'm not much of a photographer, but here are some pictures. .  . 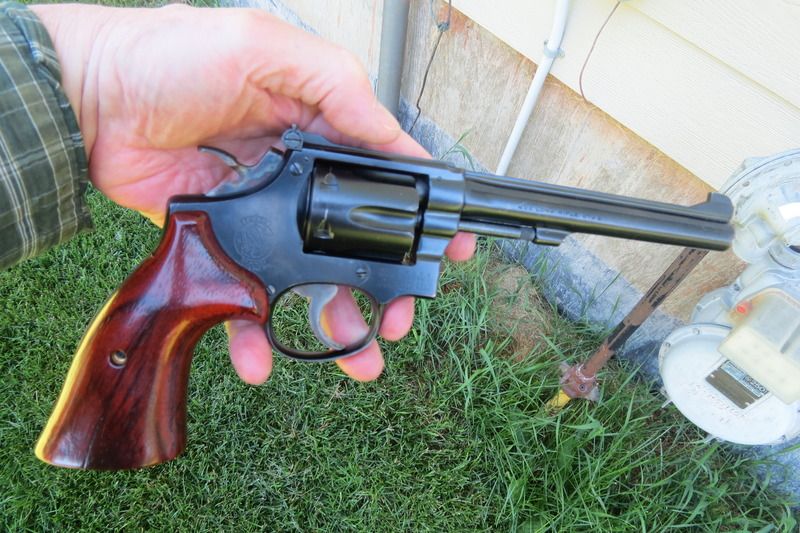 . 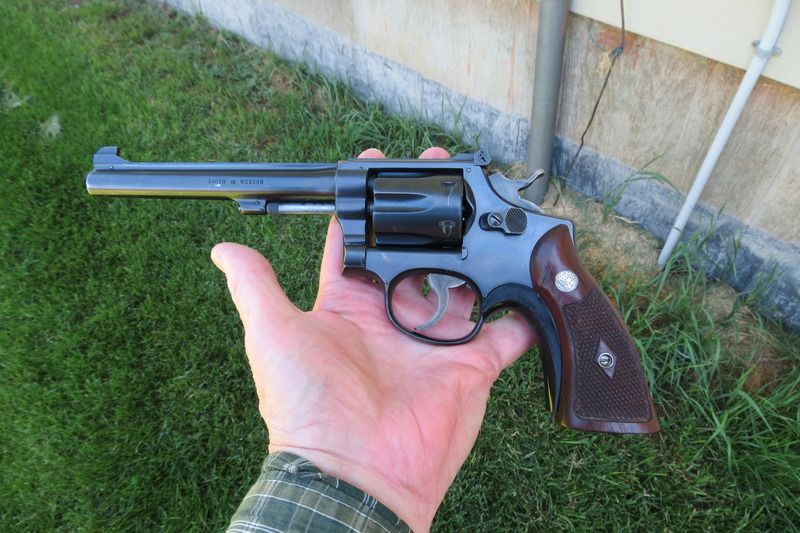 .  . 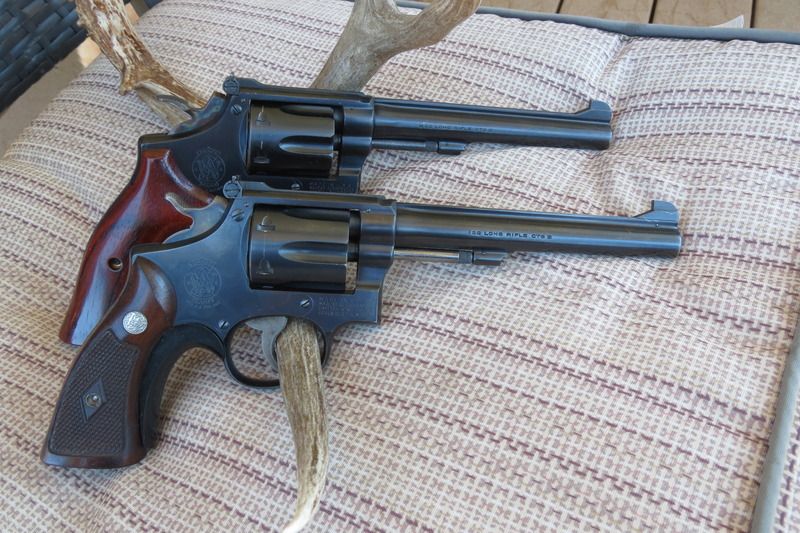 . . And my 13 year lab that stole the photo prop. Can't balme her, as she was the one that found the fresh shed several years ago on one of our daily walks. . 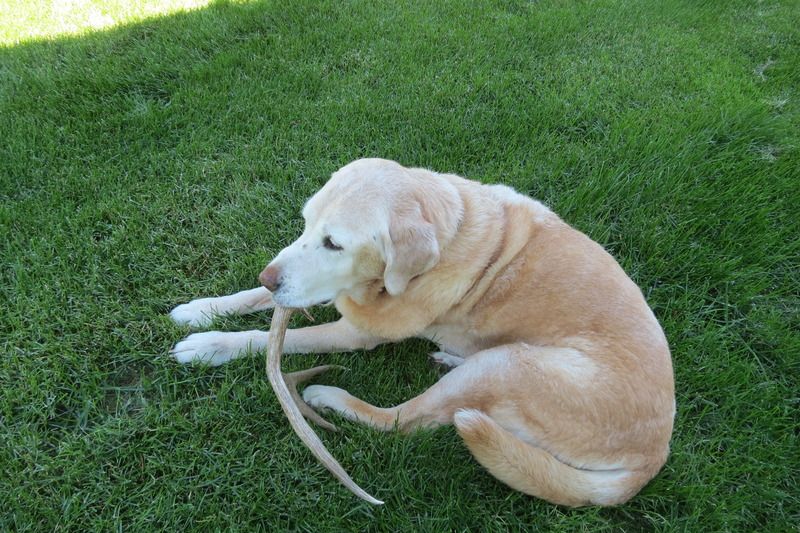 |
|
|
|
Post by paul105 on Jul 29, 2015 14:38:47 GMT -5
I didn't photo the M17-6 or the 4" M317 that I have, but they are also favorites. The 317 is a 10 shot and I have one of those 22 speed loaders and loading block for it. Works great in the winter. Load the block and speed loader in the warm house an go do some shooting. Sure beats fumbling around with old cold hands and the little .22 rounds (they seem too get smaller and slipperyer with each passing year).
Paul
|
|
|
|
Post by bradshaw on Jul 30, 2015 15:18:58 GMT -5
Paul.... first off, thanks for showing your sweet Lab, and her taste in horns.
Looks to be a later beaver tail spur on the hammer of your 1948-'49 #161XXX K.
Note on .22 accuracy: "Do not over clean a .22 rimfire" does not mean "don't clean it at all." Lead and lubricant can build up over time. Especially if fouling has been allowed to oxidize in the barrel for a long time, accuracy of subsequent shooting may suffer.
Won't hurt to run 0000 steel wool, with solvent, through the chambers. Follow with cotton flannel patch. Some rimfire ammo fouls revolver chambers almost instantly, causing immediate sticky extraction. Such ammo falls in love with any trace of fouling which hasn't been removed.
As to random binding, free-spin the unloaded cylinder. If it does not bind, yet binds when loaded, some of the rounds may have thick rims.
David Bradshaw
|
|
|
|
Post by bradshaw on Aug 1, 2015 21:39:28 GMT -5
Paul101.... set up Tin Man at 110 yards today, talked a couple of the boys who pack all sorts of rackback ordnance to flang lead at the quarter inch hot rolled victim, against their will permit me to add, allowing that these "combat shooters" must incorporate the rear sight at distance, and got 'em clinking lead off the old sheet metal stiff. This experience introduces a person brainwashed to cartoon combat distance to the joy of making contact out yonder. The old K-22 came out for some double action play. Those recalcitrant K-22's of your are remediable. Find the person who can put his finger on the bind and get 'em rolling.
David Bradshaw
|
|
|
|
Post by paul105 on Aug 2, 2015 8:10:34 GMT -5
David,
Took the 163xxx gun for a walk with the dogs last Thurs or Fri. Was using CCI standard velocity segmented hollow point ammo which extracted quite easily. Shot two cylinders full at some gophers without a hitch. Later that day went the range with the same gun to verify point of impact with the CCIs. Shot a couple of more cyls and begin to notice very slight binding and resistence when closing cyl. Cleaned under the extractor star and binding seemed to go away. Ran out of the CCIs and had some Norma match standard velocity ammo in the truck. Had to quit shooting after 6 rounds. Couldn't extract cases with with hook em horns method, had to gently tap them out. Fired one at a time and still couldn't extract easily. I got side tracked, but will resume testing with some other ammo and the other gun today.
I bought these guns as shooters and will get them running as such eventually.
One of the pistol bays at our range has two poppers at 77 yds. One is full size, the other is real small. We shoot at those double action with the K22s and M617s. Lots of fun.
Always appreciate your insight/input.
Pau
|
|
|
|
Post by bradshaw on Aug 2, 2015 11:53:16 GMT -5
Paul.... no experience with Norma .22 LR. For decades, experience with American .22 LR has been, overall, excellent. Recent ammo, particularly some Winchester, shows poor case uniformity, as some rounds chamber stiffly, while others from the same box slide in. Ammo that feeds perfectly in a Ruger MK II and ancient 10/22 seems oversize for the K-22. The K-22 certainly is a signature grade match revolver, easily outshooting revolvers made to looser tolerances. Your K-22s, unless reblued, don't have the appearance of having digested case upon case of ammo.
Nevertheless, as with any firearm, take a close look at clean, dry chambers. While a gentle tap of the extractor rod----straight down on a wood bench----should free tight cases, raised muzzle to vertical to complete ejection. This will keep partially burned powder granules from accumulating under the star.
One point I did not mention: yoke endshake. Check yoke for any fore & aft movement----there should be none. Fore & aft movement is eliminated by close fit of front sideplate screw. The unthreaded post on the end of the screw contacts the side of a groove in the yoke pivot. This is yet another area where lubrication pays dividends over the long haul. (With an underlug barrel, such as found on the Model 29, the underlug prevents yoke endshake with the cylinder closed.)
David Bradshaw
|
|
|
|
Post by paul105 on Aug 2, 2015 22:07:58 GMT -5
No yoke endshake.
Both guns to the range today. The 163xxx and 213xxx digested subsonic/target ammo (except previously mentioned Norma) with no extraction problems. CCI subsonic HPs, CCI subsonic segmented HPs, and CCI standard velocity Target. All good. Had some Remington yellow jackets and CCI Blazer's that exhibited difficult extraction.
The big surprise was CCI Velocitors (40gr GDHP at 1,425 fps per label). The cases pretty much fell out of each gun and accuracy was very good. And this was after shooting other ammo and before cleaning. Forgot to bring empties home to see if any weight diff. Might also be harder brass. As far as I know this stuff is no longer avail. Recoil and report was noticeably more pronounced than other ammo shot.
The Norma Target ammo is very oily feeling (like Wolf Match) and extraction is extremely sticky in the K22s. I tried it in a Ruger 22/45 Lite and a S&W M617 4" 10 shot -- worked just fine.
The 163xxx gun started binding right at the 4th full cyl. Discovered one yoke end shake bushing in gun 163xxx while oiling sideplate/yoke screw slot. Something not quite right as cyl opens with no resistance then resistance than no resistance. Wiped off fouling on the recoil shield -- no help. Noticed some rub marks on barrel butt and cyl face on two cyls (not adjacent). Brass wire brushed face of cyl and shot 6 rnds -- no binding.
Paul
|
|


 ? Extraction is also difficult with both guns.

